
Add Juniper devices
Relevant for: AFA Administrators
This topic describes how to add Juniper devices to AFA.
Tip: If you have multiple Juniper Netscreen or SRX devices, we recommend adding the Juniper NSM or Space that manages these devices.
This automatically enables AFA to analyze any devices managed by the NSM or Space device.
Juniper NSM devices in AFA
The following sections describe how Juniper NSM devices are added to AFA:
Consider the following when adding NSM devices:
| Juniper NSM 2007 managing Netscreen devices |
If you have a Juniper NSM 2007 managing Netscreen devices, you must add each Netscreen device separately, and specify that the Netscreen device logs are collected from the NSM. For more details, see Juniper Netscreen devices in AFA. |
| NAT support for SRX devices |
NAT is not supported for Juniper SRX devices defined in AFA under an NSM. If you need NAT support, add your Juniper SRX device separately. For details, see Juniper SRX devices in AFA. |
AFA requires the following to collect data from NSM devices:
To collect data from the NSM GUI server via SOAP, the user accessing the NSM must have the read-only System Administrator role.
You may want to create a user specifically for AFA data collection. To create this user, do the following:
Create a read-only NSM user for data collection
-
Log in to the NSM and select Tools > Manage Administrators and Domains.
-
Click + to create a new administrator.
-
In the General tab, enter a name for the user.
-
In the Authorization tab, click Set Password and set a password for the user.
-
In the Permissions tab, click +.
-
In the New Select Role and Domains dialog, do the following:
- From the Role drop-down list, select Read-Only System Administrator.
- Select the checkboxes for any of the relevant domains.
- Click OK to close any open dialog boxes.
To collect log files from the NSM dev server, you must do one of the following:
- Access the NSM dev server as user root
- Deploy the install_nsm_sudo script on the NSM dev server to change a minimal set of folder permissions. For more details, see Collecting Logs from Juniper NSM without Using the Root in AlgoPedia.
To retrieve dynamic routing data from devices managed by the NSM, the user accessing the NSM must have SNMP access.
For more details, see Collecting dynamic routes via SNMP for devices managed by NSM in AlgoPedia.
To collect global-zone rules for SRX devices managed by an NSM, the NSM user defined in AFA must have a role with permissions to view the Junos Global Rulebase. To enable this, do the following:
In the NSM application, navigate to Administration > Common > Task > Manage administrator and domains > Roles, and select View Juno Global Rulebase.
This procedure describes how to add a Juniper NSM to AFA. AFA uses the NSM API 2008, available in NSM versions 2008 and higher, to connect to the NSM and collect data.
Do the following:
-
Set your NSM device to listen to port 8443 on the IP address of its interface.
-
If you are using a Juniper NSM 2007 or 2008, enable AFA to translate rule numbers to rule IDs.
These rule IDs are available by default in NSM 2009 traffic logs.
Enable rule number translationDo the following:
- In the AFAAdministration area, navigate to the OPTIONS > Advanced Configuration tab.
-
Click Add to add a new parameter. Enter the following details:
Name Use_Rulenum Value yes - Click OK and OK again to save your changes.
-
Access the Devices Setup page. For more details, see Access the DEVICES SETUP page.
-
In the vendor and device selection page, select Juniper > NSM (NSM 2008 or above).
-
Complete the following fields as needed.
Access InformationNSM GUI server
Enter the host name or IP address of the NSM GUI server.
NSM HA Cluster
Select this option to enable a High Availability cluster. If AFA fails to access the primary NSM GUI server, AFA will attempt to access the secondary server instead.
If selected, also populate the Secondary NSM GUI server field with the host name or IP address of the secondary server.
Note: NSM HA cluster support is only available if the NSM GUI server and Dev server are running on the same server.
User Name
Enter the user name to use for SSH access to the NSM GUI server.
Note: AlgoSec recommends using a "read-only" user account on the NSM GUI server.
For details, see Device analysis.
Tip: Configure AFA to connect to the device using SSH and Public key authentication.
Configure this on the Administration > Options > General tab. For details, see Use public key authentication in data collection.
Password
Enter the password to use for SSH access to the NSM GUI server.
Port
Enter the port number to use on the NSM GUI server.
Default: 8443
Default for NSMXpress appliances: 443
Geographic DistributionSelect the remote agent that should perform data collection for the device.
To specify that the device is managed locally, select Central Manager.
This field is relevant when a Geographic Distribution architecture is configured.
Log Collection and MonitoringDo the following:
- Ensure that Collect Logs (via SSH) is selected to determine that AFA collects traffic logs for the device using SSH.
-
In the From field, select the log source:
NSM
(Default)
Under NSM Dev server, select the NSM location:
- Same as NSM GUI server (default). The NSM Devices server is located on the same machine as the NSM GUI server.
- Separate server: The NSM is located separately from the NSM GUI server. If selected, also enter the NSM's host name or IP address.
In the SSH User Name and SSH Password fields, enter the credentials used to connect to the NSM.
Dlick Test Connectivity to test the connection.
Tip: When using Juniper's STRM log server, AFA enables you to forward logs to a built-in or external syslog-ng server, which you can define as the relevant log server instead. For more details, see Configure Juniper STRM to forward logs to a Syslog-ng server.
Note: For NSMXpress appliances, the NSM GUI server and the NSM Devices server are installed on the same machine.
Syslog-ng Select an existing syslog-ng server, edit its details, or add a new one.
For details, see Specify a Syslog-ng server.
Select the NSM forwarding option to indicate that logs are collected on the NSM and then forwarded to the syslog-ng server.
- Select Collect audit logs from the same server to determine that AFA collects audit logs in addition to traffic logs.
- In the Log collection frequency (minutes) dropdown, select an interval at which AFA collects logs. Default = 60 minutes.
Note: You many need to specify additional device identifiers for AFA to process logs from devices managed by this NSM device. This is relevant when the managed device has multiple or non-standard device identifiers in the logs, such as for firewall clusters or non-standard logging settings. For details, see Add additional device identifiers for sub-systems.
-
Click Next to continue to the Juniper NSM Step 2/2 page.
This page lists the devices that are managed by the NSM, including standalone devices and virtual systems.
Do the following:
Add Device column Select the checkbox for any devices you want to define via the NSM.
Log Analysis column Select one of the following to determine log functionality for a selected device:
- None to disable logging.
- Standard to enable logging.
- Extensive to enable logging and the Intelligent Policy Tuner.
This enables AFA to detect policy optimization data, such as unused rules, and display them in the Policy Optimization section of the AFA report.
Migrate from currently defined Netscreen column Displayed if you have Netscreen devices managed by this NSM already defined in AFA.
Select devices to migrate for AFA to delete them in the background and add them back via the NSM.
Note: Juniper SRX devices already defined in AFA cannot be migrated. To define the device as managed by the NSM, first delete the SRX device from AFA, and then redefine via the NSM.
-
(Optional) Enable generation of baseline compliance reports.
Do the following:
- Click
 .
. -
Do one of the following:
Configure direct access for each device In the Direct Access Configuration dialog, enter the following details:
- Host IP. Enter the device's IP address.
- Username. Enter the username used to access the device.
- Password. Enter the password to access the device.
- Baseline Profile. Select a baseline profile to use for the device. For details, see Customize baseline configuration profiles. To disable Baseline Compliance Report generation for this device, select None.
Click Test Connectivity to test connectivity to the defined device.
This triggers a direct SSH connection to the device.
Configure access to managed devices via the NSM If you do not want to enter credentials for each device and have AFA access them directly, select Access the managed devices through the NSM machine. Then, enter the SSH User Name and SSH Password.
AFA connects to the NSM via SSH, and opens another SSH connection from the NSM to each of the selected devices.
- Click
-
Complete the remaining fields as needed, and click Finish.
AdvancedSelect Display virtual routers (Netscreen devices) to analyze each virtual router under a Netscreen device separately.
Each virtual router will appear in the device tree immediately below the Netscreen device, and parallel to virtual systems.
Note: This option is not available for Juniper SRX devices defined in AFA via the NSM. To use this functionality for SRX devices, define them directly in AFA.
For more details, see Juniper SRX devices in AFA.
OptionsSelect the following as needed:
Real-time change monitoring
Select this option to enable real-time alerting upon configuration changes. For details, see Configure real-time monitoring.
Set user permissions
Select this option to set user permissions for this device.
The new device is added to the device tree.
-
If you selected Set user permissions, the Edit users dialog box appears.
In the list of users displayed, select one or more users to provide access to reports for this account.
To select multiple users, press the CTRL button while selecting.
Click OK to close the dialog.
A success message appears to confirm that the device is added.
Junos Space Security Director devices in AFA
The following sections describe how ASMS connects to Junos Space Security Director devices:
Consider the following when adding Junos Space Security Director devices to AFA:
Juniper Space devices defined in AFA before version A30.00 have different behavior and support options.
If you are upgrading, do one of the following:
|
Upgrading from A30.00 to A30.10 or higher |
If you already have a Juniper Space device defined in AFA, edit your Space device in the AFA Administration area to view all updates for Space devices, such as viewing additional routing instances in the device tree and the map. No changes are required. Simply edit the device configuration and click Finish to update the data. |
|
Upgrading with Juniper Space devices added prior to ASMS A30.00 |
If your Juniper Space device was added prior to ASMS A30.00, you will need to delete this device from AFA and add it back again to implement all new features. For more details, see Delete a device. |
If you have SRX devices already defined in AFA and want to convert them to Juniper Space, first remove the SRX devices and then add them back via Space.
For more details, see Delete a device and Juniper SRX devices in AFA.
When the Juniper Space device manages an SRX device or LSYS, which in turn manages Virtual Routers, VRFs, or Secure Wires, AFA displays these routing instances in AFA the device tree. This provides increased route analysis and automation design at the levels of these routing instances.
For example:
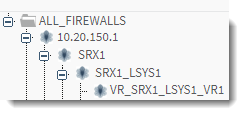
Note: Items not added to the device tree include empty Virtual Routers or LSYSs, unsupported routing instances, and LSYSs that contain only unsupported routing instances.
AFA reports provide the following data, per tree level:
| Virtual Router / VRF / Secure Wire level |
At the level of the routing instance, AFA displays topology information only, and no policy information. Policy information is displayed at the LSYS level, one node up in the tree. |
| LSYS level |
At the LSYS level, AFA displays policy information only, and no topology information. Topology information is shown at the routing instance level, one node down in the tree. |
| Management level | Higher up in the tree, at the Space management, AFA displays aggregated information for all child devices, including both policy and topology information. |
If you've added new routing instances to your Juniper Space device and want to generate AFA data for these routing instances, edit your Space device in the AFAAdministration area.
No changes are required. Simply edit the device configuration and click Finish to update the data.
For details, see Virtual Router, VRF, and Secure Wire support.
AFA supports RIB groups and next-table commands as next-hop routers (NHRs) for SRX devices managed by Juniper Space Security Director.
When AFA detects either of these inter-VR routing configurations, it adds fake, or back-plane, interfaces to the Juniper Space's URT file to simulate these connections. These connections can then be displayed on the AFA network map and in query results.
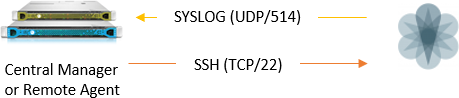
The following diagram shows an ASMS Central Manager or Remote Agent connecting to a Juniper SPACE device.
ASMS requires the following for the user used to access your Juniper SPACE devices:
- Super administrator permissions on the Juniper SPACE device
- Both GUI and API access enabled
- Full access to all Domains
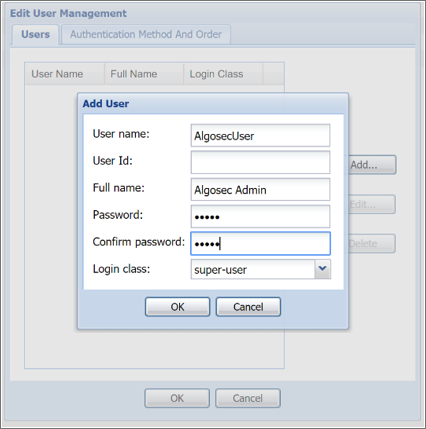
You may want to create a user specifically for AFA data collection. To create this user, do the following:
Create a read-only Juniper Space user for data collection
-
Log in to the Junos Space - Network Management Platform.
-
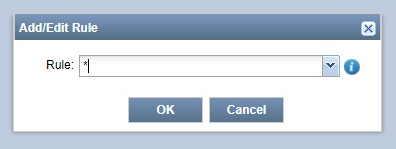
In the Junos Space - Network Management Platform, create a new API Access profile.
When adding the new profile, add a new rule with only an asterisk (*) in the name.
For example:
-
Switch to the Roles area and create a new role with the following permissions:
Log Collector Management Read Log Collector info Event Viewer View Device Logs Reports Reports > View Report Firewall Policies The following, without sub-permissions:
- View Policy
- Export Policy
- Policy Profiles
- Schedulers
- AccessProfile
- AppFirewall Policy
- SSL Proxy Profile
- End User Profile
- Active Directory
- Condition
- Environment Variable
- Identity Management
- Application Signatures
NAT Policies - Export NAT Policy
- View NAT Policy
- View NAT Dirty Policy
- NAT Pools (without sub-permissions)
- Ports Sets (without sub-permissions)
VPNs View VPN Shared Objects The following, without sub-permissions:
- Services
- Addresses
- Zones Sets
- Variables
Security Director Devices View Security Director Devices Devices - Unmanaged Devices
- Model Devices >
- View Modeled Instance
- View Modeled Device Status
- View Configlet
- Connection Profiles > View Connection Profile
- Device Management >
- Device Inventory >
- View Physical Inventory
- View Physical Interfaces
- View Logical Interfaces
- View License Inventory
- View Software Inventory
- Device Access > SSH to Device
Device Configuration >
View Active Configuration (without the sub-permissions)
View Template Association
View Configuration Change Log
- Device Inventory >
Device Templates Templates >
- View Template Details
- View Template Association
CLI Configlets - Configlets > View CLI Configlet Details
- Configuration View >
- View Configuration View Details
- Export Configuration View
Configuration Files Config Files Management > Export Configuration File Jobs Job Management > View Recurrence Audit Logs Audit Log > Export Audit Logs
Administration Fabric (without sub-permissions)
Applications (without sub-permissions)
-
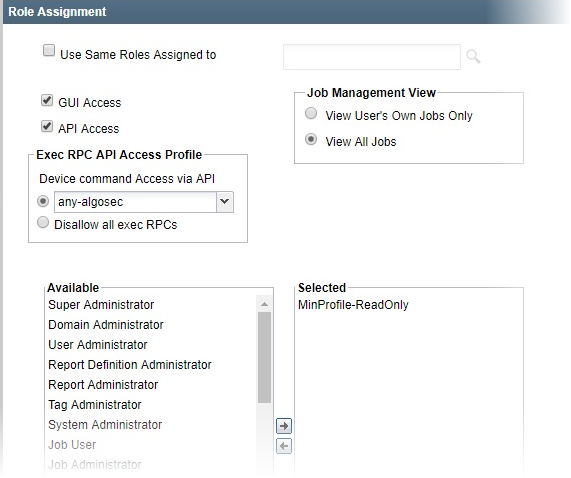
Create a new user. When assigning roles, do the following:
- Select GUI Access and API Access
- In the Exec RPC API Access Profile area, select the new API access profile that you created in step 2.
- Select the newly defined role that you created in step 3.
- In the Job Management View area, select to view all jobs.
For example:
- When assigning domains, select all domains, or the Global domain.
For more details about how to perform these steps, see Junos Space - Network Management Platform documentation.
When ActiveChange is enabled, the user connecting to the Junos Space device requires a minimum of read-write access via SSH.
Configure your system to do one of the following:
- Have syslog messages sent to ASMS directly from the firewall
- Have ASMS collect syslog messages from a remote syslog-ng server
For details, see:
Add a Junos Space Security Director device
This procedure describes how to add a Junos Space Security Director device to AFA. Once added, all SRX devices managed by the Space device are also added to AFA, as well as any Virtual Routers or Secure Wires managed by the SRX device or LSYS.
For more details, see Virtual Router, VRF, and Secure Wire support.
Do the following:
-
Access the Devices Setup page. For details, see Access the DEVICES SETUP page.
-
In the vendor and device selection page, click Juniper > Junos Space Security Director.
-
Complete the fields as needed.
Access InformationEnter the following access details and credentials:
Host
Enter the device's host name or IP address.
User Name
Enter the user name to use to access the device.
Password
Enter the associated password.
Geographic DistributionSelect the remote agent that should perform data collection for the device.
To specify that the device is managed locally, select Central Manager.
Note: This field is relevant only when a Geographic Distribution architecture is configured.
ActiveChangeSelect Enable ActiveChange to configure FireFlow to generate CLI recommendations and push them to the device.
For more details, see Implement changes with ActiveChange.
Log CollectionDefine log collection on the device as follows:
Log collection method
Specify whether AFA should collect logs for the device, by selecting one of the following:
- None: Do not collect logs.
- Standard: Enable log collection.
- Extensive: Enable log collection and the Intelligent Policy Tuner.
The default value is Extensive.
Syslog-ng server
If you selected Standard or Extensive in the Log collection method field, you must also specify the syslog-ng server. For details, see Specify a Syslog-ng server.
Note: When using Juniper's STRM log server, we recommend forwarding logs to the syslog-ng server defined in AFA. For more details, see Configure Juniper STRM to forward logs to a Syslog-ng server.
Log collection frequency
Select the interval of time in minutes, at which AFA should collect logs for the device.
Note: In order for AFA to process logs from the devices that are managed by this management device, you may need to specify additional device identifiers.
This is relevant when the sub-device is represented by multiple or non-standard device identifiers in the logs, for example, in cases of firewall clusters or non-standard logging settings. For more details, see Add additional device identifiers for sub-systems.
-
If you enabled ActiveChange, the ActiveChange License Agreement dialog box appears.
Select I Agree and click OK.
-
Click Next to continue to the Junos Space Security Director - Step 2/2 page.
This page lists the devices that are managed by the Juniper Space, including standalone devices and logical systems.
Do the following:
Add Device column Select the checkbox for any devices you want to define via the Space device.
Log Analysis column Select one of the following to determine log functionality for a selected device:
- None to disable logging.
- Standard to enable logging.
- Extensive to enable logging and the Intelligent Policy Tuner.
This enables AFA to detect policy optimization data, such as unused rules, and display them in the Policy Optimization section of the AFA report.
-
(Optional) Enable generation of baseline compliance reports.
Do the following:
- Click .
-
In the Direct Access Configuration dialog, enter the following details:
- Host IP. Enter the device's IP address.
- Username. Enter the username used to access the device.
- Password. Enter the password to access the device.
- Baseline Profile. Select a baseline profile to use for the device. For details, see Customize baseline configuration profiles. To disable Baseline Compliance Report generation for this device, select None.
Click Test Connectivity to test connectivity to the defined device.
This triggers a direct SSH connection to the device.
- Click
-
Select the remaining options as needed:
Real-time change monitoring
Select this option to enable real-time alerting upon configuration changes. For details, see Configure real-time monitoring.
Set user permissions
Select this option to set user permissions for this device.
-
Click Finish.
The new Space device is added to the device tree, showing each individual device, LSYS, or routing instance configured.
Space devices and the devices they manage appear in the device tree with a potentially four-tier hierarchy. For example: Juniper Space Security Director (Management Device) > SRX > LSYS > Virtual Router, VRF, or Secure Wire
For more details, see Virtual Router, VRF, and Secure Wire support.
Note: SRX clusters in passive/active mode appear as a single node in the tree, while SRX clusters in active/active mode appear as two nodes.
Empty routers or LSYSs, unsupported routing instances, or LSYSs that contain only unsupported routing instances, are not added to the device tree.
-
If you selected Set user permissions, the Edit users dialog box appears.
In the list of users displayed, select one or more users to provide access to reports for this account.
To select multiple users, press the CTRL button while selecting.
Click OK to close the dialog.
A success message appears to confirm that the device is added.
Juniper Netscreen devices in AFA
The following sections describe how ASMS connects to Juniper Netscreen devices:
The following diagram shows an ASMS Central Manager or Remote Agent connecting to a Juniper Netscreen device.
ASMS requires the following to connect to Juniper Netscreen devices:
The user connecting to the Netscreen device must be a super-user with a minimum of read-only access via SSH.
When ActiveChange is enabled, the user connecting to the Netscreen device requires a minimum of read-write access via SSH.
ASMS can either receive syslog messages from the device or can collect syslog messages from a remote syslog-ng server.
Tip: We recommend configuring a remote syslog-ng server for log collection whenever possible.
If your system is configured for the Netscreen device to send syslog messages to ASMS, the message format must be configured as follows.

In such cases, ensure that the TCP option is cleared.
Add a Juniper Netscreen to AFA
This procedure describes how to add a Juniper Netscreen to AFA.
Do the following:
-
Access the Devices Setup page. For details, see Access the DEVICES SETUP page.
-
In the vendor and device selection page, select Juniper > Netscreen.
-
Complete the fields as needed:
Access InformationEnter the device's access information and credentials as follows:
Host
Enter the device's host name or IP address.
User Name
Enter the user name to use for SSH access to the device.
Password
Enter the password to use for SSH access to the device.
Retrieve credentials from CyberArk vault
Select to authenticate the device with a CyberArk Vault instead of saving the device credentials on the AlgoSec server.
When selected, also define the following:
- Platform (Policy ID). The Platform for this device which will be authenticated via CyberArk.
- Safe. The safe for this device which will be authenticated via CyberArk.
- Folder. The folder for this device which will be authenticated via CyberArk.
- Object. This device's CyberArk Object.
Note: These options only appear when CyberArk is configured in AFA. For details, see Integrate AFA and CyberArk.
Geographic DistributionSelect the remote agent that should perform data collection for the device.
To specify that the device is managed locally, select Central Manager.
Note: This field is only relevant when a Geographic Distribution architecture is configured.
Baseline Configuration ComplianceTo enable generation of Baseline Compliance Reports for this device, select the baseline compliance profile to use.
The drop-down list includes all baseline compliance profiles in the system.
To disable Baseline Compliance Report generation for this device, select None.
For more details, see Customize baseline configuration profiles.
AdvancedClick the arrow next to the Advanced heading to display the fields in this area.
Select Display virtual routers to analyze each virtual router separately.
When selected, each virtual router will appear in the device tree immediately below the Netscreen device and parallel to virtual systems.
Note: This is required in the rare cases where there are no inter-VR routes to/from a specific VR. In other words, when there is an “isolated” VR.
Remote Management CapabilitiesSelect one of the following methods to collect data:
- SSH (recommended)
- Telnet
To specify a custom port, select the Custom Port option and enter the port. This is only relevant when SSH is selected.
Tip: Alternately, configure AFA to connect to the device using SSH with Public-Key authentication. To do so, select the Use public key authentication in data collection check box in the General sub-tab of the Options tab in the Administration area.
For details, see Define AFA preferences.
Firewall LogConfigure logging fields as follows:
Collect logs
Specify whether AFA should collect logs for the device, by selecting one of the following:
- None. Do not collect logs.
- Standard. Enable log collection.
- Extensive. Enable log collection and the Intelligent Policy Tuner.
The default value is Extensive.
Specify from where AFA should collect logs, by selecting one of the following:
-
NSM (default). AFA collects logs from the NSM. If selected, also define the following:
- NSM Dev server. The NSM host name or IP address.
- User Name. The user name used to connect to the NSM.
- Password. The password used to connect to the NSM.
Click Test Connectivity to test your connection to the NSM server.
-
Syslog-ng. AFA collects logs from a syslog-ng server.
If selected, also specify the syslog-ng server. For details, see Specify a Syslog-ng server.
Tip: If you are using Juniper's STRM log server, have the messages forwarded to a syslog-ng. For details, see Configure Juniper STRM to forward logs to a Syslog-ng server.
The default value is NSM.
Collect audit logs from the same server
Select to specify that AFA uses the same server to collect both traffic and audit logs.
Note: If you clear this option, specify a separate set of audit log details, just as you did for the traffic log server.
Additional firewall identifiers
Enter any additional IP addresses or host names that identify the device, separated by colon (:).
For example: 1.1.1.1:2.2.2.2:ServerName
This is relevant when the device is represented by multiple or non-standard device identifiers in the logs, for example, in cases of firewall clusters or non-standard logging settings. If AFA receives logs with an identifier it does not recognize, the logs will not be processed.
Note: This field is not supported for sub-systems, such as Juniper VSYS/LSYS. For more details, see Add additional device identifiers for sub-systems.
Note: This field only appears if you selected Syslog-ng in the From field.
Log collection frequency
Enter the interval of time in minutes, at which AFA should collect logs for the device.
ActiveChangeSelect Enable ActiveChange to configure FireFlow to generate recommendations and push them to the device.
For more details, see Implement changes with ActiveChange.
Note: The ActiveChange area only appears if you selected SSHabove.
OptionsDefine the following options as needed:
Real-time change monitoring
Select this option to enable real-time alerting upon configuration changes. For details, see Configure real-time monitoring.
Set user permissions
Select this option to set user permissions for this device.
-
Click Finish. The new device is added to the device tree.
-
If you selected Set user permissions, the Edit users dialog box appears.
In the list of users displayed, select one or more users to provide access to reports for this account.
To select multiple users, press the CTRL button while selecting.
Click OK to close the dialog.
Juniper SRX devices in AFA
The following sections describe how ASMS connects to Juniper SRX devices:
- Network connection
- Device permissions
- Add a Juniper SRX device to AFA
- Configure Juniper SRX devices to send traffic logs
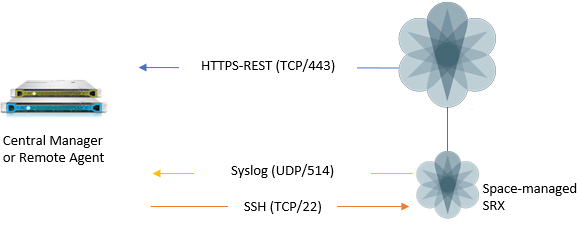
The following diagram shows an ASMS Central Manager or Remote Agent connecting to a Juniper SRX device.
ASMS requires the following permissions for your Juniper SRX routers:
AFA requires permissions to run the following commands on your SRX device:
- show configuration
- show route extensive all
- show configuration groups junos-defaults applications
When ActiveChange is enabled, ASMS requires a specific user on the SRX device. This user must be a member of the super-user login class.
For example, define the SRX user as follows:
Note: If ActiveChange is not enabled, the user can be in a login-class other than super-user.
For details, see How to configure a Juniper SRX read-only user with permissions required for AFA data collection in AlgoPedia.
Add a Juniper SRX device to AFA
This procedure describes how to add a Juniper SRX to AFA.
Do the following:
- Access the Devices Setup page. For details, see Access the DEVICES SETUP page.
- In the vendor and device selection page, select Juniper > SRX.
-
Complete the fields as needed.
Access InformationEnter the device's access information and credentials as follows:
Host
Enter the host name or IP address of the device.
User Name
Enter the user name.
Password
Type the associated password.
Geographic DistributionSelect the remote agent that should perform data collection for the device.
To specify that the device is managed locally, select Central Manager.
This field is relevant when a Geographic Distribution architecture is configured.
Baseline Configuration ComplianceTo enable generation of Baseline Compliance Reports for this device, select the baseline compliance profile to use.
The drop-down list includes all baseline compliance profiles in the system. For more details, see Customize baseline configuration profiles.
Note: To disable Baseline Compliance Report generation for this device, select None.
Additional InformationSelect Display virtual routers to analyze each virtual router separately, enabling advanced routing analysis.
This causes individual virtual routers to appear in the AFA device tree as the last tier (below their LSYS), and AFA provides a report for each router.
When this option is enabled, the analysis AFA provides for the LSYS aggregates the information provided for its VRs and should be used for most AFA analysis capabilities, such as policy optimization recommendations.
The VR analyses provides the ability to:
- Troubleshoot routing/topology issues, such as traffic simulation query results
- Manage risks by focusing on the rules that trigger risks,
- Determine which risky rules to trust
Although the LSYS analysis aggregates the information for each VR under it, the LSYS analysis does not fully contain the information provided in the VR tier analyses.
Route CollectionSpecify how AFA should acquire the device's routing information:
- Automatic. AFA will automatically generate the device's routing information upon analysis or monitoring.
- Static Routing Table (URT). AFA will take the device's routing information from a static file you provide. For details, see Specify routing data manually.
Remote Management CapabilitiesSelect a data collection method:
- Telnet
- SSH (more secure)
Then, define the following:
Custom Port
To specify a custom port, select this option and type the port.
This option is only relevant when SSH is selected.
Number of allowed encryption keys
Enter the permitted number of different RSA keys received from this device's IP address.
Different RSA keys may be sent from the same IP address in cases of cluster fail-over, device operating system upgrades, etc. For example, if a cluster fail-over occurs, the secondary node will send a new RSA key from the same IP address to AFA. If this number is set to 1, the connection to the node will fail, resulting in a failed analysis.
Tip: You can configure AFA to connect to the device using SSH with Public-Key authentication. For details, see Define AFA preferences.
Log Collection and MonitoringDefine log collection and monitoring settings as follows:
Log collection method
Specify whether AFA should collect logs for the device, by selecting one of the following:
- None: Do not collect logs.
- Standard: Enable log collection.
- Extensive: Enable log collection and the Intelligent Policy Tuner.
The default value is Extensive.
Syslog-ng server
If you selected Standard or Extensive in the Log collection method field, you must specify the syslog-ng server. For details, see Specify a Syslog-ng server.
Note: When using STRM (Juniper's log server), you can forward the logs to a syslog-ng (AFA's built-in syslog-ng or an external one). Then, you can define this syslog-ng as the relevant log server. For more details, see Configure Juniper STRM to forward logs to a Syslog-ng server.
Additional firewall identifiers
Enter any additional IP addresses or host names that identify the device. Separate multiple entries by colons (:).
For example: 1.1.1.1:2.2.2.2:ServerName
This is relevant when the device is represented by multiple or non-standard device identifiers in the logs, for example, in cases of firewall clusters or non-standard logging settings.
If AFA receives logs with an identifier it does not recognize, the logs will not be processed.
Note: This field is only relevant for the parent device, and you may want to specify additional identifiers for sub-systems. For details, see Add additional device identifiers for sub-systems.
Log collection frequency
Select the interval of time in minutes, in which AFA should collect logs for the device.
ActiveChangeSelect Enable ActiveChange for all supported Juniper SRX firewalls to enable FireFlow to generate CLI recommendations and push them to the device.
Note: Checking this box will enable ActiveChange for all Juniper SRX firewalls (not only for this device).
For more details, see Implement changes with ActiveChange.
OptionsDefine the following options as needed:
Real-time change monitoring
Select this option to enable real-time alerting upon configuration changes.
For details, see Configure real-time monitoring.
Set user permissions
Select this option to set user permissions for this device.
-
If you enabled ActiveChange, the ActiveChange License Agreement dialog box appears.
Select I Agree and click OK.
- Click Finish.
-
If you selected Set user permissions, the Edit users dialog box appears.
In the list of users displayed, select one or more users to provide access to reports for this account.
To select multiple users, press the CTRL button while selecting.
Click OK to close the dialog.
The new device is added to the device tree, and a success message appears to confirm that the device is added.
Configure Juniper SRX devices to send traffic logs
ASMS can collect log data by receiving traffic logs from the device itself, or by collecting syslog messages from an external, remote syslog-ng server.
Configure this as needed. For details, see the Juniper Knowledge Base.
Juniper routers in AFA
The following sections describe how ASMS connects to Juniper JUNOS routers:
Note: Juniper routing devices with large route tables may cause data collection to take longer than usual.
For details about specific routers supported, see the AlgoSec Support Matrix.
The following diagram shows an ASMS Central Manager or Remote Agent connecting to a Juniper router.

ASMS connects to Juniper routing devices using SSH, and requires a super-user with the following permissions:
- show version
- show route active-path all
- show configuration
Note: If you need to use a user that is not a super-user, contact AlgoSec support.
This procedure describes how to add a Juniper router to AFA.
Do the following:
- Access the Devices Setup page. For details, see Access the DEVICES SETUP page.
- In the vendor and device selection page, select Juniper > M/E Routers.
-
Complete the fields as needed.
Access InformationEnter the device's access information and credentials as follows:
Host
Enter the device's host name or IP address.
User Name
Enter the user name used to access the device.
Password
Enter the password used to access the device.
Geographic DistributionSelect the remote agent that should perform data collection for the device.
To specify that the device is managed locally, select Central Manager.
Note: This field is relevant when a Geographic Distribution architecture is configured.
Baseline Configuration ComplianceTo enable generation of Baseline Compliance Reports for this device, select the baseline compliance profile to use.
To disable Baseline Compliance Report generation for this device, select None.
The drop-down list includes all baseline compliance profiles in the system. For more details, see Customize baseline configuration profiles.
Route CollectionSpecify how AFA should acquire the device's routing information:
- Automatic. AFA will automatically generate the device's routing information upon analysis or monitoring.
- Static Routing Table (URT). AFA will take the device's routing information from a static file you provide. For details, see Specify routing data manually.
Remote Management CapabilitiesSelect a method of data transmission:
-
SSH (recommended).
If selected, AFA also enables you to specify a custom port. Select Custom Port and enter the port number.
- Telnet
From the Number of allowed encryption keys dropdown, select the number of permitted different RSA keys received from this device's IP address.
Different RSA keys may be sent from the same IP address in cases of cluster fail-over, device operating system upgrades, etc.
For example, if a cluster fail-over occurs, the secondary node will send a new RSA key from the same IP address to AFA. In this case, if the Number of allowed encryption keys value was set to 1, the node connection and subsequent analysis will fail.
OptionsDefine the following options as needed:
Real-time change monitoring
Select this option to enable real-time alerting upon configuration changes.
For details, see Configure real-time monitoring.
Set user permissions
Select this option to set user permissions for this device.
- Click Finish. The new device is added to the device tree.
-
If you selected Set user permissions, the Edit users dialog box appears.
In the list of users displayed, select one or more users to provide access to reports for this account.
To select multiple users, press the CTRL button while selecting.
Click OK to close the dialog.
A success message appears to confirm that the device is added.
Configure Juniper STRM to forward logs to a Syslog-ng server
This procedure describes how to configure Juniper STRM to forward logs to a syslog-ng server.
Do the following:
- Log in to the STRM Log Manager interface, and click the Admin tab.
- On the left, click Data Sources > Syslog Forwarding Destinations > Add.
- Enter the syslog-ng server's IP address and port, and click Save.
All logs that are sent to the Juniper STRM device will be forwarded to the syslog-ng server.
