
Relevant for: AFA Administrators
ASMS integrates with CyberArk Vault to enable ASMS access to devices without saving device credentials in ASMS directly. Once configured, ASMS connects to CyberArk to retrieve device credentials, for monitoring, scheduled analysis, or ActiveChange. The actual credential retrieval is transparent to the user.
ASMS supports configuring CyberArk credentials for multiple devices in AFA, becoming more valuable as the number of devices you have in AFA grows.
Note: When integrating with AFA, credentials for syslog collection still need to be provided separately to AFA.
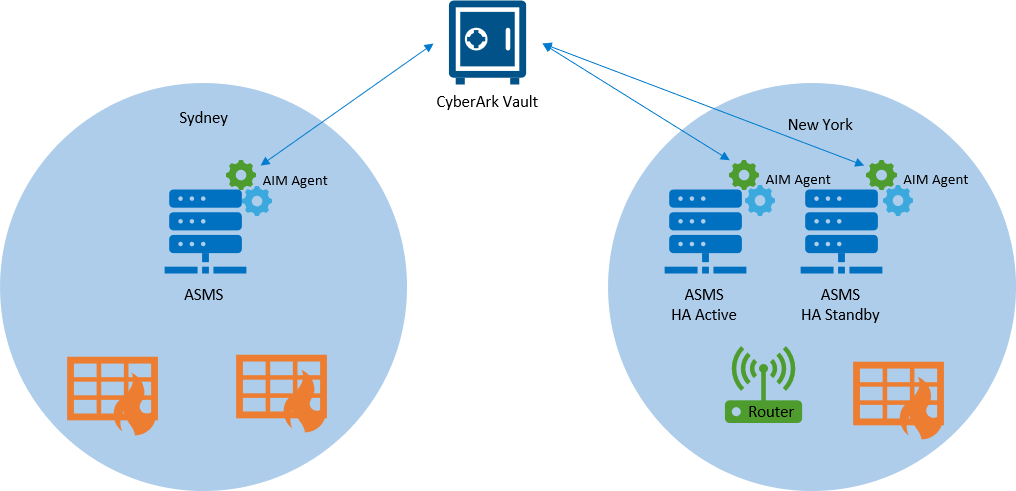
ASMS and CyberArk integration architecture
The following image shows an example of an ASMS-CyberArk integration, with ASMS in a Geographic Distribution and High Availability architecture.
The CyberArk integration is supported for:
- Standalone ASMS installations
- Two ASMS machines, serving in High Availability or Disaster Recovery configurations
- A Central Manager with one or more hosts in different geographic locations near each target security device
- Any combination of the last two architectures
The CyberArk AIM agent must be installed on each of the ASMS machines, as each ASMS machine will need to connect to the devices they manage, and require CyberArk credentials.
Supported devices for CyberArk integration
CyberArk integration is supported for the following device brands:
- Fortinet FortiManager
- Juniper Netscreen
- Cisco ASA
- Cisco Nexus
- Cisco IOS
- F5 BIG-IP LTM and AFM
- Symantec Blue Coat
Note: For details about supported versions of CyberArk, contact your AlgoSec customer representative.
Configure CyberArk AIM for ASMS access
Before using CyberArk in ASMS, you must enable ASMS access in CyberArk. This procedure describes how to define an application ID and application details for ASMS in CyberArk's Password Vault Web Access (PVWA).
Do the following:
-
Log in to the PVWA as a user with authorization to manage applications. Add an application, and name it AlgoSec.
-
Enable the Allow extended authentication restrictions option for the AlgoSec application you created. This enables you to specify an unlimited number of machines and Windows domain OS users for a single application.
- Specify the application's Allowed Machines, and include any of your ASMS machines. This ensures that ASMS can access credentials managed by CyberArk from any machine in your system.
For more details, see the CyberArk documentation.
Configure CyberArk accounts and permissions
This procedure describes how to ensure that CyberArk accounts and permissions are configured as needed for the ASMS integration, and is performed in the CyberArk Vault.
Do the following:
- In the CyberArk Password Safe, provision any privileged accounts required by the AlgoSec application. For each account, make sure to add the Add accounts permission.
- Add the Credential Provider and application users as members of the Password Safes where the application passwords are stored.
-
Add the Provider users as a Safe Member, with the following permissions:
- List accounts
- Retrieve accounts
- View Safe Members
Tip: If you are installing multiple Provider users, we recommend creating a group for these users and adding the group to the Safe with the required permissions.
- Add the application, using the APPID, as a Safe Member with the Retrieve accounts permission only.
-
Additionally, provide the Provider user and the application with the Access Safe without Confirmation permission, if your scenario complies with all of the following:
- Your environment is configured for dual control
- You have a PIM-PSM environments version 7.2 and lower
- The Safe is configured to require confirmation from authorized users before passwords can be retrieved
This is not required for Privileged Account Security solutions versions 8.0 and higher.
For more details, see the CyberArk documentation.
Configure CyberArk integration
This procedure describes how to configure specific devices to be authenticated via a CyberArk vault. When configured, the CyberArk configuration fields appear for those devices in the DEVICES SETUP page.
Do the following:
-
Complete the integration configuration on the CyberArk side. For details, see:
-
In the AFAAdministration area, navigate to the Options > Authentication tab.
-
Scroll down to the CyberArk area, and select the Allow to setup devices with CyberArk credentials management checkbox.
-
(Optional) Define default values for all devices authenticated via CyberArk, as follows:
Platform (Policy ID)
Enter a default CyberArk Platform.
Safe
Enter a default CyberArk safe.
Folder
Enter a default CyberArk folder.
Default : root
-
Click OK to save your changes.
From now on, CyberArk options will appear in the DEVICES SETUP page for all relevant device brands.
-
(Optional). Configure CyberArk system notifications. The following parameters are disabled by default:
- cyberark_connectivity_health_check - Tests the connectivity between ASMS and the CyberArk vault.
- suite_cyberark_aim_service – Checks the status of the CyberArk AIM service (aimprv) running on the ASMS host.
For more details, see System metric notifications.
-
Configure the specific devices you want to authenticate via CyberArk, either one at a time or in bulk.
For details, see:
-
Configure the CyberArk Application Access Manager (AAM) agent on all ASMS hosts and configure it to communicate with the CyberArk vault. If you're working in a distributed environment, make sure to configure the AIM agent on all hosts in your system, including the Central Manager, Remote Agents, secondary nodes of all clusters, and so on.
For more details, see the CyberArk documentation.
