
Configure user authentication
This topic describes how to configure ASMS user authentication, including single sign-on, authentication servers, and LDAP forests.
Best practice: Whenever possible, leverage LDAP/LDAPS for authentication. This enables all ASMS users to log in easily, including change requestors, application owners, auditors, and so on.
Configuring LDAP/LDAPS for ASMS also enables auto-provisioning, which means that users are automatically created and assigned to their appropriate roles based on their LDAP group membership, without any additional configuration.
 Configure LDAP in AFA: Watch to learn how to sync AFA with your organization’s LDAP server.
Single Sign On (SSO) and ASMS
ASMS supports a SAML 2.0-based Single Sign On (SSO) solution, enabling you to integrate user logins with your SSO Provider.
SSO solutions have the following elements:
| A service provider (SP) | In our case, AlgoSec is a service provider that provides ASMS. |
| An identity provider (IdP) |
In our case, your SSO Provider provides user identity verification as the identity provider. |
When SSO is enabled:
- ASMS directs users to authenticate against your SSO Provider as the IdP, and then redirects the user back to ASMS.
- Users already logged in to the SSO Provider are directed directly to ASMS.
- The Logout button no longer appears in ASMS. Log out by logging out of your SSO Provider only.
For more details, see:
Note: ASMS provides service provider metadata at the following URL:
https://<Algosec URL>/AFA/php/module.php/saml/sp/metadata.php/<SP Identifier>
As your IdP, your SSO Provider must be aware of the following ASMS services:
|
Assertion Consumer Service, or the Single Sign On URL |
Informs the IdP where ASMS redirects the user for Single Sign On (login) requests. Configured as: https://<ASMS URL>/simplesaml/module.php/saml/sp/saml2-acs.php/<SP Identifier> |
| Single Logout Service |
May not be required in all situations. Informs the IdP where ASMS redirects the user for Single Sign Out (logout) requests. Configured as: https://<ASMS URL>/simplesaml/module.php/saml/sp/saml2-logout.php/<SP Identifier> |
The SSO Provider must inform ASMS about the user performing the authentication. The following data is passed with the returned attributes, post-authentication:
| Attribute | Content | Example |
|---|---|---|
| UID |
Username |
laura |
| Email address | [email protected] | |
| displayName | Name displayed in the user interface | Laura Sanchez |
Tip: If your SSO Provider cannot be configured to provide the required data in this format, configure a customized UID parser.
For details, see Configure a customized UID parser.
To configure Single Sign on in ASMS, do the following:
-
In the AFA Administration area, browse to the OPTIONS > Authentication tab.
-
Under User Authentication, select Single Sign On, and complete the following fields as needed:
Service Provider identifier
The identifier of the AlgoSec SP.
This identifier must be unique, and it must be added to the list of known SPs in your identity provider's configuration.
Identity Provider identifier
The identifier of your installed IdP.
IdP's Single Sign On service URL
The URL of the IdP's Login page.
IdP's Single Sign Out service URL
The URL of the IdP's Logout page.
-
Optional: To fetch user data, select the Fetch User Data checkbox and do one of the following:
Fetch user data from an LDAP serverDo the following:
-
Select LDAP, and complete the fields as needed:
- Click Test connectivity for the specific server to test connectivity. A message informs you whether AFA connected to the server successfully.
-
To configure one or more secondary LDAP servers, select Use Secondary Servers, and complete the additional fields as needed. For details, see LDAP Server Credentials fields.
- Continue with step 4.
LDAP Server Credentials fields
Server
Type the IP address of the LDAP server's host computer.
LDAP Version
Select the version of LDAP used on the LDAP server.
Port
Type the port number on the LDAP server's host computer.
Timeout
Use the arrow buttons to select the maximum amount of time in seconds to wait for the LDAP server's reply.
Secure Connection
Select this option to secure connections with the LDAP server, then choose the method to use for securing the connection: LDAPS or StartTLS.
The default method is LDAPS.
The value of the Port field changes according to the method selected.
Verify Server Certificate
Select this option to specify that AFA should check the LDAP server's certificate against a locally stored certificate. AFA will only connect to the LDAP server if the certificates are identical.
The CA Certificate field appears.
CA Certificate
Select the locally stored certificate against which AFA should compare the LDAP server's certificate.
The certificate must be stored under /home/afa/.fa/ca_certs in order to appear in the drop-down list.
Bind Type
Select the bind type to use:
- Simple. AFA sends the entered username and password to the LDAP server. If the entered username exists in the LDAP server, and the password matches the username, then the user is logged in.
-
Regular. AFA logs in to the LDAP server using a user DN and password, and then checks the entered username and password against the LDAP server. If the entered username exists in the LDAP server, the password matches the username, and any additional criteria are met, then the user is logged in.
-
Anonymous. AFA accesses the LDAP server anonymously, and then checks the entered username and password against the LDAP server. If the entered username exists in the LDAP server, the password matches the username, and any additional criteria are met, then the user is logged in.
If you chose Regular or Anonymous, additional fields appear.
The default value is Regular.
User DN
Type the user DN that AFA should use to log in to the LDAP server.
This field appears only for Regular bind type.
Password
Type the password that AFA should use to log in to the LDAP server.
This field appears only for Regular bind type.
Name
Type the attribute that contains a user's name, in user objects in the database.
The default value is sAMAccountName.
Group Membership
Type the attribute that contains a user's groups, in user objects in the database.
The default value is member.
Associated Roles Select this option to import user group information from the LDAP server. Selecting this option enables assigning user roles via a specified correspondence between LDAP groups and AFA, FireFlow, or AppViz roles.
To manage roles from within the AlgoSec Suite (not the LDAP), do not select this option.
Full Name
Type the name of the LDAP server user field from which you want to import data to the AlgoSec Firewall Analyzer and FireFlow Full Name field.
Email
Type the name of the LDAP server user field from which you want to import data to the AlgoSec Firewall Analyzer and FireFlow Email field.
Notes
Type the name of the LDAP server user field from which you want to import data to the AlgoSec Firewall Analyzer and FireFlow Notes field.
Organization
Type the name of the LDAP server user field from which you want to import data to the FireFlow Organization field.
Address
Type the name of the LDAP server user field from which you want to import data to the FireFlow Address field.
City
Type the name of the LDAP server user field from which you want to import data to the FireFlow City field.
State
Type the name of the LDAP server user field from which you want to import data to the FireFlow State field.
Zip Code
Type the name of the LDAP server user field from which you want to import data to the FireFlow Zip Code field.
Country
Type the name of the LDAP server user field from which you want to import data to the FireFlow Country field.
Home Phone
Type the name of the LDAP server user field from which you want to import data to the FireFlow Home Phone field.
Work Phone
Type the name of the LDAP server user field from which you want to import data to the FireFlow Work Phone field.
Mobile Phone
Type the name of the LDAP server user field from which you want to import data to the FireFlow Mobile Phone field.
Pager
Type the name of the LDAP server user field from which you want to import data to the FireFlow Pager field.
Fetch user data from the SSO Provider (the IdP)Select IDP and complete the fields as needed. For details, see:
When complete, continue with step 4.
Full Name
Type the name of the LDAP server user field from which you want to import data to the AlgoSec Firewall Analyzer and FireFlow Full Name field.
Email
Type the name of the LDAP server user field from which you want to import data to the AlgoSec Firewall Analyzer and FireFlow Email field.
Notes
Type the name of the LDAP server user field from which you want to import data to the AlgoSec Firewall Analyzer and FireFlow Notes field.
Organization
Type the name of the LDAP server user field from which you want to import data to the FireFlow Organization field.
Address
Type the name of the LDAP server user field from which you want to import data to the FireFlow Address field.
City
Type the name of the LDAP server user field from which you want to import data to the FireFlow City field.
State
Type the name of the LDAP server user field from which you want to import data to the FireFlow State field.
Zip Code
Type the name of the LDAP server user field from which you want to import data to the FireFlow Zip Code field.
Country
Type the name of the LDAP server user field from which you want to import data to the FireFlow Country field.
Home Phone
Type the name of the LDAP server user field from which you want to import data to the FireFlow Home Phone field.
Work Phone
Type the name of the LDAP server user field from which you want to import data to the FireFlow Work Phone field.
Mobile Phone
Type the name of the LDAP server user field from which you want to import data to the FireFlow Mobile Phone field.
Pager
Type the name of the LDAP server user field from which you want to import data to the FireFlow Pager field.
-
-
To set a default mail domain, select Default Mail Domain, and enter the URL.
When this option is configured, AFA automatically generates an email address for users by attaching the specified email suffix to its username (when an email address is not provided).
-
At the bottom of the page, click OK. Changes to user authentication settings immediately take effect.
Optionally, do any of the following:
If you must encrypt communication between ASMS and your IdP (the SSO Provider), have the IdP create a certificate for ASMS to use. This is the default behavior for most IdPs.
Do the following:
- Open a terminal and log in as user afa.
-
Save the IdP's certificate in a Base-64 encoded PEM format to /usr/share/fa/simplesaml/cert/.
Tip: The default filename is server.crt. We recommend that you use a different filename, as this default file is overwritten during upgrades.
-
If you saved the file under a name other than server.crt, configure the name of the IdP certificate file.
Do the following:
- Navigate to the /home/afa/.fa/config configuration file, and open it for editing.
-
Add the SSOSAML_IdP_Certificate parameter, and define it's value as the name of the IdP certificate file.
For example:
SSOSAML_IdP_Certificate=MyIdPCert.cr
By default, ASMS uses SP-initiated, or solicited SSO, in which the SP signs the Assertion Certificated passed between the two systems. This is the recommended usage.
ASMS also supports IdP-initated, or unsolicited SSO, in which the IdP signs the Assertion Certificate instead.
While both scenarios have users access ASMS using the ASMS URL, the method used may affect parameter values in the system configuration.
Do the following:
-
In the AFA Administration area, navigate to the Options > Advanced Configuration tab.
-
Add the following parameters and their values, one at a time:
SSOSAML_IdP_Unsolicited_SSO Yes/No. Specifies whether to use the IdP method first.
SSOSAML_IdP_Unsolicited_SSO_URL The IdP's URL.
SSOSAML_IdP_Unsolicited_SSO_SP_ID_KEY The parameter name for the SP unique identifier.
For more details, see Advanced Configuration.
Various IdPs have different response formats, and yours may not match the format expected by ASMS.
If you cannot configure the response format to match ASMS's expectation, define a customer UID parser to translate the responses.
Do the following:
-
View the response format being sent to ASMS:
- Switch to Debug mode.
- Log in to ASMS again, and navigate to the public_html/algosec/.ht-fa-history log file.
- Search for the debug log and find the user attributes received, including the object returned and its structure.
-
Create the customer UID parser as follows:
-
On the ASMS server, create the following new directory: /usr/share/fa/php/site
-
Copy the original parser from /usr/share/fa/php/SampleUIDParser.php to /usr/share/fa/php/site/<parser name>.php, giving it a meaningful name.
-
Open the /usr/share/fa/php/site/<parser name>.php file for editing, and modify the file so that the parseUID function returns the value you expect.
By default the function returns "$userAttributes['UID'][0]".
-
Change your parser permissions by running:
-rw-r----- root apache
-
-
Set PHP to include files from the /usr/share/fa/php/site/ directory. Do the following:
-
Browse to and open the /etc/php.ini file for editing.
-
Change the PHP include path directive to include the new directory:
include_path = ".:/usr/share/fa/phplib:/usr/share/fa/php:/usr/share/fa/php/inc:/usr/share/fa/php/site"
-
Configure AFA to use the new UID parser. In the ~afa/.fa/config configuration file, add the following attribute:
UID_PARSER_NAME=<parser name>
-
Restart Apache server. Run:
/etc/init.d/httpd restart
-
ASMS enables users to log in directly to ASMS, without using SSO, even when SSO is configured. For example, this may be helpful if your IdP is down, or if there are configuration errors.
Note: Forcing local authentication uses direct ASMS logins, and requires that users are defined locally in ASMS.
Do the following:
Navigate to ASMS, with the additional forcelocalauth=1 string added on to the end of the URL.
For example: https://<algosec server>/algosec/suite/login.html?forcelocalauth=1
The local ASMS login page appears, and users can log in using ASMS credentials.
If an SSO error occurs, the browser displays an error page instead of ASMS.
Error messages often show as SimpleSAML_Error_Error errors, and contain a UUID that can be used to locate the event in the .ht-fa-history log file. There, following the instructions indicated as ACTION REQUIRED.
Common errors include:
|
Time assertion failures, such as:
|
Check the clock configurations on the ASMS machine and the SSO Provider. Both of these clocks must be synchronized, including timezone. |
| Lost sessions and STATE-related errors |
Verify that the SSO Provider directs the user to ASMS using the same hostname as accessed by the user. |
| cause:SimpleSAML_Error_Exception:private] => SimpleSAML_Error_UnserializableException Object |
The message cannot be parsed. It may have been encrypted, and the SSO Provider certificate not defined. Place the SSO Provider certificate in the following directory, and define it's name in the AFA configuration file: /usr/share/fa/simplesaml/cert/ |
| [ message:protected] => saml20-idp-remote/'Test': Could not find PEM encoded certificate in "/usr/share/fa/simplesaml/cert/server.crt". |
The certificate may have an incorrect format. Ensure that the certificate format is PEM. |
| Users are able to connect from expired sessions |
If a user is able to log in to ASMS, even if the ASMS session timeout period has passed, verify whether the ASMS timeout and the SSO Provider timeout are configured correctly. The ASMS session timeout must be set to a time limit equal or greater than the SSO Provider's session timeout. |
Disable SSO configuration
If your SSO configuration behaves unexpectedly, you may want to disable it while you troubleshoot the issues.
Do the following:
- Log in to the ASMS server or Central Manager as user root.
- Navigate to the /home/afa/.fa/config file, and open it for editing.
- Set the Use_SSO value to no.
SSO is disabled. Log in to ASMS using a user defined in ASMS directly.
User authentication via authentication servers
The AlgoSec Security Management Suite (ASMS) supports authenticating users via an authentication server in the following ways:
| Local user database | The AlgoSec Security Management Suite maintains a local user database that is composed of the usernames and passwords of users you have added. When a user attempts to log in, the AlgoSec Suite compares the entered username and password to the local user database. If the entered username exists in the database, and the password matches the username, then the user is logged in. |
| LDAP server |
If your company uses an LDAP (Lightweight Directory Access Protocol) server for authenticating network users (for example, Microsoft Active Directory), you can configure the AlgoSec Suite to authenticate users against the LDAP server. When a user attempts to log in (using the login credentials defined for them on the LDAP server), the AlgoSec Suite sends the entered username and password to the LDAP server. If the entered username exists in the LDAP server, and the password matches the username, then the user is logged in. The user will automatically be added to ASMS, allowing you to manage the user in the ASMS web interface. If desired, you can configure additional criteria for authentication. For example, you can specify that the LDAP server should only search certain parts of its database for the entered username and password, or that users must belong to a certain LDAP user group. The AlgoSec Suite additionally supports importing user data, such as permissions and roles, from an LDAP Server. When this is configured, each user is automatically assigned roles based on their LDAP groups. Note: It is possible to use multiple LDAP servers to authenticate users. For more details, see Import user data from an LDAP server. |
| RADIUS server |
Some companies use a RADIUS (Remote Authentication Dial In User Service) server for authenticating network users. The AlgoSec Security Suite can be configured to use the corporate RADIUS server to authenticate users. When a user attempts to log in (using the login credentials defined on the RADIUS server), ASMS sends the entered username and password to the RADIUS server. If the entered username exists in the RADIUS database, and the password matches the username, then the user is logged in. The user will automatically be added to ASMS, allowing you to manage the user in the ASMS web interface. The AlgoSec Suite additionally supports importing data from an LDAP server for RADIUS authenticated users. See Import user data from an LDAP server. Note: Microsoft Active Directory can be configured as a RADIUS server. For information on configuring Active Directory, refer to Microsoft documentation. |
By default, the AlgoSec Security Suite uses the local user database to authenticate users. If you want to use a RADIUS server and/or an LDAP server in addition to local authentication, you must configure the desired user authentication method using the following procedure.
Note: When more than one user authentication method is enabled, you can choose which method to use on a per-user basis.
If importing user data from an LDAP server is not configured, you must manually define privileged users in AFA.
Configure user authentication via an authentication server
Do the following:
-
In the toolbar, click your username.
A drop-down menu appears.
-
Select Administration.
The Administration page appears, displaying the Options tab.
-
In the Options tab, click the Authentication sub-tab.
The Authentication page appears.
-
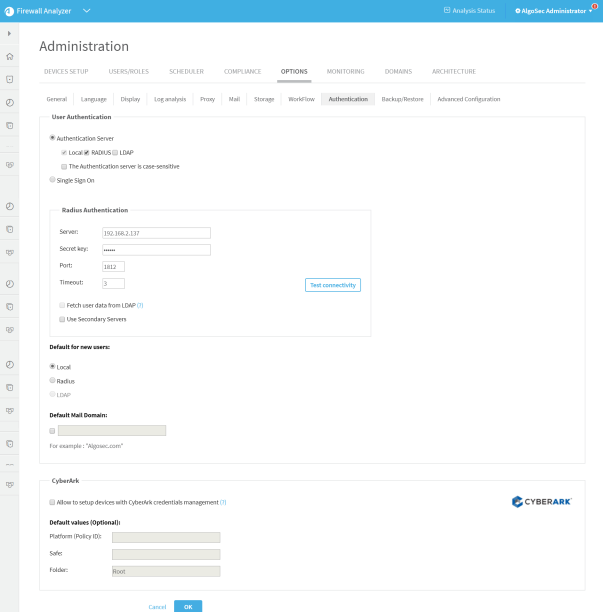
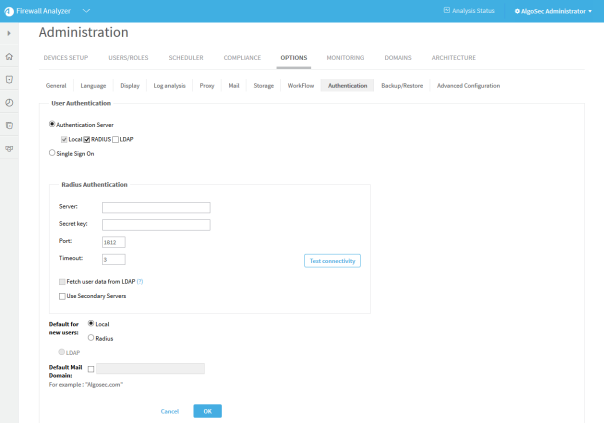
Choose Authentication Server.
Note: The Local check box is selected by default and cannot be cleared.
-
To enable user authentication using a corporate RADIUS server:
-
Select the RADIUS check box.
Radius Authentication fields appear.
-
Complete the fields as needed. If you selected the Use Secondary Servers check box, additional fields appear.
For details, see RADIUS authentication fields.
-
-
To enable user authentication against an LDAP server:
-
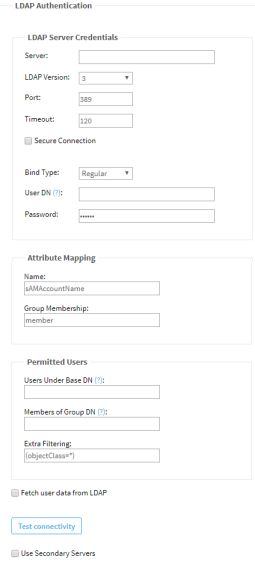
Select the LDAP check box.
New fields appear.
-
Complete the fields using the information in LDAP Authentication Fields (see LDAP authentication fields).
If you selected the Use Secondary Servers or Fetch user data from LDAP check boxes, additional fields appear.
Continue completing the fields using the information in LDAP Authentication Fields (see LDAP authentication fields).
-
-
To test connectivity for a defined RADIUS or LDAP server, click Test connectivity for the specific server.
A message informs you whether AFA connected to the server successfully.
-
In the Default for new users area, choose the default authentication method for new users.
Note: You can override the default authentication method to use on a per-user basis.
-
To set a default mail domain, select Default Mail Domain, and type the URL.
When this option is configured, AFA automatically generates an email address for users by attaching the specified email suffix to its username (when an email address is not provided).
-
Click OK.
Changes to user authentication settings immediately take effect.
|
In this field... |
Do this... |
|---|---|
|
Server |
Type the IP address of the RADIUS server's host computer. |
|
Secret key |
Type the secret key to use for authenticating to the RADIUS server. |
|
Port |
Type the port number on the RADIUS server's host computer. |
|
Timeout |
Use the arrow buttons to select the maximum amount of time in seconds to wait for the RADIUS server's reply. |
|
Fetch user data from LDAP |
Select this option to fetch user data from an LDAP server. AFA will perform authentication (check passwords) against the defined RADIUS server, but will also access the specified LDAP server to obtain user information and optionally assign roles. Important: When this option is selected, you must additionally define the LDAP server and configure the import with the Fetch user data from LDAP check box. For more information, see Importing User Data from an LDAP Server (see Import user data from an LDAP server). |
|
Use Secondary Servers |
Select this option to configure one or more secondary RADIUS servers. You must complete the fields in the Secondary Radius Servers area. |
|
In this field... |
Do this... |
|---|---|
| LDAP Server Credentials |
|
|
Server |
Type the IP address of the LDAP server's host computer. |
|
LDAP Version |
Select the version of LDAP used on the LDAP server. |
|
Port |
Type the port number on the LDAP server's host computer. |
|
Timeout |
Use the arrow buttons to select the maximum amount of time in seconds to wait for the LDAP server's reply. |
|
Secure Connection |
Select this option to secure connections with the LDAP server, then choose the method to use for securing the connection: LDAPS or StartTLS. The default method is LDAPS. The value of the Port field changes according to the method selected. |
|
Verify Server Certificate |
Select this option to specify that AFA should check the LDAP server's certificate against a locally stored certificate. AFA will only connect to the LDAP server if the certificates are identical. The CA Certificate field appears. |
|
CA Certificate |
Select the locally stored certificate against which AFA should compare the LDAP server's certificate. The certificate must be stored under /home/afa/.fa/ca_certs in order to appear in the drop-down list. |
|
Bind Type |
Select the bind type to use:
If you chose Regular or Anonymous, additional fields appear. The default value is Regular. |
|
User DN |
Type the user DN that AFA should use to log in to the LDAP server. This field appears only for Regular bind type. |
|
Password |
Type the password that AFA should use to log in to the LDAP server. This field appears only for Regular bind type. |
| Attribute Mapping |
|
|
Name |
Type the attribute that contains a user's name, in user objects in the database. The default value is sAMAccountName. |
|
Group Membership |
Type the attribute that contains a user's groups, in user objects in the database. The default value is member. |
| Permitted Users |
|
|
Users Under Base DN |
Type the base DN. The baseDN is the highest level in the LDAP tree, where AFA should search. Any entries above this level will not be searched. |
|
Members of Group DN |
Type the DN of the LDAP group that includes all users who may log in to AFA and FireFlow. This field is optional. When it is filled in, users who are not members of this LDAP group will not be allowed to log in to AFA or FireFlow, even if they are members of other LDAP groups mapped to AFA or FireFlow roles. Note: This LDAP group includes all FireFlow requestors. When this field is filled in, only users who are members of this group are allowed to submit requests to FireFlow. |
|
Extra Filtering |
Type any additional criteria that users must meet in order to be authenticated. The default value is (objectClass=*). |
|
Fetch user data from LDAP |
Select this option to import user data from the LDAP server upon each login. For example, when a user logs in, data such as the user's telephone number can be imported. You must complete the fields in the Fields Mapping area. Note: The default values for these fields are taken from Active Directory. If a different LDAP server is used, the names must be changed accordingly. Since data is imported only upon user login, the data stored for users who log in infrequently may be outdated. |
| Fields Mapping |
|
|
Associated Roles |
Select this option to import user group information from the LDAP server. Selecting this option enables assigning user roles via a specified correspondence between LDAP groups and AFA, FireFlow, or AppVizroles. To manage roles from within the AlgoSec Suite (not the LDAP), do not select this option. |
|
Full Name |
Type the name of the LDAP server user field from which you want to import data to the AlgoSec Firewall Analyzer and FireFlow Full Name field. |
|
|
Type the name of the LDAP server user field from which you want to import data to the AlgoSec Firewall Analyzer and FireFlow Email field. |
|
Notes |
Type the name of the LDAP server user field from which you want to import data to the AlgoSec Firewall Analyzer and FireFlow Notes field. |
| FireFlow specific fields |
|
|
Organization |
Type the name of the LDAP server user field from which you want to import data to the FireFlow Organization field. |
|
Address |
Type the name of the LDAP server user field from which you want to import data to the FireFlow Address field. |
|
City |
Type the name of the LDAP server user field from which you want to import data to the FireFlow City field. |
|
State |
Type the name of the LDAP server user field from which you want to import data to the FireFlow State field. |
|
Zip Code |
Type the name of the LDAP server user field from which you want to import data to the FireFlow Zip Code field. |
|
Country |
Type the name of the LDAP server user field from which you want to import data to the FireFlow Country field. |
|
Home Phone |
Type the name of the LDAP server user field from which you want to import data to the FireFlow Home Phone field. |
|
Work Phone |
Type the name of the LDAP server user field from which you want to import data to the FireFlow Work Phone field. |
|
Mobile Phone |
Type the name of the LDAP server user field from which you want to import data to the FireFlow Mobile Phone field. |
|
Pager |
Type the name of the LDAP server user field from which you want to import data to the FireFlow Pager field. |
|
Use Secondary Servers |
Select this option to configure one or more secondary LDAP servers. You must complete the fields in the Secondary LDAP Servers area. (See LDAP Server Credentials at top of this table.) |
Import user data from an LDAP server
Whether you are authenticating users with an LDAP or RADIUS authentication server, you can configure ASMS to import user data from an LDAP server. Upon each login, ASMS will fetch the user's full name and email address, as well as roles and inherited permissions. All of this information will be updated for the users on the AlgoSec server.
Note: This procedure is only relevant when authenticating with an LDAP or RADIUS authentication server. If you want to fetch data from an LDAP, but authenticate with SSO, see Configure user authentication.
Note: If the system is configured to import user information from an LDAP server, changes to user settings must be made only on the LDAP server (changes made in the AlgoSec Suite may be overridden the next time the user logs in).
Note: The data stored for users who log in infrequently may be outdated. Each user's information is fetched and updated upon login; in addition to name and email, this includes the list of roles the user is assigned, the list of permissions the user inherits, and the list of users assigned the fetched roles.
Do the following:
-
Configure LDAP or RADIUS user authentication. For details, see User authentication via authentication servers.
- When authenticating with an LDAP server, select the Fetch user data from LDAP check box and complete the fields in the Fields Mapping area.
-
When authenticating with a RADIUS server, do the following:
- Select the Fetch user data from LDAP check box in the RADIUS Authentication fields area.
-
Additionally define the LDAP, select the Fetch user data from LDAP check box and complete the fields in the Fields Mapping area.
Note: Many fields in FireFlow appear as options for mapping data.
-
Click OK.
-
If you selected the Associated Roles option, indicate a correspondence between LDAP groups and AlgoSec Suite roles doing the following:
- Add/Edit the user role you want to link with an LDAP group. For details, see Manage users and roles in AFA.
-
Type the LDAP group name that you want to link with the role in the Role LDAP DN field.
When users log in that are members of this LDAP group, they will automatically be granted the role.
Configure an LDAP forest
If you have multiple LDAP servers with different users defined on each one, you can configure an LDAP forest consisting of these servers. AFA and FireFlow will authenticate LDAP users against the correct LDAP server.
Complete this procedure for each LDAP server you want to include in the forest.
Do the following:
-
Choose a number to represent the LDAP server.
Number 1 represents the primary LDAP server, and numbers 2 and 3 represent possible backup servers. If you do not want those servers to be included in the forest, choose a number higher than 3.
-
In the toolbar, click your username.
A drop-down menu appears.
-
Select Administration.
The Administration page appears, displaying the Options tab.
-
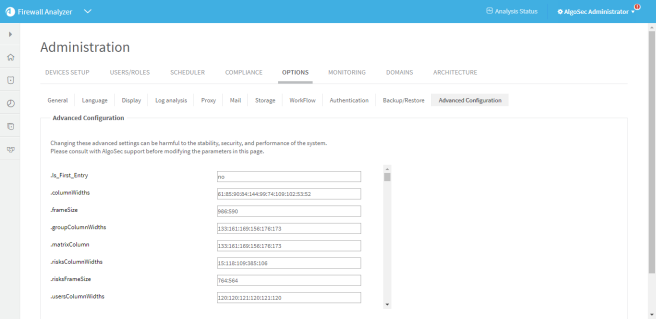
In the Options tab, click the Advanced Configuration sub-tab.
The Advanced Configuration page appears.
-
Add the parameters specified in LDAP Parameters (see LDAP parameters), one at a time, by doing the following:
-
Click Add.
The Add New Configuration Parameter dialog box appears.
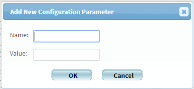
-
In the Name field, type ParamNumber
Where:
- Param is the parameter name.
-
Number is the server number selected in the previous step.
For example, to specify the port number of LDAP server number 4, type LDAP_Port4.
-
In the Value field, type the parameters value.
-
Click OK.
-
Repeat the above steps for each parameter.
-
Click OK.
-
|
Set this parameter... |
To this... |
|---|---|
|
LDAP_Port |
The port number on the LDAP server's host computer. This parameter is mandatory. |
|
LDAP_Timeout |
The maximum amount of time in seconds to wait for the LDAP server's reply. This parameter is mandatory. |
|
LDAP_Version |
The version of LDAP used on the LDAP server. This parameter is mandatory. |
|
Ldap_Secured_Authentication_Method |
The method to use for securing connections with the LDAP server. This can have the following values:
This parameter is mandatory. |
|
LDAP_Server |
The IP address of the LDAP server's host computer. This parameter is mandatory. |
|
LDAP_UseSecured |
Indicates whether to secure connections with the LDAP server. This can have the following values:
This parameter is mandatory. |
|
LDAP_VerifyCert |
Indicates whether AFA should check the LDAP server's certificate against a locally stored certificate. AFA will only connect to the LDAP server if the certificates are identical. This can have the following values:
This parameter is mandatory. |
|
LDAP_Certificate |
The locally stored certificate against which AFA should compare the LDAP server's certificate. The certificate must be stored under /home/afa/.fa/ca_certs. This parameter is mandatory. |
|
LDAP_Domain |
The LDAP server's domain name. This parameter is mandatory. |
|
LDAP_Username |
The user DN that AFA should use to log in to the LDAP server. This parameter is optional. |
|
LDAP_Password |
The password that AFA should use to log in to the LDAP server. This parameter is optional. |
|
LDAP_Bind_Type |
The bind type to use. This can have the following values:
This parameter is optional. |
|
LDAP_BaseDN |
The base DN. This parameter is optional. |
|
LDAP_ExtraFiltering |
Any additional criteria that users must meet in order to be authenticated. The default value is (objectClass=*). This parameter is optional. |
|
LDAP_NameAttr |
The attribute that contains a user's name, in user objects in the database. This parameter is optional. |
|
LDAP_MemberAttr |
The attribute that contains a user's groups, in user objects in the database. This parameter is optional. |
|
LDAP_GroupDN |
The DN of the user group to which users must belong in order to be authenticated. This parameter is optional. |
|
LDAP_AttrEmail |
The name of the LDAP server user field from which you want to import data to AFA and FireFlow Email field. This parameter is optional. |
|
LDAP_AttrFullName |
The name of the LDAP server user field from which you want to import data to AFA and FireFlow Full Name field. This parameter is optional. |
|
LDAP_AttrNotes |
The name of the LDAP server user field from which you want to import data to AFA and FireFlow Notes field. This parameter is optional. |
|
LDAP_AttrOrganization |
The name of the LDAP server user field from which you want to import data to the FireFlow Organization field. This parameter is optional. |
|
LDAP_AttrAddress1 |
The name of the LDAP server user field from which you want to import data to the FireFlow Address field. This parameter is optional. |
|
LDAP_AttrCity |
The name of the LDAP server user field from which you want to import data to the FireFlow City field. This parameter is optional. |
|
LDAP_AttrState |
The name of the LDAP server user field from which you want to import data to the FireFlow State field. This parameter is optional. |
|
LDAP_AttrZip |
The name of the LDAP server user field from which you want to import data to the FireFlow Zip Code field. This parameter is optional. |
|
LDAP_AttrCountry |
The name of the LDAP server user field from which you want to import data to the FireFlow Country field. This parameter is optional. |
|
LDAP_AttrHomePhone |
The name of the LDAP server user field from which you want to import data to the FireFlow Home Phone field. This parameter is optional. |
|
LDAP_AttrWorkPhone |
The name of the LDAP server user field from which you want to import data to the FireFlow Work Phone field. This parameter is optional. |
|
LDAP_AttrMobilePhone |
The name of the LDAP server user field from which you want to import data to the FireFlow Mobile Phone field. This parameter is optional. |
|
LDAP_AttrPagerPhone |
The name of the LDAP server user field from which you want to import data to the FireFlow Pager field. This parameter is optional. |
|
LDAP_AttrCustom |
The name of a custom FireFlow attribute. For more details, see Manage authentication servers and SSO. This parameter is optional. |
In the following example, LDAP server 4 is added to the forest:
LDAP_Port4=349
LDAP_Timeout4=120
LDAP_Version4=3
Ldap_Secured_Authentication_Method4=LDAPS
LDAP_Server4=192.164.2.43
LDAP_UseSecured4=no
LDAP_VerifyCert4=no
LDAP_Certificate4=Algosec_CA.pem
LDAP_Domain4=ldomain4
LDAP_Username4=CN=Bob,OU=Algosec,DC=algosec,DC=local
LDAP_Password4=$FOQABRER$27:A3:BD:F2:90:C7:21:5A:3A:F4:F4:AB:R8:20:6F:25
LDAP_Bind_Type4=Regular
LDAP_BaseDN4=dc=algosec,dc=local
LDAP_ExtraFiltering4=(objectClass=*)
DAP_NameAttr4=sAMAccountName
LDAP_MemberAttr4=memberOf
LDAP_GroupDN4=
LDAP_AttrEmail4=mail
LDAP_AttrFullName4=displayName
LDAP_AttrNotes4=description
LDAP_AttrOrganization4=company
LDAP_AttrAddress14=streetAddress
LDAP_AttrCity4=l
LDAP_AttrState4=st
LDAP_AttrZip4=postalCode
LDAP_AttrCountry4=co
LDAP_AttrHomePhone4=homePhone
LDAP_AttrWorkPhone4=telephoneNumber
LDAP_AttrMobilePhone4=mobile
LDAP_AttrPagerPhone4=pager
LDAP_AttrCustom4=group,primaryGroupID;allowDial,msNPAllowDialin;mark,
department
Log in when an LDAP forest is configured
Do the following:
-
In the AFA or FireFlow Login page, type the following in the Username field:
LdapDomain\userName
Where:
- LdapDomain is the domain name of the LDAP server on which they are defined.
-
userName is the user's LDAP username.
For example, if Bob is defined on an LDAP server whose domain name is Ldomain4, then he must type "Ldomain4\Bob" in the Username field.
-
In the Password field, type your LDAP password.
-
Click Login.
Note: The backup servers will not be consulted, in the event that AFA/FireFlow did not locate the user in the specified LDAP domain.
