
Customize trusted traffic
Customize trusted traffic from AFA
To customize trusted traffic:
- Do one of the following:
To customize the device's trusted traffic via the device page, view the desired device. For details, see View a specific device.
Note: You can perform this procedure in either the Overview or Reports tab.
- To customize the device's trusted traffic via the ALL_FIREWALLS group page:
- View the ALL_FIREWALLS group. For details, see Viewing the ALL_FIREWALLS Group.
Click the All Reports tab.
The All Reports tab appears.
- Select the check box next to the desired device.
-
Click Trusted Traffic.
The Trusted Traffic page appears.
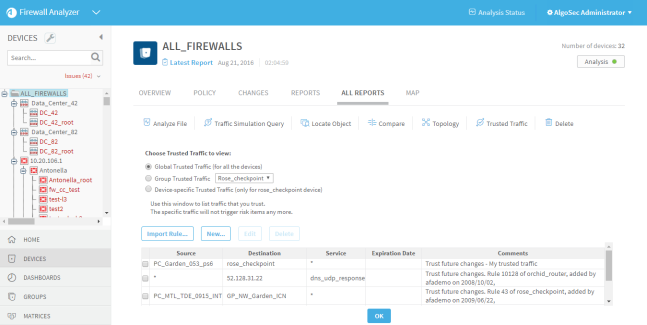
- Select the type of trusted traffic to view and modify:
- To work with traffic that is trusted for all devices, click Global Trusted Traffic.
- To work with traffic that is trusted for a specific group, click Group Trusted Traffic, then select the desired group from the drop-down list.
- To work with traffic that is trusted for the current device only, click Device-specific Trusted Traffic.
The desired type of trusted traffic appears in a table at the bottom of the page.
Note: All changes to trusted traffic will affect the selected type of trusted traffic only.
- To add or edit trusted traffic:
- Do one of the following:
- To add new traffic, click New.
- To edit existing traffic, select the trusted traffic in the table and click Edit.
The Add New Trusted Traffic page appears.
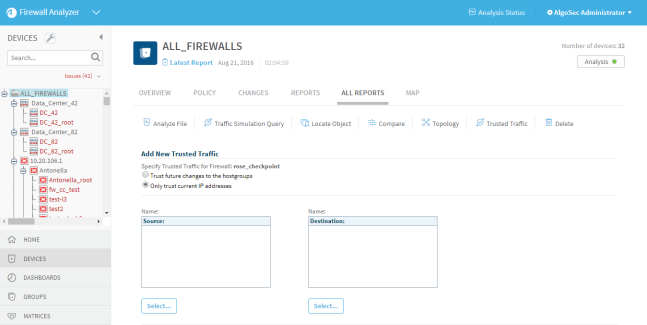
- In the Specify Trusted Traffic for Firewall area, do one of the following:
- To specify that the host group you selected should remain trusted even if the device administrator changes the IP addresses defined by it, click Trust future changes to the hostgroups.
- Select the source, destination, and service of the traffic that should be trusted.
- To specify an expiration date for the trusted traffic, select the Expiration Date check box and specify the desired date.
- In the Comment field, type any comments.
Click OK.
The Global Trusted Traffic page re-appears with the new traffic listed.
- Do one of the following:
-
To delete trusted traffic, select the desired traffic in the table and click Delete.
The trust for the selected traffic is removed.
- To import traffic that is specified by a risky rule, do the following:
Click Import Rule.
The Trusted Traffic page appears.
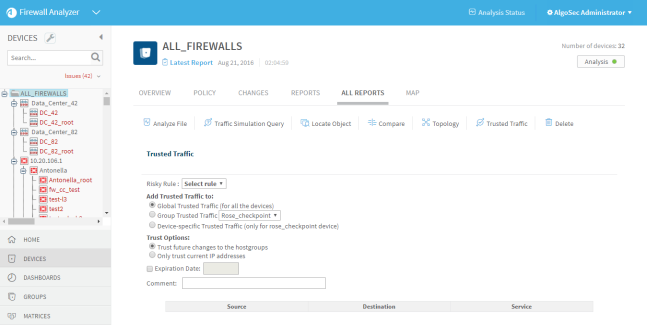
In the Risky Rule drop-down list, select the desired risky rule.
The relevant traffic appears in a table at the bottom of the page.
- In the Trust Options area, do one of the following:
- To specify that the host group you selected should remain trusted, even if the device administrator changes the IP addresses defined by it, click Trust future changes to the hostgroup.
- To specify that AFA should make a copy of the current definition, and only the IP addresses listed in it should be trusted, click Only trust the current IP addresses.
- To specify an expiration date for the trusted traffic, select the Expiration Date check box and specify the desired date.
- In the Comment field, type any comments.
Click OK.
The Global Trusted Traffic page reappears with the new traffic listed.
-
Click OK.
A message appears recommending that you run a new analysis for changes to take effect.
-
Click OK.
To run an analysis, see Manually generated reports.
Customize trusted traffic from a device report
You can customize trusted traffic from a device report's Risky Rules page.
Note: Customizing a risky rule from a device report is only available when viewing the report in the AFA Web interface, and not when viewing the downloaded report on your computer.
To customize trusted traffic:
-
View a report for the desired device. For details, see View device reports.
-
In the report menu, click the Risky Rules tab.
-
In the Findings table, click Trust Rule next to the desired risky rule.
A new window opens, displaying the Trusted Traffic page.
The desired rule is selected in the Risky Rule drop-down list, and the relevant traffic appears in a table at the bottom of the page.
-
Do one of the following:
- To specify that the rule traffic should be trusted for all devices, click Global Trusted Traffic.
- To specify that the rule traffic should be trusted for a specific group, click Group Trusted Traffic, then select the desired group from the drop-down list.
- To specify that the rule traffic should be trusted for the current device only, click Device-specific Trusted Traffic.
- In the Trust Options area, do one of the following:
- To specify that the host group you selected should remain trusted even if the device administrator changes the IP addresses defined by it, click Trust future changes.
- To specify that AFA should make a copy of the current definition, and only the IP addresses listed in it should be trusted, click Only trust the current IP addresses.
- To specify an expiration date for the trusted traffic, select the Expiration Date check box. Specify the desired date.
- In the Comment field, type any comments.
-
Click OK.
The Global Trusted Traffic page appears.
-
Click OK.
A message appears recommending that you run a new analysis for changes to take effect.
-
Click OK.
To run an analysis, see Manually generated reports.
