Run traffic simulation queries
This section explains how to perform traffic simulation queries and routing queries.
Overview
Once AFA has analyzed a device, group, or matrix, you can issue your own traffic simulation query to be tested against the policy. When running a traffic simulation query on a group or matrix, AFA finds the devices in the path of the traffic, using the graphic network map, and queries all these devices. If traffic is blocked by the device, you can determine which rules block it. This provides you with a powerful help desk support functionality. Furthermore, using the traffic simulation query feature allows users to determine whether the devices are protecting the organization's networks against traffic from a new exploit, or which device is letting a particular type of traffic through.
NAT is fully supported for traffic simulation queries on groups of devices. When finding the devices in the path of the traffic for a group, AFA supports both NAT and Proxy ARP. AFA predicts the devices in the path and then validates the prediction with the query information. When the query information matches the path, the source and destination values for all relevant devices in the path are updated. When only part of the traffic is translated, the downstream devices are queried for both the pre- and post-NAT values. This produces an accurate query, where no relevant traffic is ignored. If you want to run a traffic simulation query, but you only know post-NAT values, you can look up the pre-NAT values with which to run the query. For details, see Find NAT values.
AFA additionally provides the option to run a routing query to determine the devices in the path, without policy simulation. Note that routing queries ignore NAT. For details, see Run a routing query.
Run traffic simulation queries on individual devices
AFA enables you to run a traffic simulation query on an individual device's current or past policy.
Do the following:
-
Verify your permissions. To run a successful query, you must have access to all the firewalls that are relevant for your query results path. Queries will fail if the query goes through a non-permitted device.
Users with permissions to view an entire group can run queries on the group. If you do not have permission to view a group of devices, or the ALL_FIREWALLS group, we recommend that you perform single-device queries on the devices you have permissions to view. For more details, see Run traffic simulation queries on groups.
-
View a device report, as follows:
Run a query on a device's latest policy View the device, and then continue with step 3. Run a query on an earlier version of the device policy View the device and click the Reports tab.
There, select the report for the time you want to query, and continue with step 3.
-
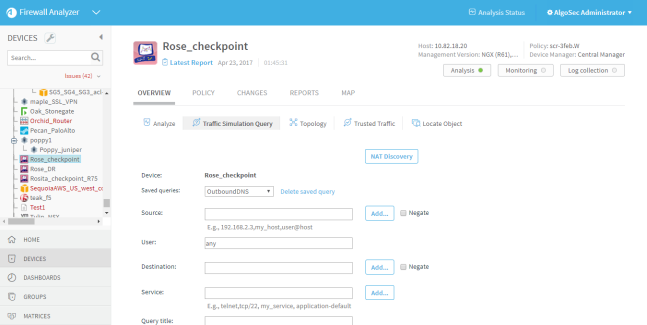
Click Traffic Simulation Query.
The Traffic Simulation Query page appears.
-
To load a saved query, select the desired query in the Saved queries drop-down list.
The fields are populated with the saved query's data.
For information on saving queries, see Save traffic simulation queries.
-
Specify the source and destination, by doing one or more of the following:
Note: For Cisco ACI, when you specify TSQ source and destination, either use the EPG name, any host IP that is currently part of the EPG, or the first IP in the subnet.
Specify a source/destination that is not defined in AFAEnter an IP address, IP address range, CIDR, or host group name in the relevant field (Source or Destination).
You can specify multiple sources/destinations by separating them with commas.
Specify a source/destination already defined in AFADo the following:
-
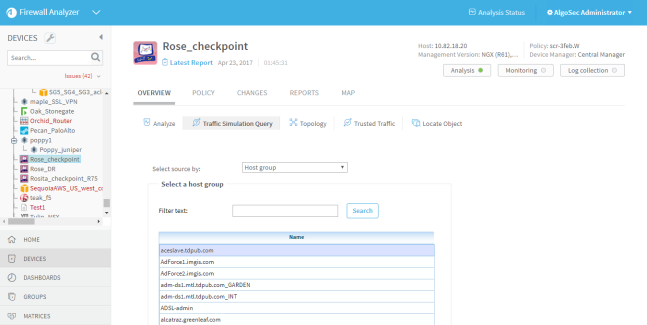
Click Add to the right of the desired field (Source or Destination).
The Add source or Add destination dialog box appears.
-
Specify the desired source or destination.
You can select either an individual IP address, a range of IP addresses, CIDR, or a host group that is defined on the device. If you wish to select a host group, you can search the defined names alphabetically, or by using the search filter.
-
Click OK.
You can specify multiple sources/destinations, by repeating this step.
Note: You can run a query for the source/destination that you specify, or the negation of the source/destination that you specify (all IPs other than the source/destination that you specify).
-
-
To negate the source and/or destination that you specified, select the Negate check box to the right of the desired field.
If you specified multiple IP addresses, IP address ranges, and/or hostgroups, the union of these values is negated.
-
Specify the service by doing one or more of the following:
Specify a service that is not defined in AFAIn the Service field, type the desired service's definition.
You can query multiple services by separating them with commas. For example: "tcp/123, udp/9911".
Specify a service that is already defined in AFADo the following:
-
To the right of the Service field, click Add.
The Select Service dialog box appears.
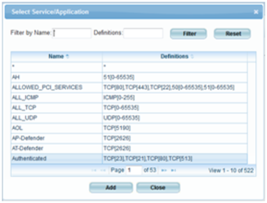
- You can filter the information displayed in the list, by doing one or more of the following:
- To filter the information displayed in the list by service name, type the desired service name in the Filter by Name field, and then click Filter.
- To filter the information displayed in the list by service definition, type the desired service definition in the Definitions field, and then click Filter.
To clear the filter, click Reset.
- Select the desired service.
-
Click Add.
You can specify multiple services, by repeating this step.
-
- (Optional) In the Query title field, type a name for the query.
-
Click Run Query.
A new window opens displaying the query results.
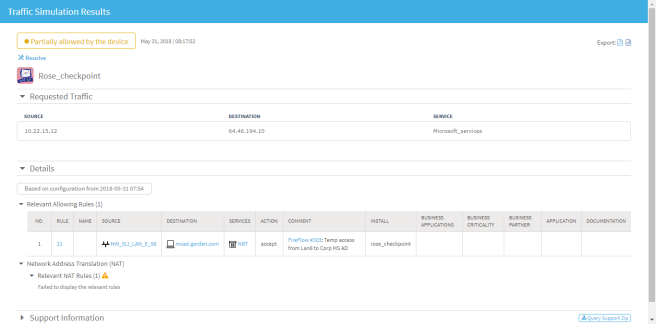
The Details area displays the query results. The fields that appear for each rule depends on the device brand. If AppViz is licensed, fields from AppViz appear, indicating business information such as which rules are included as flows in which applications.
If NAT is performed by the device, the NAT rules appear in tooltips in the map. For Check Point and Cisco ASA devices which perform NAT, a table of applied NAT rules appears below the map.
- To open a FireFlow change request to allow the blocked traffic or block the allowed traffic, do the following:
Click
 .
.The New Change Request window appears.
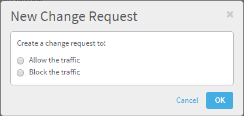
If the result of the query is Blocked, the change request will open the traffic. If the result of the query is Allowed, the change request will block the traffic. If the result of the query is Partially Allowed, you are prompted to chose whether to allow or block traffic.
- If the result of the query is Partially Allowed, select whether to block or allow the traffic.
Click OK.
The change request is opened. Once the change request is successfully created, a link to the change request appears.
By default, the change request will use the default traffic change request template (which is the Standard template, by default).
-
To export the query results to PDF, click
 in the top-right corner of the report. For more details, see Export AFA screens to PDF.
To export to CSV format, click
 in the top-right corner of the report. Follow your browser prompts to open or save the CSV file.
Run traffic simulation queries on groups
When running traffic simulation queries on device groups, AFA finds the devices in the path of the query by simulating routing and NAT across the entire network. AFA then simulates the policy on each relevant device to determine if it blocks or allows the traffic that reaches it.
AFA uses the graphic network map when querying groups; therefore, it is important to ensure that the map is correct. For details, see AFA's graphic network map.
To run a traffic simulation query on a group:
-
Verify your permissions. To run a successful query, you must have access to all the firewalls that are relevant for your query results path. Queries will fail if the query goes through a non-permitted device.
Users with permissions to view an entire group can run queries on the group. If you do not have permission to view a group of devices, or the ALL_FIREWALLS group, we recommend that you perform single-device queries on the devices you have permissions to view. For more details, see Run traffic simulation queries on individual devices.
- Do one of the following. For details, see View AFA group data.
- To run a query on a group's latest policies, view the desired group.
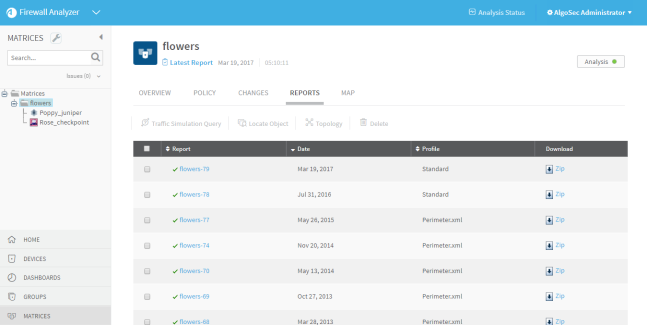
- To run a query on a group's older policies:
- View the desired group.
Click the Reports tab.
The Reports page appears.
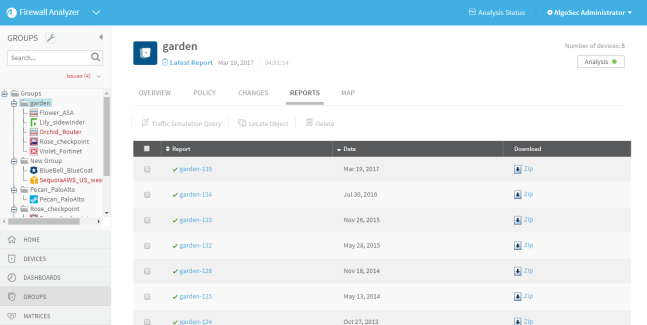
- Select the check box next to the desired report.
-
Click Traffic Simulation Query.
The Traffic Simulation Query page appears.
-
To load a saved query, select the desired query in the Saved queries drop-down list.
The fields are populated with the saved query's data.
For information on saving queries, see Save traffic simulation queries.
-
Specify the source and destination, by doing one or more of the following:
Note: For Cisco ACI, when you specify TSQ source and destination, either use the EPG name, any host IP that is currently part of the EPG, or the first IP in the subnet.
Specify a source/destination that is not defined in AFAEnter an IP address, IP address range, CIDR, or host group name in the relevant field (Source or Destination).
You can specify multiple sources/destinations, by separating them with commas.
Specify a source/desintation that is already defined in AFADo the following:
-
Click Add to the right of the desired field (Source or Destination).
The Add source or Add destination dialog box appears.
-
Specify the desired source or destination.
You can select either an individual IP address, a range of IP addresses, CIDR, or a host group that is defined on the device. If you wish to select a host group, you can search the defined names alphabetically, or by using the search filter.
-
Click OK.
You can specify multiple sources/destinations, by repeating this step.
Note: You can run a query for the source/destination that you specify, or the negation of the source/destination that you specify (all IPs other than the source/destination that you specify).
-
-
To negate the source/destination that you specified, select the Negate check box to the right of the desired field.
If you specified multiple IP addresses, IP address ranges, and/or hostgroups, the union of these values is negated.
-
Specify the service by doing one or more of the following:
Specify a service that is not defined in AFAIn the Service field, type the desired service's definition.
You can query multiple services by separating them with a comma. For example: "tcp/123, udp/9911".
Specify a service already defined in AFADo the following:
-
To the right of the Service field, click Add.
The Select Service window appears.
- You can filter the information displayed in the list, by doing one of the following:
- To filter the information displayed in the list by service name, type the desired service name in the Filter by Name field, then click Filter.
- To filter the information displayed in the list by service definition, type the desired service definition in the Definitions field, then click Filter.
To clear the filter, click Reset.
- Select the desired service.
-
Click Add.
You can specify multiple services, by repeating this step.
-
- (Optional) In the Query title field, type a name for the query.
-
(Optional) To specify that query results should be grouped by policy, and only one device should be displayed per policy, select the Group by Policy check box.
This option is only available if grouping query results by policy is enabled in the system.
-
Click Run Query.
A new window opens displaying the query results.
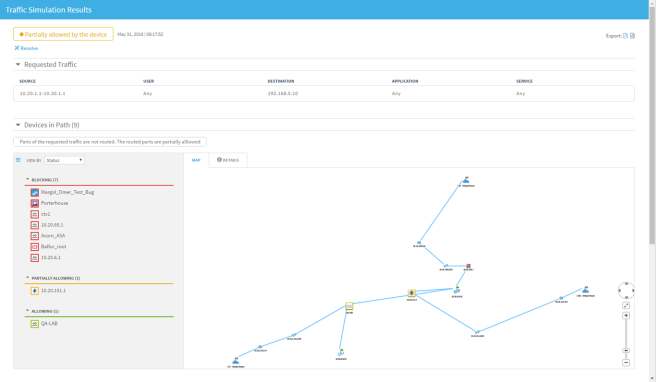
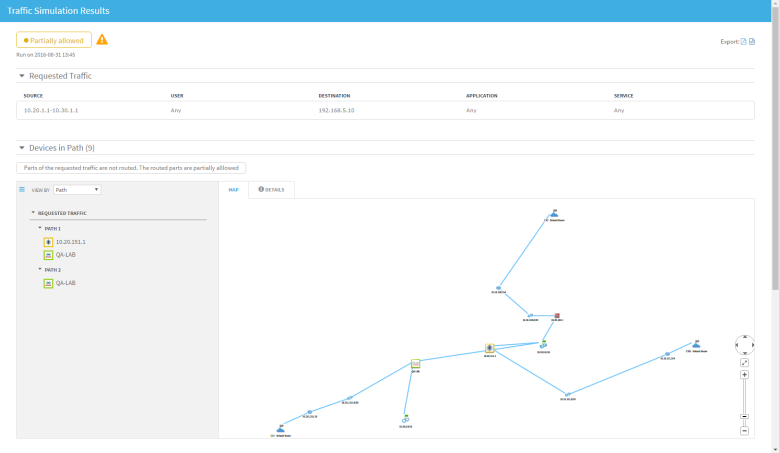
The list of devices and the graphic network map appear. In both the map and the list, a colored box around each device indicates whether traffic is allowed (green), blocked (red), or partially allowed through the device (yellow). Clicking on a device in the list will shift the map's focus to that device.
The list of devices appears sorted by Status: Blocking, Partially Allowing or Allowing. Details for each device and any support information appears at the bottom of the page.
Note: When the path of the query intersects an IP addresses in a host-based device, the device is represented in the results map. For VMware NSX or Cisco ACI, the device and relevant IP address is always represented by a single icon. For AWS and Azure, the individual internal elements (such as VPC / VNet routers) may additionally appear in the map.
In the map, the sources are marked with a green flag
 , and destinations are marked with a checkered flag
  . The path between each source and destination is marked in blue. You can zoom in, zoom out, resize the graphic network map to fit the screen, and pan the view. For details, see AFA's graphic network map.
The map indicates if they perform NAT with a NAT icon. Hovering over NAT devices displays the translation information for source and destination. Additionally, a table of applied NAT rules is displayed. If NAT is performed before traffic reaches a device, the results specify that the source and/or destination was modified before reaching the device.
Note: If you ran the query from the Groups tab, the query result is also stored and attached to the report. To view it later, go to the Policy page in the report. If you specified a query title, then this title will be shown in the Policy page. Otherwise a default title is selected.
-
To view the list of devices by Path, in the View By drop-down list, select Path.
The devices appear according to relevant traffic paths. Each device in the path appears sequentially, from source to destination.
- Right click on the map frame to see (depending upon the device type) the following selections:
- Routing Information
- Connectivity Diagram
- Latest Report
- To open a FireFlow change request to allow the blocked traffic or block the allowed traffic, do the following:
Click
.The New Change Request window appears.
If the result of the query is Blocked, the change request will open the traffic. If the result of the query is Allowed, the change request will block the traffic. If the result of the query is Partially Allowed, you are prompted to chose whether to allow or block traffic.
- If the result of the query is Partially Allowed, select whether to block or allow the traffic.
Click OK.
The change request is opened. Once the change request is successfully created, a link to the change request appears.
By default, the change request will use the default traffic change request template (which is the Standard template, by default).
-
To export the query results to PDF, click
in the top-right corner of the report. For more details, see Export AFA screens to PDF.To export to CSV format, click
in the top-right corner of the report. Follow your browser prompts to open or save the CSV file.
Run traffic simulation queries on matrices
Running a traffic simulation query on a generated matrix analysis report enables you to do the following:
- Determine whether a specific type of traffic is allowed or blocked through the network.
- View the traffic type's returning path across the devices.
- View a list of rules in each device that allow or block the traffic type.
To run a traffic simulation query on a matrix:
- Do one of the following. For details, see View AFA matrix data.
- To run a query on a matrix's latest policies, view the desired matrix.
- To run a query on a matrix's older policies, do the following:
- View the desired matrix.
Click the Reports tab.
The Reports page appears.
- Select the check box next to the desired report.
-
Click Traffic Simulation Query.
The Traffic Simulation Query page appears.
-
To load a saved query, select the desired query in the Saved queries drop-down list.
The fields are populated with the saved query's data.
For information on saving queries, see Save traffic simulation queries.
-
Specify the source and destination, by doing one or more of the following:
Note: For Cisco ACI, when you specify TSQ source and destination, either use the EPG name, any host IP that is currently part of the EPG, or the first IP in the subnet.
Note: You can run a query for the source/destination that you specify, or the negation of the source/destination that you specify (all IPs other than the source/destination that you specify).
- To specify a source/destination that is already defined in AFA:
Click Add to the right of the desired field (Source or Destination).
The Add source or Add destination dialog box appears.
Specify the desired source or destination.
You can select either an individual IP address, a range of IP addresses, CIDR, or a host group that is defined on the device. If you wish to select a host group, you can search the defined names alphabetically, or by using the search filter.
Click OK.
You can specify multiple sources/destinations, by repeating this step.
-
To specify a source/destination that is not defined in AFA, type an IP address, IP address range, CIDR, or host group name in the relevant field (Source or Destination).
You can specify multiple sources/destinations, by separating them with commas.
- To specify a source/destination that is already defined in AFA:
-
To negate the source/destination that you specified, select the Negate check box to the right of the desired field.
If you specified multiple IP addresses, IP address ranges, and/or hostgroups, the union of these values is negated.
- Specify the service, by doing one or more of the following:
- To specify a service that is already defined in AFA:
To the right of the Service field, click Add.
The Select Service window appears.
- You can filter the information displayed in the list, by doing one of the following:
- To filter the information displayed in the list by service name, type the desired service name in the Filter by Name field, then click Filter.
- To filter the information displayed in the list by service definition, type the desired service definition in the Definitions field, then click Filter.
To clear the filter, click Reset.
- Select the desired service.
Click Add.
You can specify multiple services, by repeating this step.
To specify a service that is not defined in AFA, in the Servicefield, type the desired service's definition.
You can query multiple services by separating them with a comma. For example: "tcp/123, udp/9911".
- To specify a service that is already defined in AFA:
-
(Optional) In the Query title field, type a name for the query.
-
Click Run Query.
A new window opens displaying the query results.
The Details area displays the query results. The fields that appear for each rule depends on the device brand. If AppViz is licensed, fields from AppViz appear, indicating business information such as which rules are included as flows in which applications.
If NAT is performed by the device, the NAT rules appear in tooltips in the map. For Check Point and Cisco ASA devices which perform NAT, a table of applied NAT rules appears below the map.
Note: If you ran the query from the Matrices tab, the query result also is stored and attached to the report. To view it later, go to the Policy page in the report. If you specified a query title, then this title will be shown in the Policy page. Otherwise a default title is selected.
-
To export the query results to PDF, click
in the top-right corner of the report. For more details, see Export AFA screens to PDF.To export to CSV format, click
in the top-right corner of the report. Follow your browser prompts to open or save the CSV file.
Save traffic simulation queries
Some traffic simulation queries are repeated often. AFA allows saving the source, destination, service and title values of such queries, and then reloading them when they are needed again. The saved queries are kept for each user individually, for maximum customization. Saved queries can be used for both single device queries and group queries.
To save a traffic simulation query:
- Fill in the query form.
-
Click Save Query.
The Save Query As window appears.
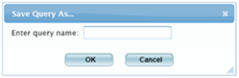
- In the field, type a name for the query.
-
Click OK.
The query is saved.
Delete saved traffic simulation queries
To delete a saved traffic simulation query:
- Access the query form.
- In the Saved queries list, select the desired query.
-
Click Delete saved query.
The query is deleted.
Find NAT values
AFA provides the ability to look up all the potential translations to and or from an IP address. This is particularly useful if you want to run a traffic simulation query, but you only know a post-NAT value. You can look up the pre-NAT value(s) with which to run the query.
Note: The results of this search include all possible translations across all NAT rules and configurations.
- View the desired device. For details, see View AFA device data.
-
Click Traffic Simulation Query.
The Traffic Simulation Query page appears.
-
Click
 .
.The Discover NAT Assistant dialog box appears.
- In the Type a single IP field, type a single IP address.
- Using the IP address can be check boxes, indicate whether the IP address can be a Pre-NAT value, Post-NAT value, or both.
- Using the Discover NAT address in check boxes, indicate whether the IP address can be a Source, Destination, or both.
-
Click Discover.
The results appear.
The results indicate the device name, the potential pre- and post-NAT values, and whether the NAT is static or dynamic.
Run a routing query
Run a routing query to see the devices in the path of a route without policy simulation.
Note: When running a routing query, NAT is ignored.
Note: Traffic simulation queries include policy simulation and take NAT into account. Consequently, they produce a more accurate path when NAT is involved (especially for a group of devices). For details, see Run traffic simulation queries.
To run a routing query:
- View the graphic network map. For details, see AFA's graphic network map.
-
Click Routing Query.
The Routing Query dialog box appears.
-
In the Source field, type the relevant IP address or CIDR.
Note: IP ranges are not a supported format for this field.
-
In the Destination field, type the relevant IP address or CIDR.
Note: IP ranges are not a supported format for this field.
-
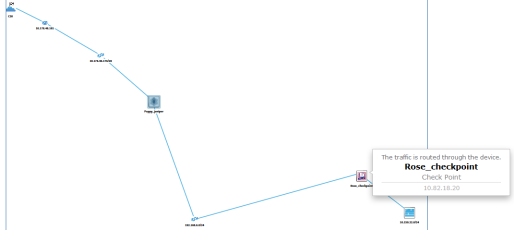
Click Run Query.
The results appear in a new window. The path of the traffic is highlighted in blue on the graphic network map. When hovering over the route, all devices in the path display a tooltip that states "Traffic is routed through this device".