
To deploy
As a Chat Bot, AlgoBot has to be notified of any new messages that the users may send over one of the supported chat platforms. To integrate
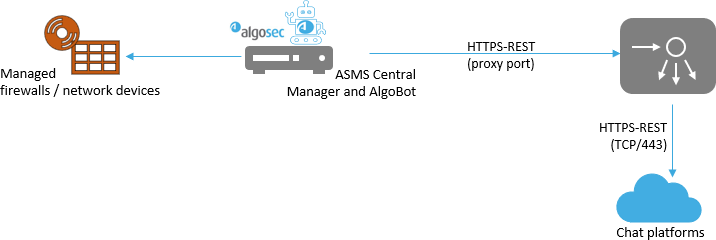
| Internet access |
The Verify also that you have the following connectivity:
Unauthenticated proxies are supported if needed. For details, see the diagrams below: |
Permissions | You must have administrator privileges and access to authorize |
| DNS | The |
| Installation files | To obtain |
Install
Click this link to Slack or navigate to https://lyfwzqae36.execute-api.us-west-1.amazonaws.com/production/slack/ to install AlgoBot on Slack.
Click Allow.
Continue with
Use the Microsoft App Studio app to install
On Microsoft Teams,
Use one of the following options to configure
ngrok is a useful tool to create secure tunnels to locally hosted applications using a reverse proxy. Microsoft recommends ngrok in their documentation.
ngrock Subscription Levels:
The Basic level provides a stable custom endpoint. For example, during ASMS upgrades and reboots, Teams will maintain endpoint settings. The Basic level is recommended for a production environment.
Using the Free level, the endpoint needs to be manually updated after ASMS upgrades and reboots. The Free level is more suitable for a demo/testing environment.
Pricing: See ngrok pricing ![]() (for Basic level).
(for Basic level).
Install and configure ngrok for use with
Download ngrok for Linux from the ngrok download ![]() page to your ASMS machine.
page to your ASMS machine.

Extract ngrok-stable-linux-amd64.zip to the /home/afa folder.
On the ngrok website ngrok.com![]() , log in to your ngrok subscription.
, log in to your ngrok subscription.
On the Authentication tab, select Your Authtoken sub-tab.
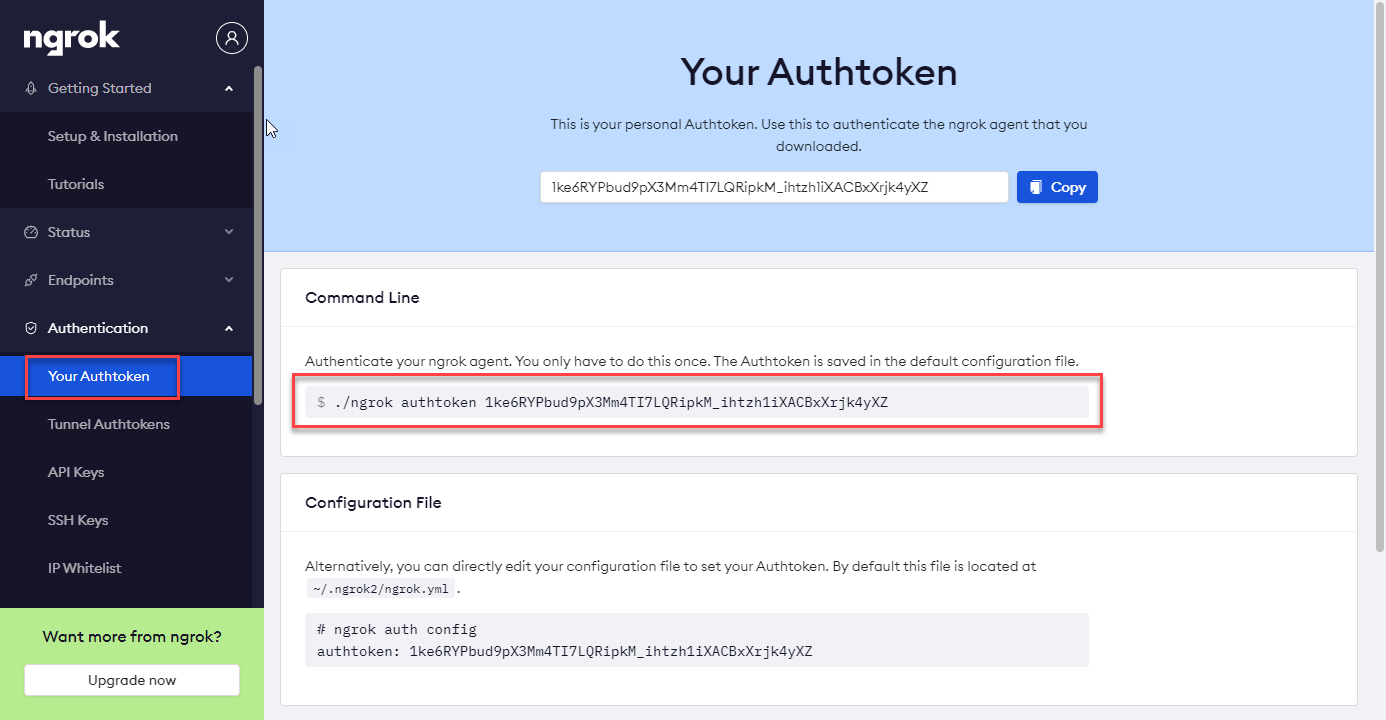
Copy the Authtoken script from the Command Line section:
./ngrok authtoken <Your Authtoken>
Paste to the command line on the ASMS machine, and run the command.
For the Basic subscription, run the following command using a unique name for the subdomain:
./ngrok http -subdomain=<unique name> 5000
For example, ngrok http -subdomain=algobot.companyName 5000
For the Free subscription level, run the following command:
./ngrok http 5000
Note the https endpoint provided by ngrok, and save it for later.
TunnelRelay is a Microsoft OpenSource project to allow bots running from internal networks to respond to messages from Microsoft Teams.
TunnelRelay cannot currently run on
Install and configure TunnelRelay for use with
Run the TunnelRelay.Console executable. Follow the on-screen instructions to enable TunnelRelay and connect it to your Azure subscription.
Use your Microsoft Azure credentials to log TunnelRelay into your account. Select the relay you created in step a.
Continue with step 2.
Extract the algobot-<version #>.zip file you downloaded from the
In this filename, the <version> value may change with each
In Microsoft Teams, in the App Studio app, do the following:
Click Capabilities > Bots > Set up. On the New bot tab, do the following:
A new bot ID value is displayed. Copy it and save it for later.
In the App Passwords section on the Bots tab, click Generate New Password.
Copy the generated password and save it for later.
This password is used by Microsoft to cryptographically sign incoming messages, and by
In the Messaging Endpoint section on the Bots tab, update the URL used to access
For example, if you created a ngrok tunnel using ngrok .com, the Messaging Endpoint will be similar to the following:
https://0a065b29d1e6.ngrok.io
Continue on this page with
| Skype online |
Navigate to Welcome to AlgoBot Installation Skype For Business version, and follow the instructions. After completing step 1, you will have a file named algobot-s4b-ucwa-credentials.json. Save this file on the |
| Skype on-premises |
Do the following:
Note the |
Once complete, continue with
After installing
 .
.To extract the installation files, run:
unzip /tmp/algobot-<version #>.zip -d /home/afa
where the <version> value differs with with each
The following responses appear:
Archive: /tmp/algobot-<version #>.zip creating: /home/afa/algobot/
inflating: /home/afa/algobot/algobot-version.txt inflating: /home/afa/algobot/algobot
Navigate into the
./algobot <platform> --config
where <platform> is one of the following, depending on your chat platform:
Follow the on-screen instructions and enter the details as needed.
You saved some of these details when you performed the procedures above:
Some values have defaults already configured. To use the default value, press ENTER when relevant.
Some steps will prompt you for optional configurations, as follows:
The CLI will ask whether a proxy configuration is needed for your installation.
The default value is no, or no proxy.
To configure a proxy, enter yes instead, and then enter the proxy URL and port. The proxy URL must include the http:// or https:// prefix.
The proxy will be used for both HTTPS and the HTTP proxy for
The default number of concurrent command is 7.
To modify this number, enter a different number of concurrent commands to support. To modify this value later on, re-run the configuration as needed.
The CLI will prompt you to customize the set of commands exposed to end-users.
Unless you have a specific need for your organization, we recommend entering no, and enabling
To support multiple
The following is a sample CLI output for installing
######################## ALGOBOT BACKEND SETUP ######################## [PRESS ENTER WHEN READY]
AlgoSec server IP [127.0.0.1]: AlgoSec user: admin
AlgoSec password:
BOT_TOKEN: xoxb-162846395123-veXbEQ1Xk1g
BOT_ID: U4SQWB
Number of concurrent command handlers [7]:
Would you like to configure custom proxy settings? [y/N]: y
Proxy url: https://my.proxy.net
Proxy port: 8080
Would you like to customize the commands AlgoBot will show to users? [y/N]: ######## Config creation finished ########
Thanks! config file created at /home/afa/algobot/algobot-slack.conf
You can re-configure any of the options above by running the AlgoBot again with '--config' option
Please re-run the script to use the new config
Start
./algobot <platform>&
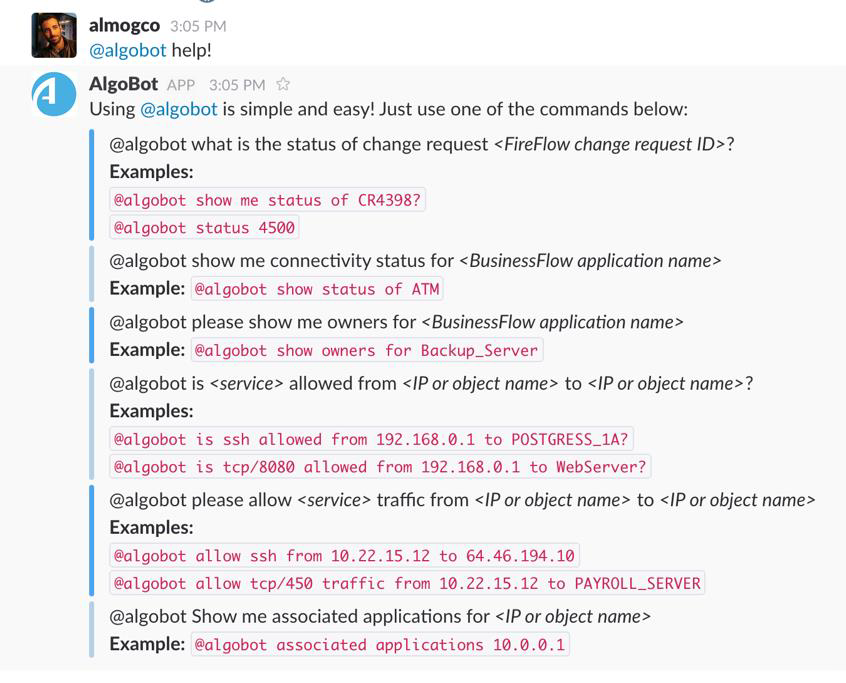
Chat with
Language support: If you’re typing in English, German, French, or Portuguese, AlgoBot will attempt to recognize the language and reply in kind. By default, AlgoBot replies in English.
Make sure that you have run an analysis in
For example:
The following sections describe how to maintain and troubleshoot your
A set of log and configuration files are saved for each chat platform, with the platform name, such as slack, as part of the filename.
Each set includes the following files:
| algobot-<platform>.conf | The configuration data generated as part of the installation and configuration process. |
| algobot-<platform>.log |
General logs, commands, and errors. If you need to contact |
| utilization-<platform>.log | A synthesized, clear log of the commands used in |
To update an existing
No additional configuration is required.
Run multiple AlgoBot instances on a single machine
To support multiple
./algobot --config-path /some/path.conf
where /some/path.conf is the path and filename of a separate configuration file. When run using this syntax, the CLI prompts you to create the defined configuration instead of the default.
For example:
algobot slack --config-path /path/to/config1 algobot slack --config-path /path/to/config2
Alternately, use the linux alias command to match each
For example:
alias algobot-team1=”~/algobot/algobot slack --config-path /path/to/config1” alias algobot-team2=”~/algobot/algobot slack --config-path /path/to/config2”
Then, run algobot-team1 to launch this instance.