
Manage workflow actions
Add workflow actions
Do the following:
-
In the VisualFlow main menu, click Workflows.
The List of Workflows page is displayed.
-
Do one of the following:
- Click on the desired workflow's name.
- Next to the desired workflow, click Edit.
The Edit Workflow page opens with the workflow's details.
-
Do one of the following:
In the VisualFlow main menu, click Actions.The Available actions page is displayed with a list of actions used in the workflow.
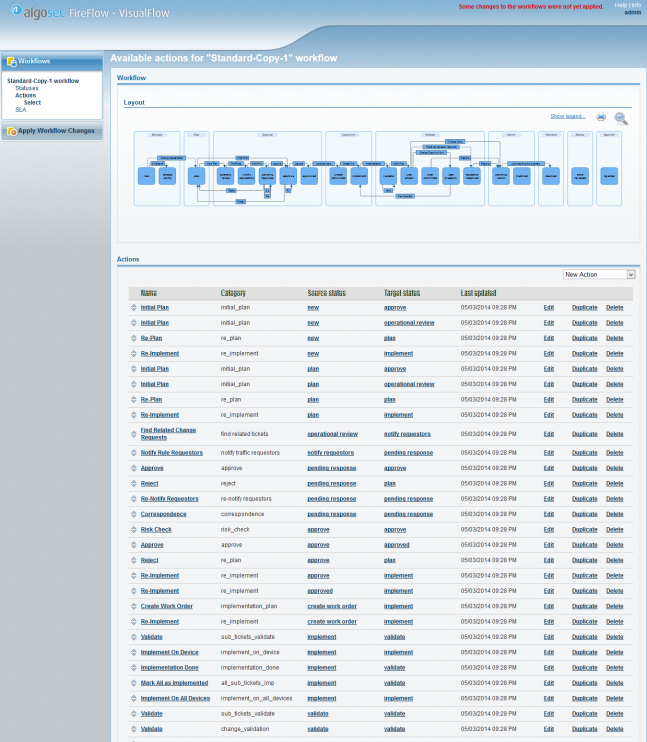 In the workflow layout, click on a status to which you want to add an action.
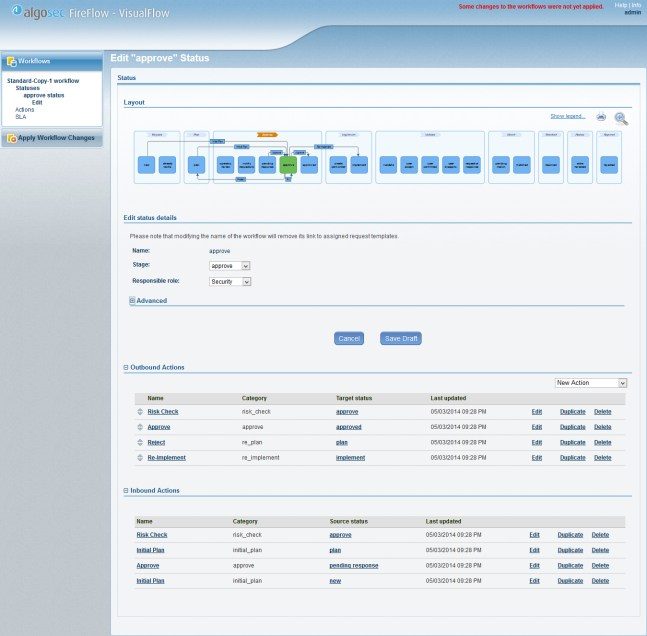
The Edit Status page is displayed with a list of inbound and outbound actions for the status.
-
Do one of the following:
Add a new action from scratch, in the New Action drop-down list, select the new action's typeAn action's type describes what it does. For more details, see Action Type.
Add a new action that is based on an existing action-
Next to the desired existing action, click Duplicate.
A confirmation message appears.
-
Click OK.
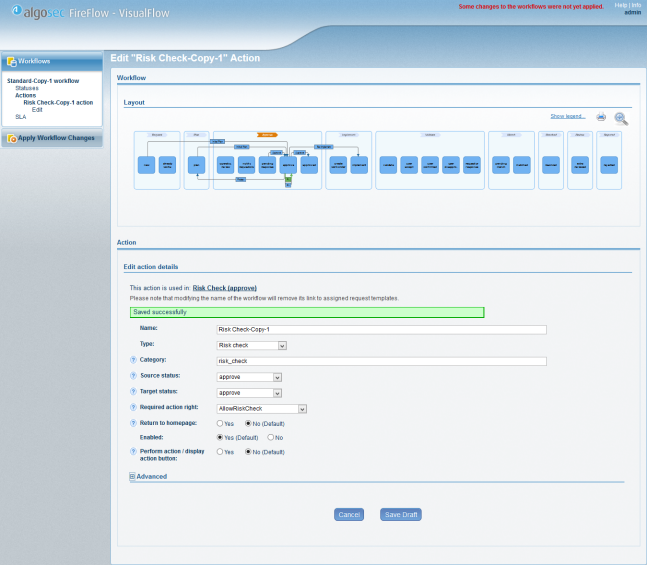
The new action is named OriginalAction-Copy-Number, where:
- OriginalAction is the name of the action you copied.
- Number is a number used to differentiate between copies of the duplicated action.
For example, if you duplicated an action called Risk Check, and there is already an action called Risk Check-Copy-1, then the new action will be called Risk Check-Copy-2.
The Edit Action page is displayed.
-
-
Complete the fields using the information in Action Fields (see Action Fields ).
-
If you set the Parallel field to Yes, set the action's responsible roles by doing the following:
-
Click the Set responsible roles link.
The Responsible roles dialog box appears.
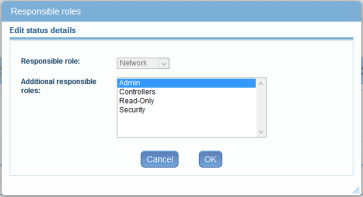
The Responsible role field displays the user role responsible for change requests in this status.
-
In the Additional responsible roles list, select the additional user roles responsible for change requests in this status.
To select multiple user roles, press Ctrl while you click on the desired user roles.
-
Click OK.
-
-
Click Save Draft.
The action is added to the list of actions.
|
This action type... |
Does this... |
|---|---|
|
Change status |
Changes the status of the change request. |
|
Internal comment |
Adds a comment to the change request that is hidden from the requestor. |
|
Reply to user |
Adds a comment to the change request that is seen by the requestor. Includes sending an email to the requestor. Includes sending an email to the requestor. |
|
Modify custom field |
Allows a user to modify one or more custom fields. |
|
Authenticate with custom field |
Allows a user to modify one or more custom fields as "Modify custom field" action, but in addition it requests from the user to re-enter their password and verify it. Fill in this action with the following data: |
|
Take ownership |
Assigns the user ownership of a change request. |
|
Assign |
Allows a user to assign ownership of a change request to another user. |
|
Initial plan |
Performs initial planning. Relevant only for traffic change requests. It is recommended to consult with AlgoSec before using this action type. |
|
Risk check |
Performs a risk check. Relevant only for traffic change requests. It is recommended to consult with AlgoSec before using this action type. |
|
Implementation plan |
Creates a work order. It is recommended to consult with AlgoSec before using this action type. |
|
Manual reconcile |
Opens a dialog box that allows a user to manually match the change request with a change record. Relevant only for traffic change requests. It is recommended to consult with AlgoSec before using this action type. |
|
No change record |
Opens a dialog box that allows a user to manually match the change request, while specifying that there is no associated change record. Relevant only for traffic change requests. It is recommended to consult with AlgoSec before using this action type. |
|
Change validation |
Performs validation of a traffic change request. Relevant only for traffic change requests. It is recommended to consult with AlgoSec before using this action type. |
|
Review work order |
Enables a user to view an existing work order and edit it. Relevant controls will appear in the UI only for Check Point and Juniper devices. Relevant only for traffic change requests. It is recommended to consult with AlgoSec before using this action type. |
|
Active change |
Enables a user to implement planned changes via ActiveChange. Relevant controls will appear in the UI only for supported devices and supported workflows. |
|
Object change validation |
Performs validation of an object change request. Relevant only for object change requests. It is recommended to consult with AlgoSec before using this action type. |
|
Affected rules |
Finds affected rules for an object change request. Relevant only for object change requests. It is recommended to consult with AlgoSec before using this action type. |
|
Related tickets |
Finds change requests that are related to a change request. Relevant only for rule removal requests. It is recommended to consult with AlgoSec before using this action type. |
|
Notify requestors |
Enables a user to notify other users regarding the impending removal/disablement of a device rule. Relevant for rule removal requests only. It is recommended to consult with AlgoSec before using this action type. |
|
View correspondence |
Allows a user to view correspondences with other users regarding the impending removal/disablement of a device rule. Relevant only for rule removal requests. It is recommended to consult with AlgoSec before using this action type. |
|
Rule removal validation |
Performs validation of a rule removal request. Relevant only for rule removal requests. It is recommended to consult with AlgoSec before using this action type. |
|
In this field... |
Do this... |
|---|---|
|
Name |
A unique key value for the action. Used when the action's behavior is to be overridden for a specific status. This field is mandatory. It is only available when working with a workflow's list of actions. |
|
Type |
Select the action's type, which describes what it does. See Action Types (see Action Type). This field is mandatory. It is only available when working with a workflow's list of actions. |
|
Category |
Type the action's category. You can create categories and assign similar actions to them. When editing an action, the Edit action details area will display links to other actions belonging to the same category. |
|
Source status |
Use the fields in this area to specify the status or statuses from which the change request must transition, before this action can be performed. |
|
Target status |
Use the fields in this area to specify the status or statuses to which the change request will transition when the action is performed. |
|
Required action permission |
Specify whether the user must be granted a specific permission, in order for the action to appear for each change request in a drop-down list, by selecting the relevant permission. Note: This is a cosmetic issue only. Actions that require the user to have a specific permission will not succeed if the user does not have the permission. |
|
Return to homepage |
Specify whether the user should be re-directed to the Home page after executing the action, by choosing one of the following:
The default value is No. |
|
Enabled |
Specify whether this action should be enabled, by choosing one of the following:
The default value is Yes. |
|
Perform action/ display action button |
Specify whether the action should be available via an explicit button, by choosing one of the following:
The default value is No. Note: When the Risk check and Implementation plan actions are configured to run asynchronously, there is no action button for these actions, and this field specifies whether asynchronous computation should begin when the change request reaches the source status of the action. This is the default configuration. |
|
Advanced |
Expand this area to display the Advanced fields. |
|
Conditional target status |
Use the fields in this area to specify a set of conditional target statuses that the change request can transition to. FireFlow will check the conditions in the order listed; therefore, if the first condition is met, FireFlow will not check the second condition, and so on. If none of the conditions are met, the change request will transition to the status specified in the Edit action details area's Target status field, by default. |
|
Target status |
Select a new status that the change request should transition to when the action is performed, if the condition(s) in the Condition field are met. |
|
Condition |
Type an XQL query specifying the conditions under which the change request will transition to the status specified in the Target Status field. For example, to specify the condition that the number of risks must be zero, type: Ticket[RisksNumber = "0"] For more details, see Action condition syntax. |
|
Message to user |
Type a message that should appear onscreen when transitioning to the new status. |
|
+ |
Click this button to add another conditional target status. |
|
Parallel |
Specify whether the action will be performed in parallel to a second, identical action. Choose one of the following:
The default value is No. It is possible to add more parallel action logic. For details, see Add parallel action logic. This field is enabled only for statuses of the following types: Change status, Internal comment, and Reply to user. |
|
action completed when |
The strategy used to determine whether the parallel action has been completed. To specify that the action should be considered completed only when all responsible roles have performed it, select all. If desired, you can configure other strategies. For example, you can configure a strategy specifying that if a specific role performs the action, then the action should be considered completed; otherwise, FireFlow should wait for all other roles to perform the action. For information on configuring additional strategies, contact AlgoSec. |
|
Perform action/ display action button when field is empty |
Specify whether the action should be available via an explicit button only if a specific change request field is empty, by selecting the relevant change request field. Note: When the Risk check and Implementation plan actions are configured to run asynchronously, there is no action button for these actions, and this field specifies whether asynchronous computation should begin when the change request reaches the source status of the action if the specific change request field is empty at that time. This is the default configuration. |
|
Display action button when current user is the owner |
Specify whether the action should be available via an explicit button only if the current user is the change request's owner. Choose one of the following:
The default value is No. Note: When the Risk check and Implementation plan actions are configured to run asynchronously, there is no action button for these actions, and this field specifies whether asynchronous computation should begin when the change request reaches the source status of the action (regardless of the current user). This is the default configuration. |
|
Display action button when current user is not the owner |
Specify whether the action should be available via an explicit button only if the current user is not the change request's owner. Choose one of the following:
The default value is No. Note: When the Risk check and Implementation plan actions are configured to run asynchronously, there is no action button for these actions, and this field specifies whether asynchronous computation should begin when the change request reaches the source status of the action (regardless of the current user). This is the default configuration. |
|
Perform action/ display action button when change request is unassigned |
Specify whether the action should be available via an explicit button only if the change request is not assigned to a user. Choose one of the following:
The default value is No. Note: When the Risk check and Implementation plan actions are configured to run asynchronously, there is no action button for these actions, and this field specifies whether asynchronous computation should begin when the change request reaches the source status of the action, if the change request is not assigned to a user at that time. This is the default configuration. |
|
Perform action/ display action button when field value is true |
Specify whether the action should be available via an explicit button only if a specific change request field's value is "true", by selecting the relevant change request field. Note: When the Risk check and Implementation plan actions are configured to run asynchronously, there is no action button for these actions, and this field specifies whether asynchronous computation should begin when the change request reaches the source status of the action, if the specific change request field's value is "true" at that time. This is the default configuration. |
|
Perform action/ display action button when field value is one of the values listed |
Specify whether the action should be available via an explicit button only if a specific change request field's value is one of the values in the comma separated list of values. Note: When the Risk check and Implementation plan actions are configured to run asynchronously, there is no action button for these actions, and this field specifies whether asynchronous computation should begin when the change request reaches the source status of the action if the specific change request field's value is one of the values in the list at that time. This is the default configuration. |
|
Modify Field Title |
Type the message that should appear when this action is performed, instructing the user to complete the field specified in the Field Name field. This field is only relevant if the Type field's value is Modify custom field. |
|
Display action button if condition is true |
Type an XQL query specifying the conditions under which the action should be available via an explicit button. You can use the variable __CurrentUser__ to specify that a value in the condition should be the current user. For example, to specify that the requestor is not the current user, type: Ticket[Requestor/EmailAddress != "__CurrentUser__"] For more details, see Action condition syntax. |
|
Field Name |
If the action requires a field's value as input, select the field's name. To select multiple fields, hold down the CTRL key while clicking on the desired fields. This field is only relevant if the Type field's value is Modify custom field. |
|
Display in workflow layout |
Specify whether the action should be displayed in the workflow layout when viewing a workflow, by choosing one of the following:
The default value is No. Note: When viewing a status for which this action is an outbound action, the action will be displayed in the workflow layout, regardless of this attribute's value. |
|
Applies to change requests of type |
Select the check boxes next to the types of change requests for which the action is relevant, and for which the action should appear. This can be one or more of the following:
If you do not select any of the check boxes, the action will be relevant to all change request types. |
|
User confirmation needed |
Specify whether a confirmation message should appear when a user performs the action, by choosing one of the following:
The default value is No. |
|
Mail content |
Type the default text that will appear in the main message box when commenting on a change request or replying to the user. This field is relevant only for actions of the type Reply to user and Internal comment. |
|
Set 'auto-matching status' |
Specify whether after the action is performed, the change request's "auto-matching status" should be set to a specific value, and the change request should be displayed in the Auto Matching page, by selecting the relevant status. The default value is No. |
|
Traffic fields required |
Specify whether certain change request fields are mandatory, in which case if the fields are not filled in when the action is performed, a message will appear prompting the user to fill them in. The fields in question are:
Choose one of the following:
The default value is No. |
|
Hide from 'Other' actions menu |
Specify whether the action should not appear for each change request in a drop-down list. Choose one of the following:
The default value is No. |
|
Allow this action for unprivileged users |
Specify whether unprivileged users should be allowed to perform this action, by choosing one of the following:
The default value is No. |
|
Return to parent request |
Specify whether after the action is performed on a sub-request, the user should be redirected to the parent request, by choosing one of the following:
The default value is No. |
|
Return to homepage and display sub requests |
Specify whether after the action is performed on a parent request, the user should be redirected to the Home page, which displays a list of the parent request's sub-requests. Choose one of the following:
The default value is No. This field is relevant only for actions of the type Change status, Reply to user and Internal comment. |
|
Display action button when the user is assigned to the responsible role |
Specify whether the action should be available via an explicit button only if the current user is assigned the responsible role. Choose one of the following:
The default value is No. Note: When the Risk check and Implementation plan actions are configured to run asynchronously, there is no action button for these actions, and this field specifies whether asynchronous computation should begin when the change request reaches the source status of the action (regardless of the current user). This is the default configuration. |
Action condition syntax
In order to specify a condition under which a change request will transition to a new status when an action is performed, you must compose an XQL query. The XQL query can include the following:
| Elements |
An element may be any node in the XML of a change request, called a flat ticket. A flat ticket's root node is <Ticket>, which is written in an XQL query as Ticket. In order to specify a sub-node, use "/". For example, to specify a flat ticket's <Firewall> node, write: Ticket/Firewall You can use an asterisk "*" to specify a wildcard. For example, to specify any sub-node of Firewall, write: Ticket/Firewall/* |
| Filters |
In order to apply a condition to an element, use square brackets "[ ]" in the following format: Element[condition] Where condition is a sub-query specifying the desired condition. For example, to specify that the device brand must be Juniper Netscreen, write the following: Ticket/Firewall[Brand = "Juniper Netscreen"] |
| Comparison operators |
Elements in a sub-query may be compared via comparison operators in the following format: element operator "value" Where operator is a supported comparison operator, and value is the element's desired value. In the previous example, the sub-query used the = operator as follows: Brand = "Juniper Netscreen" |
| Boolean operators |
It is possible to use Boolean operators inside a sub-query. For example, the following query specifies that the change request must be assigned to the Standard workflow, and the status must be "new": Ticket[Workflow = "Standard" $and$ Status = "new"] For more intricate queries, you can use parentheses to group comparisons inside a sub-query. For example, the following query specifies that the change request must be assigned to the Standard workflow, and the change request status must be "new" or "plan". Ticket[Workflow = "Standard" $and$ (Status = 'new' $or$ Status = 'plan')] |
The following table lists the standard flat ticket nodes in alphabetical order.
Note: These nodes represent the various change request fields.
If you configured custom fields, there will also be a node for each custom field, and those nodes can be used as elements in XQL queries.
Flat Ticket Node reference
|
Node |
Description |
Sub-nodes |
|---|---|---|
|
Action |
The action to perform for the connection. Sub-node of PlannedTraffic and RequestedTraffic. |
If inclusion of user-defined custom traffic fields in flat tickets is enabled, then this node will have the following sub-nodes:
See Enabling/Disabling Inclusion of User-Defined Custom Traffic Fields in Flat Tickets (see Enable / disable inclusion of user-defined custom traffic fields in flat tickets). |
|
AffectedRulesResult |
The device rules that will be affected by the requested change. Sub-node of Ticket. Note: Relevant for object change requests only. |
None |
|
AlreadyWorksFirewalls |
The names of devices on which the requested change already works. Sub-node of Ticket. Note: Relevant for traffic change requests only. |
None |
|
AutomaticallyImplemented |
Indicates whether the requested change should be automatically implemented. Sub-node of Ticket. Note: Relevant for traffic change requests only. |
None |
|
Brand |
The device vendor. Sub-node of Firewall. |
None |
|
Cc |
Email addresses to which the FireFlow system will send copies of all email messages regarding this request. Sub-node of Ticket. |
None |
|
ChangeFullData |
The change description. Sub-node of Ticket. |
None |
|
ChangeImplementationNotes |
The change request's implementation notes, if the change request has completed the Implement stage. Sub-node of Ticket. Note: Relevant for traffic change requests only. |
None |
|
City |
The city in which the change request owner or requestor is located, depending on the parent node. Sub-node of Owner and Requestor. |
None |
|
ClosedAt |
The date and time when the change request was closed. Sub-node of Ticket. |
None |
|
CMSticketid |
The ID number of a related change request in an external change management system that is integrated with FireFlow. Sub-node of Ticket. |
None |
|
code |
The code number of a risk. Sub-Node of Risk. Note: Relevant for traffic change requests only. |
None |
|
Country |
The country in which the change request owner or requestor is located, depending on the parent node. Sub-node of Owner and Requestor. |
None |
|
Created |
The date and time when the change request was created. Sub-node of Ticket. |
None |
|
Createticketsfromattachment |
Indicates whether the change request was created from a file. Sub-node of Ticket. |
None |
|
Description |
The description of the change request. Sub-node of Ticket. |
None |
|
description |
The description of a risk. Sub-Node of Risk. Note: Relevant for traffic change requests only. |
None |
|
Destination |
The IP address, IP range, network, or device object. Sub-node of PlannedTraffic and RequestedTraffic. Note: Relevant for traffic change requests only. |
If inclusion of user-defined custom traffic fields in flat tickets is enabled, then this node will have the following sub-nodes:
See Enabling/Disabling Inclusion of User-Defined Custom Traffic Fields in Flat Tickets (see Enable / disable inclusion of user-defined custom traffic fields in flat tickets). |
|
Due |
The date by which this change request should be resolved. Sub-node of Ticket. |
None |
|
EmailAddress |
The email address of the change request owner or requestor, depending on the parent node. Sub-node of Owner and Requestor. |
None |
|
Expires |
The date on which this change request will expire. Sub-node of Ticket. |
None |
|
Firewall |
Information about the device on which the change will be implemented, if the change request has completed the Plan stage. Sub-node of Ticket. |
|
|
FormType |
The change request's form type (Traffic Change / Object Change / Generic Change). Sub-node of Ticket. |
None |
|
HomePhone |
The home telephone number of the change request owner or requestor, depending on the parent node. Sub-node of Owner and Requestor. |
None |
|
Id |
The ID number of the change request or the change request owner, depending on the parent node. Sub-node of Ticket and Owner. |
None |
|
ImplementaionDate |
The date on which the change request was implemented. Sub-node of Ticket. |
None |
|
InitialPlanStartTime |
The amount of time that has elapsed since initial planning, in UNIX time. Sub-node of Ticket. |
None |
|
IPAddress |
The IP address of the device. Sub-node of Firewall. |
None |
|
IsActiveChangeApplicable |
Indicates whether ActiveChange can be used to automatically implement the requested change. Sub-node of Ticket. Note: Relevant for traffic change requests only. |
None |
|
IsWorkOrderEditable |
Indicates whether the work order is editable. Sub-node of Ticket. |
None |
|
LastReport |
The last report generated for the device. Sub-node of Firewall. |
None |
|
LastReportDate |
The date and time at which the last report for this device was generated. Sub-node of Firewall. |
None |
|
LastUpdated |
The date and time when the change request was last updated. Sub-node of Ticket. |
None |
|
LastUpdatedBy |
The username of the person who last updated the change request. Sub-node of Ticket. |
None |
|
ManagementServer |
The name of the device's management server. Sub-node of Firewall. |
None |
|
Name |
The name of the device. Sub-node of Firewall. |
None |
|
name |
The name of a risk. Sub-Node of Risk. Note: Relevant for traffic change requests only. |
None |
|
New |
Indicates whether the change request is new. Sub-node of Ticket. |
None |
|
NewValues |
The IP addresses or protocols to add to the device object. Sub-node of PlannedTraffic and RequestedTraffic. Note: Relevant for object change requests only. |
None |
|
ObjectChangeValidationResult |
The results of object change validation. Sub-node of Ticket. Note: Relevant for object change requests only. |
None |
|
ObjectName |
The name of the device object. Sub-node of PlannedTraffic and RequestedTraffic. Note: Relevant for object change requests only. |
None |
|
Organization |
The organization to which the change request owner or requestor belongs, depending on the parent node. Sub-node of Owner and Requestor. |
None |
|
Owner |
The change request owner's username and email address. Sub-node of Ticket. |
|
|
OwningGroup |
The name of the user role that currently owns the change request. Sub-node of Ticket. |
None |
|
PlannedTraffic |
The changes planned during the Plan stage. Sub-node of Ticket. |
|
|
Policy |
The device security policy. Sub-node of Firewall. |
None |
|
Priority |
A number indicating this request's priority, where 0 indicates lowest priority. Sub-node of Ticket. |
None. |
|
RealName |
The full names of the change request owner or requestor, depending on the parent node. Sub-node of Owner and Requestor. |
None |
|
Requestedaction |
The action the user selected to perform on the rule (remove or disable). Sub-node of PlannedTraffic and RequestedTraffic. Note: Relevant for rule removal requests only. |
None |
|
RequestedTraffic |
The changes requested during the Request stage. Sub-node of Ticket. |
|
|
Requestor |
Information about the requestor. Sub-node of Ticket. |
|
|
Risk |
A risk that implementation of the planned change would entail. Sub-node of RiskDetails. Note: Relevant for traffic change requests only. |
|
|
RisksDetails |
The results of the risk check, if the change request has completed the Check stage. Sub-node of Ticket. Note: Relevant for traffic change requests only. |
|
|
RisksNumber |
The total number of risks that implementation of the planned change would entail. Sub-node of Ticket. Note: Relevant for traffic change requests only. |
None |
|
RuleDisplayId |
The rule ID as displayed to users. Sub-node of PlannedTraffic and RequestedTraffic. Note: Relevant for rule removal requests only. |
None |
|
RuleId |
The rule ID as displayed in reports. Sub-node of PlannedTraffic and RequestedTraffic. Note: Relevant for rule removal requests only. |
None |
|
RuleRemovalRelatedTickets |
FireFlow change requests with traffic that intersects that of the rule slated to be removed/disabled. Sub-node of PlannedTraffic and RequestedTraffic. Note: Relevant for rule removal requests only. |
None |
|
RuleRemovalRelatedTicketsRequestors |
The requestors of FireFlow change requests with traffic that intersects that of the rule slated to be removed/disabled. Sub-node of PlannedTraffic and RequestedTraffic. Note: Relevant for rule removal requests only. |
None |
|
RuleRemovalRuleAction |
The action to perform on the rule in the device policy (for example, allow or drop). Sub-node of PlannedTraffic and RequestedTraffic. Note: Relevant for rule removal requests only. |
None |
|
RuleRemovalUserstoNotify |
FireFlow users to notify regarding the rule's upcoming removal/disablement. Sub-node of PlannedTraffic and RequestedTraffic. Note: Relevant for rule removal requests only. |
None |
|
Scope |
The scope of the change (Local / Global). Sub-node of PlannedTraffic and RequestedTraffic. Note: Relevant for object change requests only. |
None |
|
Service |
The device service or port for the connection. Sub-node of PlannedTraffic and RequestedTraffic. Note: Relevant for traffic change requests only. |
If inclusion of user-defined custom traffic fields in flat tickets is enabled, then this node will have the following sub-nodes:
See Enabling/Disabling Inclusion of User-Defined Custom Traffic Fields in Flat Tickets (see Enable / disable inclusion of user-defined custom traffic fields in flat tickets). |
|
severity |
The severity of a risk. Sub-Node of Risk. Note: Relevant for traffic change requests only. |
None |
|
Source |
The IP address, IP range, network, or device object. Sub-node of PlannedTraffic and RequestedTraffic. Note: Relevant for traffic change requests only. |
If inclusion of user-defined custom traffic fields in flat tickets is enabled, then this node will have the following sub-nodes:
See Enabling/Disabling Inclusion of User-Defined Custom Traffic Fields in Flat Tickets (see Enable / disable inclusion of user-defined custom traffic fields in flat tickets). |
|
Status |
The change request's status. Sub-node of Ticket. |
None |
|
Subject |
The change request's subject. Sub-node of Ticket. |
None |
|
Ticket |
The root node of a flat ticket. |
|
|
TicketTemplateName |
The name of the change request's template. Sub-node of Ticket. |
None |
|
TrafficChangeTime |
The amount of time that has elapsed since the traffic was changed, in UNIX time. Sub-node of Ticket. Relevant for traffic change requests only. |
None |
|
TranslatedDestination |
The change request's destination, as translated to IP addresses. Sub-node of Ticket. Note: Relevant for traffic change requests only. |
None |
|
TranslatedService |
The change request's destination, as translated to ports. Sub-node of Ticket. Note: Relevant for traffic change requests only. |
None |
|
TranslatedSource |
The change request's source, as translated to IP addresses. Sub-node of Ticket. Note: Relevant for traffic change requests only. |
None |
|
Value |
The value of this node's parent node. Sub-node of Action, Destination, Service, and Source. Note: Relevant only when inclusion of user-defined custom traffic fields in flat tickets is enabled. See Enabling/Disabling Inclusion of User-Defined Custom Traffic Fields in Flat Tickets (see Enable / disable inclusion of user-defined custom traffic fields in flat tickets). |
None |
|
ValuesToRemove |
The IP addresses or protocols to remove from the device object. Sub-node of PlannedTraffic and RequestedTraffic. Note: Relevant for object change requests only. |
None |
|
Workflow |
The change request's assigned workflow. Sub-node of Ticket. |
None |
A flat ticket is a change request in XML format.
Note: If User-Defined Custom Traffic Fields, Initial Plan information, and Work Order information inclusion is disabled, then the flat ticket will not contain some of the XML nodes.
<Ticket>
<AdditionalResponsibleGroups></AdditionalResponsibleGroups>
<Advice>No</Advice>
<AffectedRulesResult></AffectedRulesResult>
<AlreadyWorksFirewalls></AlreadyWorksFirewalls>
<ApplicationDefaultServices></ApplicationDefaultServices>
<AutomaticallyImplemented></AutomaticallyImplemented>
<CMSticketid></CMSticketid>
<CategorytoUpdate></CategorytoUpdate>
<Cc></Cc>
<ChangeCategory></ChangeCategory>
<ChangeFullData>{"CreationTime":"2013-08-07 11:53:38" ,"ErrorMessage":[],"MultiProtocolServices":null,"Config":{"ShowHostgroupsInWorkOrder":"1","ForceWorkOrderForNA":0,"WiderObjectsSizeToSuggest":[null],"RemoveAlreadyAllowedTraffic":"1","WhichHostGroupForEachValueInWorkOrder":"1","UseFaHostGroupsDB":"1","HandleNATChanges":"1","SlowWhichHostGroupInWorkOrder":"0","RemoveNotRoutedTraffic":1},"QueryData":{"AllowTrafficQueryURL":"firewalls/afa-6151/query-5/query.html","RemoveTrafficQueryURL":null,"DNSResolveMap":{},"QueryResult":null,"QueryMode":"data"},"DeviceData":{"FunctionalProperties":{"ZoneBasedDevice":0,"PresentableIdentifier":"Number","HasAppInSeparateColumn":0,"CommentSupport":1},"NumberOfRules":"41","ObjectContainers":["m_10_132_31_1"],"DeviceProperties":{"ActionDenyLabel":"drop","DeviceSupportApp":0,"ACLBasedDevice":0,"ActionUserLabel":"User Auth","CommentLabel":"Rule Comment","Is_CKP_Application_Control":null,"CommentTooltip":"","UserFieldLabel":"","ActionAllowLabel":"accept","OrigRulesScript":"fwrules51","ZoneLabel":"Zone"},"AlgosecExtensionFramework":null,"RealName":"Cluster","Brand":"Check Point","DisplayName":"Cluster","Name":"Cluster"},"RequestType":"Traffic Change","Version":"2.0","HasWiderObject":null,"TrafficLines":[{"Rules":[],"NATType":"None","Status":"Allowed","Destination":{"RecommendedTraffic":null,"PlannedTraffic":{"Dst_1_1":{"Options":[],"IsWiderChosen":0,"IgnoreReasonPerUnit":null,"User":null,"DisplayOrder":"1","Type":null,"ObjectExistanceStatus":null,"Units":["*"],"CustomFields":[],"Id":"Dst_1_1","WiderObjects":[],"CalculatedUnits":[],"UnitsToQuery":["0.0.0.0-255.255.255.255"],"Name":null,"ToIgnore":null,"ObjectType":"ip"}},"TrafficUnitsToQuery":["0.0.0.0-255.255.255.255"],"RequestedObjectNames":["*"],"FieldName":null,"Class":"FireFlow::WorkOrder::WorkOrderTrafficField","NAT":{"Values":[],"ValuesAfterNAT":[]}},"Comment":{"Value":"FireFlow #698 test","Suffix":"test","Base":"FireFlow #698","Input":""},"TrafficScope":{"InterfaceName":null,"ACL":null,"ZoneSpanning":null,"InterfaceOrigName":null,"ZoneStatus":null,"FromZone":null,"ToZone":null},"Service":{"TrafficUnitsToQuery":["tcp/80","tcp/22","tcp/21"],"RequestedObjectNames":["http","ssh","ftp"],"IsApplication":0,"FieldName":null,"NAT":{"Values":[],"ValuesAfterNAT":[]},"RecommendedTraffic":null,"PlannedTraffic":{"Srv_1_1":{"Options":[],"IsWiderChosen":0,"IgnoreReasonPerUnit":null,"User":null,"DisplayOrder":"1","Type":null,"ObjectExistanceStatus":null,"Units":["tcp/80"],"CustomFields":[],"Id":"Srv_1_1","WiderObjects":[],"CalculatedUnits":[],"UnitsToQuery":[],"Name":null,"ToIgnore":null,"ObjectType":"service"},"Srv_1_3":{"Options":[],"IsWiderChosen":0,"IgnoreReasonPerUnit":null,"User":null,"DisplayOrder":"3","Type":null,"ObjectExistanceStatus":null,"Units":["tcp/21"],"CustomFields":[],"Id":"Srv_1_3","WiderObjects":[],"CalculatedUnits":[],"UnitsToQuery":[],"Name":null,"ToIgnore":null,"ObjectType":"service"},"Srv_1_2":{"Options":[],"IsWiderChosen":0,"IgnoreReasonPerUnit":null,"User":null,"DisplayOrder":"2","Type":null,"ObjectExistanceStatus":null,"Units":["tcp/22"],"CustomFields":[],"Id":"Srv_1_2","WiderObjects":[],"CalculatedUnits":[],"UnitsToQuery":[],"Name":null,"ToIgnore":null,"ObjectType":"service"}},"Class":"FireFlow::WorkOrder::WorkOrderServiceOrApplicationField"},"Number":1,"WorkOrderRecommendationType":"None","Action":"Allow","Source":{"RecommendedTraffic":null,"PlannedTraffic":{"Src_1_3":{"Options":[],"IsWiderChosen":0,"IgnoreReasonPerUnit":null,"User":null,"DisplayOrder":"3","Type":null,"ObjectExistanceStatus":null,"Units":["10.130.5.135"],"CustomFields":[],"Id":"Src_1_3","WiderObjects":[],"CalculatedUnits":[],"UnitsToQuery":["10.130.5.135"],"Name":null,"ToIgnore":null,"ObjectType":"ip"},"Src_1_1":{"Options":[],"IsWiderChosen":0,"IgnoreReasonPerUnit":null,"User":null,"DisplayOrder":"1","Type":null,"ObjectExistanceStatus":null,"Units":["10.130.5.5"],"CustomFields":[],"Id":"Src_1_1","WiderObjects":[],"CalculatedUnits":[],"UnitsToQuery":["10.130.5.5"],"Name":null,"ToIgnore":null,"ObjectType":"ip"},"Src_1_2":{"Options":[],"IsWiderChosen":0,"IgnoreReasonPerUnit":null,"User":null,"DisplayOrder":"2","Type":null,"ObjectExistanceStatus":null,"Units":["10.130.5.17"],"CustomFields":[],"Id":"Src_1_2","WiderObjects":[],"CalculatedUnits":[],"UnitsToQuery":["10.130.5.17"],"Name":null,"ToIgnore":null,"ObjectType":"ip"}},"TrafficUnitsToQuery":["10.130.5.5","10.130.5.17","10.130.5.135"],"RequestedObjectNames":["10.130.5.5","10.130.5.17","10.130.5.135"],"FieldName":null,"Class":"FireFlow::WorkOrder::WorkOrderTrafficField","NAT":{"Values":[],"ValuesAfterNAT":[]}},"EditRuleName":null,"CustomFields":[],"RuleToModifyStatus":"Irrelevant"}],"TicketId":"698"}</ChangeFullData>
<ChangeImplementationNotes></ChangeImplementationNotes>
<Firewall>
<ManagementServer>m_10_132_31_1</ManagementServer>
<Name>Cluster</Name>
<Policy>Policy_2.W</Policy>
</Firewall>
<FirewallNameforTraffictobeAllowed></FirewallNameforTraffictobeAllowed>
<FirewallNameforTraffictobeDropped></FirewallNameforTraffictobeDropped>
<FormType>Traffic Change</FormType>
<GMRemedyticketid></GMRemedyticketid>
<HasWiderObjects>No</HasWiderObjects>
<Id>698</Id>
<ImplementationRecommendations></ImplementationRecommendations>
<InitialPlan>
<initialPlanResultForTraffic>
<Result>
<firewall>
<TrafficLines>
<TrafficLine>
<number>1</number>
<status>N/A</status>
</TrafficLine>
</TrafficLines>
<brand>Cisco ASA</brand>
<name>10_132_16_1</name>
<status>N/A</status>
</firewall>
<firewall>
<TrafficLines>
<TrafficLine>
<number>1</number>
<status>Blocked</status>
</TrafficLine>
</TrafficLines>
<brand>Juniper JUNOS</brand>
<name>10_132_12_1</name>
<status>Blocked</status>
</firewall>
<firewall>
<TrafficLines>
<TrafficLine>
<number>1</number>
<status>Partially Blocked</status>
</TrafficLine>
</TrafficLines>
<brand>McAfee Firewall (Sidewinder)</brand>
<name>10_20_110_1</name>
<status>Partially Blocked</status>
</firewall>
</Result>
<TrafficAction>Allow</TrafficAction>
</initialPlanResultForTraffic>
</InitialPlan>
<InitialPlanStartTime>1374750789.67211</InitialPlanStartTime>
<IsActiveChangeApplicable>1</IsActiveChangeApplicable>
<IsWorkOrderEditable>true</IsWorkOrderEditable>
<LastUpdated>Wed Aug 07 11:53:38 2013</LastUpdated>
<LastUpdatedBy>[email protected]</LastUpdatedBy>
<ObjectChangeValidationResult></ObjectChangeValidationResult>
<OrganizationMethodology></OrganizationMethodology>
<Owner>
<City></City>
<Country></Country>
<EmailAddress>[email protected]</EmailAddress>
<HomePhone></HomePhone>
<Id>37</Id>
<Organization></Organization>
<RealName>network user</RealName>
</Owner>
<OwningGroup>Network</OwningGroup>
<PendingResponsibleGroups></PendingResponsibleGroups>
<PendingTargetStatus></PendingTargetStatus>
<PlannedTraffic>
<Action>
<Value>Allow</Value>
</Action>
<Destination>
<Value>*</Value>
</Destination>
<ServiceApplication>
<Value>tcp/80</Value>
</ServiceApplication>
<ServiceApplication>
<Value>tcp/22</Value>
</ServiceApplication>
<ServiceApplication>
<Value>tcp/21</Value>
</ServiceApplication>
<Source>
<Value>10.130.5.5</Value>
</Source>
<Source>
<Value>10.130.5.17</Value>
</Source>
<Source>
<Value>10.130.5.135</Value>
</Source>
</PlannedTraffic>
<PortTranslationLocation>By device</PortTranslationLocation>
<Priority>0</Priority>
<RecertificationCandidateDevices></RecertificationCandidateDevices>
<RecertificationRelatedTicketsCalculationDate></RecertificationRelatedTicketsCalculationDate>
<RecertificationStatus>Stand by</RecertificationStatus>
<RecertifiedTrafficTicket></RecertifiedTrafficTicket>
<RecommendReimplement></RecommendReimplement>
<RequestActionType>Allow</RequestActionType>
<RequestedCategory></RequestedCategory>
<RequestedObjectActionType></RequestedObjectActionType>
<RequestedTraffic>
<Action>
<Value>Allow</Value>
</Action>
<Destination>
<Value>*</Value>
</Destination>
<ServiceApplication>
<Value>http</Value>
</ServiceApplication>
<ServiceApplication>
<Value>ssh</Value>
</ServiceApplication>
<ServiceApplication>
<Value>ftp</Value>
</ServiceApplication>
<Source>
<Value>10.130.5.5</Value>
</Source>
<Source>
<Value>10.130.5.17</Value>
</Source>
<Source>
<Value>10.130.5.135</Value>
</Source>
</RequestedTraffic>
<RequestedURL></RequestedURL>
<RequestedUserGroup></RequestedUserGroup>
<RequestedWebAction>Allow</RequestedWebAction>
<Requestor>
<City></City>
<Country></Country>
<EmailAddress>[email protected]</EmailAddress>
<HomePhone></HomePhone>
<Id>31</Id>
<Organization></Organization>
<RealName>Admin</RealName>
</Requestor>
<RiskLevel>No Risk</RiskLevel>
<RisksDetails>
<Risk>
<code>R09</code>
<description>"Any destination" rules</description>
<name>R09-rule-alldest</name>
<severity>medium</severity>
</Risk>
<ExternalRisk>
<code>H0</code>
<description>high desc</description>
<name> H0 high Risk Cluster</name>
<severity>high</severity>
</ExternalRisk>
<ExternalRisk>
<code>SH0</code>
<description>sh desc</description>
<name> SH0 suspected high Risk Cluster</name>
<severity>suspected high</severity>
</ExternalRisk>
<ExternalRisk>
<code>M0</code>
<description>medium desc</description>
<name> M0 medium Risk Cluster</name>
<severity>medium</severity>
</ExternalRisk>
<ExternalRisk>
<code>L0</code>
<description>low desc</description>
<name> L0 low Risk Cluster</name>
<severity>low</severity>
</ExternalRisk>
<ExternalRiskMsg><br /> <br /> <span> <b> External Risk Check Results</b></span> <table class="risks" border="1" cellpadding="6" ><br> <tr id="risks-title" > <td colspan="3" id="risks-titlebox-title" class="titlebox-title 0">Based on device: Cluster<br>Risk Check Result is from: Thu Jul 25 14:01:58 2013.</td></tr> <tr><td class="top-risk" ><strong>Risks Found</strong>: 1 High Risk, 1 Suspected High Risk, 1 Medium Risk, 1 Low Risk</td></tr><tr><td class="top-risk" align="left"><table class="inner-risk" ><tr><th>&nbsp;</th><th>&nbsp;</th><th align="left">Code</th><th align="left">Risk Description</th></tr><tr><td align="right">1.</td><td><span class="high-risk">&nbsp;&nbsp;</span></td><td><span class="risk-code">H0</span></td><td>high desc </td></tr><tr><td align="right">2.</td><td><span class="suspectedhigh-risk">&nbsp;&nbsp;</span></td><td><span class="risk-code">SH0</span></td><td>sh desc </td></tr><tr><td align="right">3.</td><td><span class="medium-risk">&nbsp;&nbsp;</span></td><td><span class="risk-code">M0</span></td><td>medium desc </td></tr><tr><td align="right">4.</td><td><span class="low-risk">&nbsp;&nbsp;</span></td><td><span class="risk-code">L0</span></td><td>low desc </td></tr></table></td></tr></table></ExternalRiskMsg>
<RisksURLs>firewalls/afa-6151/riskCheck_1_fireflow698/risks.html</RisksURLs>
</RisksDetails>
<RisksNumber>1</RisksNumber>
<SourceNATLocation>By device</SourceNATLocation>
<Status>implement</Status>
<Subject>CR on cluster</Subject>
<TicketTemplateID></TicketTemplateID>
<TicketTemplateName></TicketTemplateName>
<TrafficChangeTime></TrafficChangeTime>
<TranslatedDestination></TranslatedDestination>
<TranslatedService></TranslatedService>
<TranslatedSource></TranslatedSource>
<WorkOrderTimestamp>1375872818.46523</WorkOrderTimestamp>
<WorkOrders>
<WorkOrder>
<ImplementationNotes></ImplementationNotes>
<ObjectRecommendation>
</ObjectRecommendation>
<TrafficLine>
<Number>1</Number>
<Suggestion>
<SuggestedAction>NoActionRequired</SuggestedAction>
</Suggestion>
</TrafficLine>
</WorkOrder>
</WorkOrders>
<Workflow>Standard</Workflow>
<reportpdf>1914</reportpdf>
<reportpdffortraffictobeallowed></reportpdffortraffictobeallowed>
<reportpdffortraffictobedropped></reportpdffortraffictobedropped>
<try></try>
<workorderpdf></workorderpdf>
</Ticket>
<Ticket>
<AffectedRulesResult>The change will affect 1 rules: 12 in device Kartiv</AffectedRulesResult>
<AlreadyWorksFirewalls></AlreadyWorksFirewalls>
<AutomaticallyImplemented></AutomaticallyImplemented>
<CMSticketid></CMSticketid>
<Cc></Cc>
<ChangeFullData></ChangeFullData>
<ChangeImplementationNotes></ChangeImplementationNotes>
<ClosedAt></ClosedAt>
<Created>Mon Feb 14 08:22:13 2011</Created>
<Createticketsfromattachment>No</Createticketsfromattachment>
<Description></Description>
<Due></Due>
<Expires></Expires>
<Firewall>
<Brand>Check Point</Brand>
<IPAddress>10.20.17.1</IPAddress>
<LastReport>michal-12327</LastReport>
<LastReportDate>2011-02-07 20:23:19</LastReportDate>
<ManagementServer>m_10_20_16_1</ManagementServer>
<Name>Kartiv</Name>
<Policy>Standard.W</Policy>
</Firewall>
<FormType>Object Change</FormType>
<Id>2128</Id>
<ImplementaionDate></ImplementaionDate>
<InitialPlanStartTime></InitialPlanStartTime>
<IsActiveChangeApplicable>1</IsActiveChangeApplicable>
<IsWorkOrderEditable>true</IsWorkOrderEditable>
<LastUpdated>Mon Feb 14 08:22:52 2011</LastUpdated>
<LastUpdatedBy></LastUpdatedBy>
<New></New>
<ObjectChangeValidationResult></ObjectChangeValidationResult>
<Owner>
<City></City>
<Country></Country>
<EmailAddress>[email protected]</EmailAddress>
<HomePhone></HomePhone>
<Id>25</Id>
<Organization></Organization>
<RealName>m</RealName>
</Owner>
<OwningGroup>Network</OwningGroup>
<PlannedTraffic>
<Action>Remove IPs from Object</Action>
<IPsToRemove>10.10.17.3</IPsToRemove>
<ObjectName>a_10.10.17.2-3</ObjectName>
<Scope>Local</Scope>
</PlannedTraffic>
<PlannedTraffic>
<Action>Remove IPs from Object</Action>
<IPsToRemove>10.40.17.0-10.40.17.255</IPsToRemove>
<ObjectName>RemoteAccess</ObjectName>
<Scope>Global</Scope>
</PlannedTraffic>
<Priority>0</Priority>
<RequestedTraffic>
<Action>Remove IPs from Object</Action>
<IPsToRemove>10.10.17.3</IPsToRemove>
<ObjectName>a_10.10.17.2-3</ObjectName>
<Scope>Local</Scope>
</RequestedTraffic>
<RequestedTraffic>
<Action>Remove IPs from Object</Action>
<IPsToRemove>10.40.17.0-10.40.17.255</IPsToRemove>
<ObjectName>RemoteAccess</ObjectName>
<Scope>Global</Scope>
</RequestedTraffic>
<Requestor>
<City></City>
<Country></Country>
<EmailAddress>[email protected]</EmailAddress>
<HomePhone></HomePhone>
<Organization></Organization>
<RealName>m</RealName>
</Requestor>
<RisksDetails></RisksDetails>
<RisksNumber></RisksNumber>
<Status>implement</Status>
<Subject>For NZ</Subject>
<TicketTemplateName>130: Object Change Request</TicketTemplateName>
<TrafficChangeTime></TrafficChangeTime>
<TranslatedDestination></TranslatedDestination>
<TranslatedService></TranslatedService>
<TranslatedSource></TranslatedSource>
<Workflow>Change-Object</Workflow>
</Ticket>
<Ticket>
<Firewall>
<Brand>Check Point</Brand>
<IPAddress>10.20.17.1</IPAddress>
<LastReport>michal-12327</LastReport>
<LastReportDate>2011-02-07 20:23:19</LastReportDate>
<ManagementServer>m_10_20_16_1</ManagementServer>
<Name>Kartiv</Name>
<Policy>Standard.W</Policy>
</Firewall>
<FormType>Rule Removal</FormType>
<Id>2128</Id>
<ImplementaionDate></ImplementaionDate>
<InitialPlanStartTime></InitialPlanStartTime>
<IsWorkOrderEditable>true</IsWorkOrderEditable>
<LastUpdated>Mon Feb 14 08:22:52 2011</LastUpdated>
<LastUpdatedBy></LastUpdatedBy>
<New></New>
<Owner>
<City></City>
<Country></Country>
<EmailAddress>[email protected]</EmailAddress>
<HomePhone></HomePhone>
<Id>25</Id>
<Organization></Organization>
<RealName>m</RealName>
</Owner>
<OwningGroup>Network</OwningGroup>
<PlannedTraffic>
<Requestedaction>Remove Rule</Requestedaction>
</PlannedTraffic>
<RequestedTraffic>
<Requestedaction>Remove rule</Requestedaction>
<RuleDisplayId>1</RuleDisplayId>
<RuleId>57E7BF23-D6BD-498A-9DDA-9071ECC47E46</RuleId>
<RuleRemovalRelatedTickets>748</RuleRemovalRelatedTickets>
<RuleRemovalRelatedTickets>471</RuleRemovalRelatedTickets>
<RuleRemovalRelatedTickets>323</RuleRemovalRelatedTickets>
<RuleRemovalRelatedTickets>5</RuleRemovalRelatedTickets>
<RuleRemovalRelatedTicketsRequesotrs>65</RuleRemovalRelatedTicketsRequesotrs>
<RuleRemovalRelatedTicketsRequesotrs>37</RuleRemovalRelatedTicketsRequesotrs>
<RuleRemovalRuleAction>accept</RuleRemovalRuleAction>
<RuleRemovalUserstoNotify>65</RuleRemovalUserstoNotify>
<RuleRemovalUserstoNotify>37</RuleRemovalUserstoNotify>
</RequestedTraffic>
<Workflow>Rule-Removal</Workflow>
</Ticket>
<Ticket>
<AdditionalResponsibleGroups></AdditionalResponsibleGroups>
<AffectedRulesResult></AffectedRulesResult>
<AlreadyWorksFirewalls></AlreadyWorksFirewalls>
<ApplicationDefaultServices></ApplicationDefaultServices>
<AutomaticallyImplemented></AutomaticallyImplemented>
<CMSticketid></CMSticketid>
<CategorytoUpdate></CategorytoUpdate>
<Cc></Cc>
<ChangeApplicationOrServiceBeforeTranslation></ChangeApplicationOrServiceBeforeTranslation>
<ChangeCategory></ChangeCategory>
<ChangeImplementationNotes></ChangeImplementationNotes>
<ChangeObjectActionType></ChangeObjectActionType>
<ChangeRequestOriginType></ChangeRequestOriginType>
<ChangeURL></ChangeURL>
<ChangeUserGroup></ChangeUserGroup>
<ChangeValidationResult></ChangeValidationResult>
<ChangeWebAction></ChangeWebAction>
<ClosedAt></ClosedAt>
<Created>Sun Aug 11 12:09:06 2013</Created>
<Createticketsfromattachment>No</Createticketsfromattachment>
<Description></Description>
<DestinationNATLocation>By device</DestinationNATLocation>
<Due></Due>
<Expires></Expires>
<Firewall>
<Brand>Check Point</Brand>
<IPAddress>10.132.32.1</IPAddress>
<LastReport>afa-9261</LastReport>
<LastReportDate>2013-05-12 11:11:23</LastReportDate>
<ManagementServer>m_10_132_31_1</ManagementServer>
<Name>fw3</Name>
<Policy>Policy_2.W</Policy>
<Provider-1>10.132.30.1</Provider-1>
</Firewall>
<FirewallNameforTraffictobeAllowed></FirewallNameforTraffictobeAllowed>
<FirewallNameforTraffictobeDropped></FirewallNameforTraffictobeDropped>
<FormType>Rule Modification</FormType>
<HasWiderObjects>No</HasWiderObjects>
<Id>3838</Id>
<ImplementationRecommendations></ImplementationRecommendations>
<InitialPlanStartTime></InitialPlanStartTime>
<IsActiveChangeApplicable>1</IsActiveChangeApplicable>
<IsWorkOrderEditable>true</IsWorkOrderEditable>
<LastUpdated>Tue Aug 13 13:25:50 2013</LastUpdated>
<LastUpdatedBy>[email protected]</LastUpdatedBy>
<ObjectChangeValidationResult></ObjectChangeValidationResult>
<OrganizationMethodology></OrganizationMethodology>
<Owner>
<City></City>
<Country></Country>
<EmailAddress>[email protected]</EmailAddress>
<HomePhone></HomePhone>
<Id>31</Id>
<Organization></Organization>
<RealName>Admin</RealName>
</Owner>
<OwningGroup>Network</OwningGroup>
<PendingResponsibleGroups></PendingResponsibleGroups>
<PendingTargetStatus></PendingTargetStatus>
<PlannedTraffic>
<Action>
<Value>Allow</Value>
</Action>
<Destination>
<Value>liran-dev</Value>
</Destination>
<ServiceApplication>
<Value>gAOL</Value>
</ServiceApplication>
<ServiceApplication>
<Value>ssh</Value>
</ServiceApplication>
<Source>
<Value>Any</Value>
</Source>
</PlannedTraffic>
<PortTranslationLocation>By device</PortTranslationLocation>
<Priority>0</Priority>
<RecertificationCandidateDevices></RecertificationCandidateDevices>
<RecertificationRelatedTicketsCalculationDate></RecertificationRelatedTicketsCalculationDate>
<RecertificationStatus>Stand by</RecertificationStatus>
<RecertifiedTrafficTicket></RecertifiedTrafficTicket>
<RecommendReimplement></RecommendReimplement>
<RequestActionType>Risk_Allow</RequestActionType>
<RequestedCategory></RequestedCategory>
<RequestedObjectActionType></RequestedObjectActionType>
<RequestedTraffic>
<Action>
<Value>Allow</Value>
</Action>
<Destination>
<Value>liran-dev</Value>
</Destination>
<Requestedaction>Disable rule</Requestedaction>
<RuleAction>accept</RuleAction>
<RuleDisplayId>2</RuleDisplayId>
<RuleIdentifier>0D7DC60E-07D3-46A5-AF6E-4FE04C9C32B4</RuleIdentifier>
<RuleRemovalShowRelatedChangeRequests>true</RuleRemovalShowRelatedChangeRequests>
<RuleRemovalSkiptoApprove>false</RuleRemovalSkiptoApprove>
<ServiceApplication>
<Value>gAOL</Value>
</ServiceApplication>
<Source>
<Value>Any</Value>
</Source>
</RequestedTraffic>
<RequestedURL></RequestedURL>
<RequestedUserGroup></RequestedUserGroup>
<RequestedWebAction>Allow</RequestedWebAction>
<Requestor>
<City></City>
<Country></Country>
<EmailAddress>[email protected]</EmailAddress>
<HomePhone></HomePhone>
<Id>31</Id>
<Organization></Organization>
<RealName>Rachel</RealName>
</Requestor>
<RiskLevel></RiskLevel>
<RisksDetails></RisksDetails>
<RisksNumber></RisksNumber>
<Somethingelse></Somethingelse>
<SourceNATLocation>By device</SourceNATLocation>
<Status>implement</Status>
<Subject></Subject>
<TicketTemplateID>898</TicketTemplateID>
<TicketTemplateName>145: Rule Modification Request</TicketTemplateName>
<TrafficChangeTime></TrafficChangeTime>
<TranslatedDestination></TranslatedDestination>
<TranslatedService></TranslatedService>
<TranslatedSource></TranslatedSource>
<WorkOrderTimestamp>1376389526.76596</WorkOrderTimestamp>
<WorkOrders>
<WorkOrder>
<ImplementationNotes></ImplementationNotes>
<TrafficLine>
<Number>1</Number>
<Suggestion>
<Action>
<CurrentValues>accept</CurrentValues>
<RecommendedValues>Allow</RecommendedValues>
<TicketValues>Allow</TicketValues>
</Action>
<Comment>
<CurrentValues></CurrentValues>
<RecommendedValues>FireFlow #3838</RecommendedValues>
</Comment>
<Destination>
<CurrentValues>liran-dev</CurrentValues>
<RecommendedValues>liran-dev</RecommendedValues>
<TicketValues>liran-dev</TicketValues>
</Destination>
<FirewallName>fw3</FirewallName>
<NATType>
<TicketValues>None</TicketValues>
</NATType>
<Service>
<CurrentValues>gAOL</CurrentValues>
<RecommendedValues>ssh</RecommendedValues>
<RecommendedValues>gAOL</RecommendedValues>
<TicketValues>gAOL</TicketValues>
<TicketValues>ssh</TicketValues>
</Service>
<Source>
<CurrentValues>*</CurrentValues>
<RecommendedValues>Any</RecommendedValues>
<TicketValues>Any</TicketValues>
</Source>
<SuggestedAction>Modify</SuggestedAction>
<firewallBrand>Check Point</firewallBrand>
<ruleNumber>2</ruleNumber>
</Suggestion>
</TrafficLine>
</WorkOrder>
</WorkOrders>
<Workflow>Rule-Modification</Workflow>
<privshouldsee></privshouldsee>
<reportpdf></reportpdf>
<reportpdffortraffictobeallowed></reportpdffortraffictobeallowed>
<reportpdffortraffictobedropped></reportpdffortraffictobedropped>
<workorderpdf>7006</workorderpdf>
</Ticket>
Supported Comparison Operators
|
Operator |
Description |
|---|---|
|
= |
Equal |
|
!= |
Not equal |
|
=~ |
Contains |
|
!~ |
Does not contain |
|
< |
Less than |
|
> |
Greater than |
Supported boolean operators include:
|
Operator |
Description |
|---|---|
|
$and$ |
Both of the comparisons in the sub-query must be true. In the following example, the condition is only met for new change requests with the Standard workflow: Ticket[Workflow = "Standard" $and$ Status = "new"] |
|
$or$ |
One or both of the sub-queries pairs joined by this operator must be true. In the following example, the condition is met for change requests that are new, change requests owned by John Smith, and new change requests owned by John Smith: Ticket[Status = "new" $or$ Owner/RealName = "John Smith"] |
The following XQL query specifies that one of the following must be true, in order for the condition to be satisfied.
- The change request's priority is greater than 7.
- The requestor's email address includes the string "company.com".
- The value of the custom field called "Project" is "Infrastructure".
Ticket[Priority > 7 $or$ Requestor/EmailAddress =~ "company.com" $or$ Project = "Infrastructure"]
The following discrete XQL queries,when used in the sequence shown, specify the following:
- If the change request's most severe risk is high, the first condition will be satisfied.
- If the change request's most severe risk is suspected high, the second condition will be satisfied.
- If the change request's most severe risk is medium, the third condition will be satisfied.
- If the change request's most severe risk is low, the fourth condition will be satisfied.
Note: In this example, each query is the condition for a discrete conditional target status. Each condition would have its own target status specified.
- Ticket/RisksDetails/Risk[severity = "high" ]
- Ticket/RisksDetails/Risk[severity = "suspected high" ]
- Ticket/RisksDetails/Risk[severity = "medium" ]
- Ticket/RisksDetails/Risk[severity = "low" ]
This would be relevant, for example, if an approval stage is only required if there are certain risks.
Note: When multiple items are expected in the XML, such as risks found by Risk Check, XQL conditions should only include equality ( = ) or containment ( = ~ ), and not include inequality ( ! = ) or exclusion ( ! ~ ). This is because the condition is true if found at least once in XML.
Add parallel action logic
If desired, you can add more logic for parallel actions. For example, you can add the following parallel action logic:
- 50% of the responsible roles must meet certain criteria, in order to trigger this action.
- The "Managers" user role must meet certain criteria in order to trigger this action.
Do the following:
- Log in to the FireFlow server using the username "root" and the related password.
- Under the directory /usr/share/fireflow/local/etc/site/lib/, open the file ParallelSiteLogic.pm.
-
For each parallel logic you want to configure, add the following lines to the file:
sub parallel_ logicName
{ my $additionalGroups = shift; my $pendingGroups = shift;}
Where logicName is the name of the parallel logic. This can be any string.
The function will receive the following parameters as input:
- $additionalGroups - The additional responsible roles field after update
- $pendingGroups - The pending responsible roles field after update
The function will return a Boolean value:
- 1 - The logic is satisfied, and the action will be triggered.
- 0 - The logic is not satisfied, and the action is still in parallel status.
- Save the file.
- Restart FireFlow. For details, see Restart FireFlow.
Edit actions
Editing an action will modify the action's default settings throughout all statuses in the workflow.
Do the following:
-
In the VisualFlow main menu, click Workflows.
The List of Workflows page is displayed.
-
Do one of the following:
- Click on the desired workflow's name.
- Next to the desired workflow, click Edit.
The Edit Workflow page opens with the workflow's details.
-
Do one of the following:
-
In the VisualFlow main menu, click Actions.
The Available actions page is displayed with a list of actions used in the workflow.
-
In the workflow layout, click on a status that uses the desired action as an inbound or outbound action.
The Edit Status page is displayed with a list of inbound and outbound actions for the status.
-
-
Click Edit next to the desired action.
The Edit Action page is displayed.
-
Complete the fields using the information in Action Fields (see Action Fields ).
If you expanded the Advanced area, additional fields appear.
-
If you set the Parallel field to all, set the action's responsible roles by doing the following:
-
Click the Click here to set the action's responsible roles link.
The Responsible roles dialog box appears.
The Responsible role field displays the user role responsible for change requests in this status.
-
In the Additional responsible roles list, select the additional user roles responsible for change requests in this status.
To select multiple user roles, press Ctrl while you click on the desired user roles.
-
Click OK.
-
-
Click Save Draft.
Reorder actions
You can control the order in which actions appear in a workflow's list of actions.
Do the following:
-
In the VisualFlow main menu, click Workflows.
The List of Workflows page is displayed.
-
Do one of the following:
- Click on the desired workflow's name.
- Next to the desired workflow, click Edit.
The Edit Workflow page opens with the workflow's details.
-
In the VisualFlow main menu, click Actions.
The Available actions page is displayed.
-
In the list of actions, click
 next to an action you want to move, and drag it to the desired location in the list.
Delete actions
Do the following:
-
In the VisualFlow main menu, click Workflows.
The List of Workflows page is displayed.
-
Do one of the following:
- Click on the desired workflow's name.
- Next to the desired workflow, click Edit.
The Edit Workflow page opens with the workflow's details.
-
Do one of the following:
-
In the VisualFlow main menu, click Actions.
The Available actions page is displayed with a list of actions used in the workflow.
-
In the workflow layout, click on a status that uses the desired action as an inbound or outbound action.
The Edit Status page appears with a list of inbound and outbound actions for the status.
-
-
Next to the desired action, click Delete.
A confirmation message appears.
-
Click OK.
The action is deleted from the list.
