
Working with SLAs
Workflow stages in SLAs
In an SLA, each of the workflow stages is represented by a Service Level Objectives (SLO). An SLO specifies the following:
- The stage's starting point, which is when the change request enters a certain status
- The stage's ending point, which is when the change request leaves a certain status
- The stage's name
If you configure a time limit to an SLO, you can optionally configure the SLA to transition to the next status once the SLO expires. For example, after a traffic change request is implemented and the requestor has been notified, the change request waits for the requestor to approve the change request. If you create an SLO on the "user accept" status and configure a time limit for it, you can configure the SLA such that if the SLO expires and the request is still in the "user accept" status (meaning the requestor has not yet responded), the change request automatically transitions to the next status.
FireFlow uses the information specified in an SLO to measure the amount of time spent on the relevant stage; and once the change request has completed its lifecycle, FireFlow can use all of the SLA's SLOs together to calculate the amount of time spent on the entire lifecycle.
FireFlow then uses the calculated SLA information to generate reports on change requests that meet certain criteria (for example, change requests which have spent more than a certain number of days in a particular stage), and display those reports in searches, charts, and dashboards. For information on configuring SLA notifications, see Working with SLA Notifications (see Manage SLA notifications).
Note: You can optionally configure SLO time to be measured in business hours. See Configuring FireFlow to Measure SLO Time in Business Hours (see Configuring FireFlow to Measure SLO Time in Business Hours).
Add SLOs
This procedure describes how to add SLOs to a worfklow's SLA.
Do the following:
-
In the VisualFlow main menu, click Workflows.
The List of Workflows page is displayed.
-
Next to the desired workflow, click Edit.
The Edit Workflow page opens with the workflow's details.
-
In the VisualFlow main menu, click SLA.
The Available SLA page is displayed with all of the SLOs comprising the workflow's SLA.
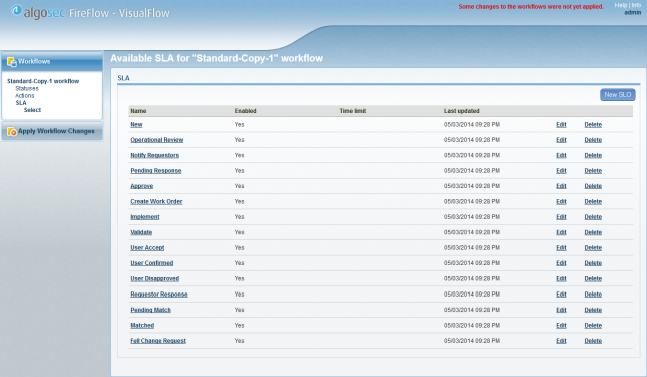
-
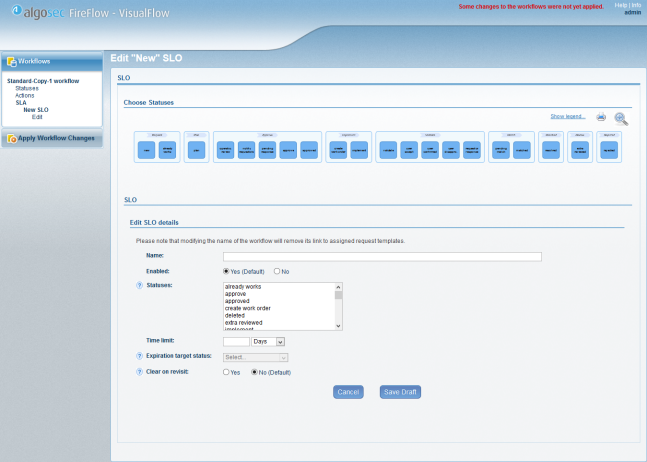
Click New SLO.
The Edit SLO page is displayed.
-
Complete the fields using the information in SLO Fields (see SLO Fields ).
-
Click Save Draft.
The new SLO is added to the workflow's SLA.
|
In this field... |
Do this... |
|---|---|
|
Name |
Type the name of the SLO. This field is mandatory. |
|
Enabled |
Specify whether this SLO should be enabled, by choosing one of the following:
The default value is Yes. |
|
Statuses |
Select one or more statuses that represent the starting point for the workflow stage represented by this SLO. To select multiple statuses, hold down the Ctrl key while clicking on the desired statuses. The selected statuses are highlighted in the diagram at the top of the workspace. Alternatively, click Enable visual edit, and then click on the desired statuses in the diagram at the top of the workspace. The selected statuses appear in green. When finished, click Finish visual edit. |
|
Time limit |
To configure a time limit for the workflow stage represented by this SLO, type in the number of time units in the field provided, and select the type of time unit in the drop-down list. |
|
Expiration target status |
Select the status to which the change request should transition, when the specified time limit has been exceeded. This field is only enabled, if you configured a time limit for the SLO. |
|
Clear on revisit |
Specify whether when re-visiting the SLO or one of its statuses, the time counter should be reset to zero, by choosing one of the following:
The default value is No. |
|
End trigger |
Specify what event should trigger the end of the SLO, by choosing one of the following:
This field appears only for SLOs that contain a status with a parallel action. |
Edit SLOs
This procedure describes how to edit SLOs in a workflow's SLA.
Do the following:
-
In the VisualFlow main menu, click Workflows.
The List of Workflows page is displayed.
-
Next to the desired workflow, click Edit.
The Edit Workflow page opens with the workflow's details.
-
In the VisualFlow main menu, click SLA.
The Available SLA page appears with all of the SLOs comprising the workflow's SLA.
-
Next to the desired SLO, click Edit.
The Edit SLO page is displayed.
-
Complete the fields as needed. For details, see SLO Fields .
-
Click Save Draft.
Delete SLOs
This procedure describes how to delete SLOs from a workflow's SLA.
Do the following:
-
In the VisualFlow main menu, click Workflows.
The List of Workflows page is displayed.
-
Next to the desired workflow, click Edit.
The Edit Workflow page opens with the workflow's details.
-
In the VisualFlow main menu, click SLA.
The Available SLA page is displayed with all of the SLOs comprising the workflow's SLA.
-
Next to the desired SLO, click Delete.
A confirmation message appears.
-
Click OK.
The SLO is deleted.
