
Search for change requests
This topic describes how to perform a simple search for change requests, as well as how to perform and manage advanced searches.
Perform a simple search
This procedure describes how to perform a simple text based search for details in change request parameters or histories.
Tip:
Do the following:
-
In the main menu on the left, enter your search query in the Search field.
Enter any of the following:
- A change request ID number
- Status
- Queue
- Owner name
- Requestor email address
- Subject
To search across all change request histories, enter your search term using the following syntax:
fulltext:<search term>
Note: Searching the full change request history can take a long time.
For more details, see FireFlow simple search process.
-
Click
 .
.The Found page appears displaying search results.

Do one of the following:
- To sort your results, click the column heading that you want to sort by. Click the heading again to reverse the sort order.
- To view a specific change request, click the ID number or subject.
For more details, see Simple Search Results Columns.
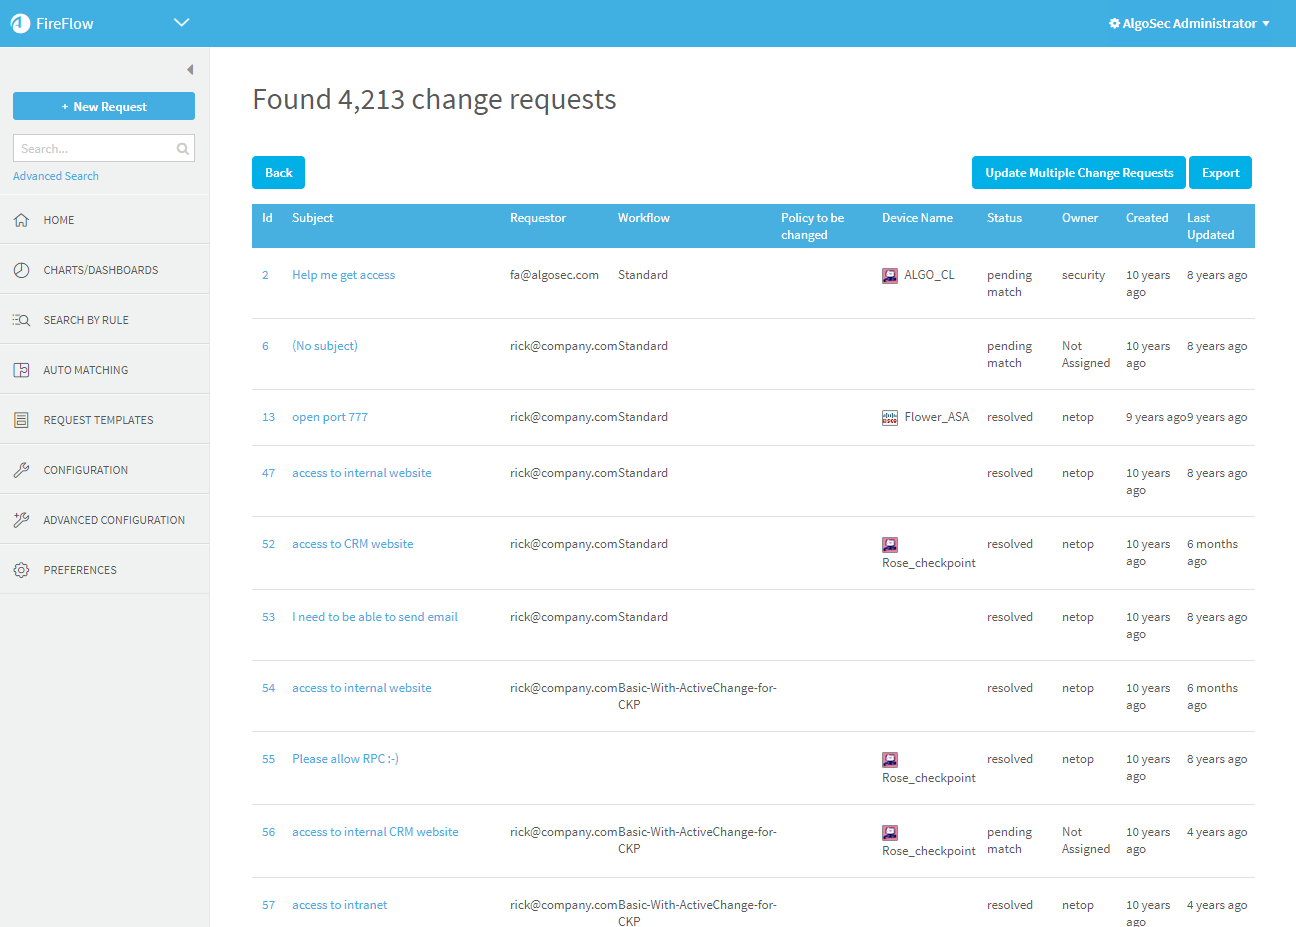
Depending on your system configuration, your search results may include any of the following columns:
|
Id |
The change request ID number. |
|
Subject |
The change request subject. |
|
Requestor |
The requestors' email addresses. |
|
Workflow |
The change request's workflow. For more details, see Request templates and workflows. |
|
Device Name |
The device for which this change request is relevant. Tip: This field also includes cloud devices. For more details, see Amazon Web Services and Microsoft Azure "Devices". |
|
Status
|
The change request's current status. |
|
Owner |
The change request's owner. |
|
Priority |
The change request's priority. |
|
Created |
The amount of time that has elapsed since the change request was created. |
|
Last Updated |
The amount of time that has elapsed since the change request was last updated. |
FireFlow processes your query in the following order:
- If your query contains a number, FireFlow checks whether any change request ID numbers match your query.
- FireFlow checks whether your query starts with fulltext. If so, then FireFlow searches the full history of all change requests.
- If your query contains an @, FireFlow checks whether any requestors' email addresses match your query.
- FireFlow checks whether any statuses match your query.
- FireFlow checks whether any queues match your query.
- FireFlow checks whether any owner names match your query.
- FireFlow checks whether any change requests' Subject fields match your query.
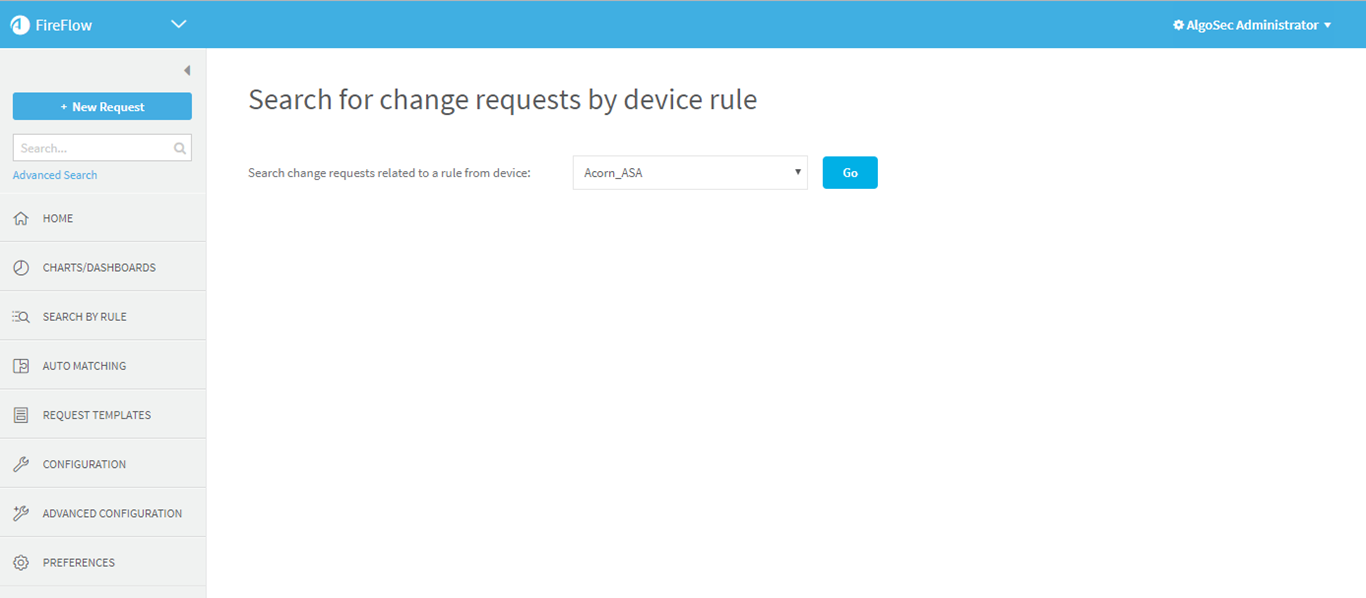
Search by rule
This procedure describes how to search for all traffic change requests whose requested change intersects with a specific device rule.
Note: This feature supports new change requests created in FireFlow v6.0 and above. Change requests created in earlier versions are only partially supported and may not be returned in the search results.
Note: This procedure can also be performed from within AFA reports.
Do the following:
-
In the main menu, click Search By Rule.
The Search for change requests by device rule page is displayed.

-
Select the desired device from the drop-down list and click Go.
The Search for change requests by device rule page appears displaying all rules and objects for the device.
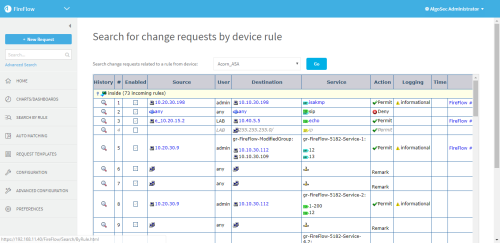
To view all change requests related to a specific rule, in the Policies table, next to the desired rule, click
 .
. -
The change requests related to the rule are displayed.
Note: The search results include change requests that did not require policy changes (those that were marked as "Already Works").
Note: If you selected a Check Point or Juniper NSM device, change requests are displayed for all devices that are installed with the same policy as the selected device.

Define an advanced search
This procedure describes how to define an advanced search for FireFlow change requests.
Tip: Alternately, perform a simple search. For details, see Perform a simple search.
Do the following:
-
In the Query Builder page's Add Criteria area, specify the search criteria.
Do the following:
-
In the Aggregator field, choose the aggregator to use between search criteria.
-
To search according to criteria related to the device, the requested change, the planned change, and risk check results, do the following:
- In the Queue row, select Firewalls.
-
Click Add these terms.
Additional rows appear in the Add Criteria area.
-
For each row in the Add Criteria area, define your search criteria by selecting change request properties and operators and entering a value for each property.
For example: Owner is johnS (John Smith)
For more details, see:
-
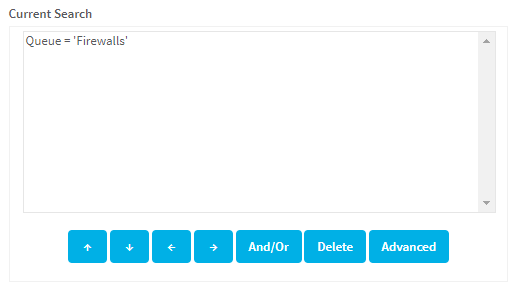
Click Add these terms.
The specified criterion is added to the Current Search area. The selected aggregator is used between the criteria.

Use the buttons in this dialog to do any of the following:
- Move a selected criterion up
 or down
- Increase
 or
or  decrease indentation for a selected criterion
 - Toggle the selected aggregator (and/or)
- Delete a selected criterion
- Perform an advanced query edit. For more details, see Advanced query edits.
- Move a selected criterion up
-
-
Specify how the search results should appear, by doing the following:
-
Scroll to the Display Columns area.
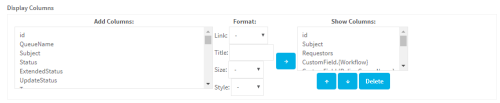
-
For each column you want to appear in the search results, do the following:
- In the Add Columns box, select a column you want to appear.
- Complete the fields in the Format area. For details, see Advanced search column format fields.
-
Click
.The column appears in the Show Columns box. The order that the columns appear in the box (top to bottom) represents the order in which they will appear in the search results (left to right).
- To move the column up or down in the box, select the column and click the or buttons.
- To delete the column, select it and click Delete.
-
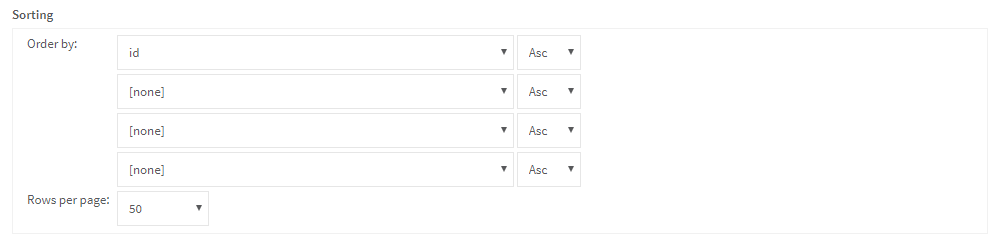
Scroll to the Sorting area.
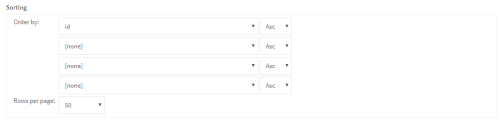
-
In the Order by area, specify the default sort order of the search results as follows:
- In the left-side fields, select one or more columns according to which the search results should be sorted.
- In the right-side fields, select the sort order to use for each specified column: ascending (Asc) or descending (Desc).
- In the Rows per page field, select the number of search result rows that should appear in each page.
-
- To remove all of your changes and define a new search, in the main menu, click New Search.

To perform an advanced edit of the defined search, do the following:
-
In the Current Search area, click Advanced.
The Edit Query page is displayed.
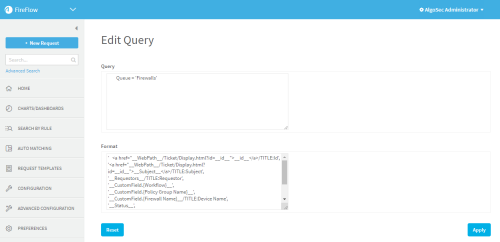
-
In the Query text box, modify the search criteria as desired.
-
In the Format text box, modify the displayed columns as desired.
-
To remove your changes, click Reset.
-
Click Apply.
The Query Builder page reappears with your changes.

The following fields are available for advanced search queries in FireFlow:
|
id |
Type the change request ID number. |
|
Subject |
Type the change request subject. |
|
Content |
Type text that appears in the original change request description or in a comment or reply added to the change request. |
|
Content-Type |
Type the file type of an attachment attached to the change request. |
|
Filename |
Type the filename of an attachment for the change request. |
|
Status |
Select the change request status. |
|
Owner |
Select the user who is the current change request owner. |
|
Creator |
Select the user who is the change request creator. |
|
Last updated by |
Select the user who last updated the change request. |
|
Requestor EmailAddress |
Type the requestor's email address. |
|
Requestor Name |
Type the requestor's username. |
|
Requestor Full Name |
Type the requestor's full name. |
|
Requestor Nickname |
Type the requestor's nickname. |
|
Requestor Organization |
Type the requestor's organization. |
|
Requestor Address1 |
Type the requestor's primary mailing address. |
|
Requestor Address2 |
Type the requestor's secondary mailing address. |
|
Requestor WorkPhone |
Type the requestor's office telephone number. |
|
Requestor HomePhone |
Type the requestor's home telephone number. |
|
Requestor MobilePhone |
Type the requestor's mobile telephone number. |
|
Requestor PagerPhone |
Type the requestor's pager telephone number. |
|
Requestor id |
Type the requestor's ID. |
|
Cc EmailAddress |
Type the email address of a user who receives copies of email messages for the change request. |
|
Cc Name |
Type the username of a user who receives copies of email messages for the change request. |
|
Cc Full Name |
Type the full name of a user who receives copies of email messages for the change request. |
|
Cc Nickname |
Type the nickname of a user who receives copies of email messages for the change request. |
|
Cc Organization |
Type the organization of a user who receives copies of email messages for the change request. |
|
Cc Address1 |
Type the primary mailing address of a user who receives copies of email messages for the change request. |
|
Cc Address2 |
Type the secondary mailing address of a user who receives copies of email messages for the change request. |
|
Cc WorkPhone |
Type the office telephone number of a user who receives copies of email messages for the change request. |
|
Cc HomePhone |
Type the home telephone number of a user who receives copies of email messages for the change request. |
|
Cc MobilePhone |
Type the mobile telephone number of a user who receives copies of email messages for the change request. |
|
Cc PagerPhone |
Type the pager telephone number of a user who receives copies of email messages for the change request. |
|
Cc id |
Type the ID of a user who receives copies of email messages for the change request. |
|
Owner EmailAddress |
Type the owner's email address. |
|
Owner Name |
Type the owner's username. |
|
Owner Full Name |
Type the owner's full name. |
|
Owner Nickname |
Type the owner's nickname. |
|
Owner Organization |
Type the owner's organization. |
|
Owner Address1 |
Type the owner's primary mailing address. |
|
Owner Address2 |
Type the owner's secondary mailing address. |
|
Owner WorkPhone |
Type the owner's office telephone number. |
|
Owner HomePhone |
Type the owner's home telephone number. |
|
Owner MobilePhone |
Type the owner's mobile telephone number. |
|
Owner PagerPhone |
Type the owner's pager telephone number. |
|
Owner id |
Type the owner's ID. |
|
Created |
Specify the date on which the change request was created, either by typing the date in YYYY-MM-DD format, or by clicking Choose a date and selecting the date in the calendar. |
|
Resolved |
Specify the date on which the change request was resolved, either by typing the date in YYYY-MM-DD format, or by clicking Choose a date and selecting the date in the calendar. |
|
Last Updated |
Specify the date on which the change request was last updated, either by typing the date in YYYY-MM-DD format, or by clicking Choose a date and selecting the date in the calendar. |
|
Due |
Specify the change request's due date, either by typing the date in YYYY-MM-DD format, or by clicking Choose a date and selecting the date in the calendar. |
|
Priority |
Type the change request's current priority. |
|
Initial Priority |
Type the change request's priority at the start of its lifecycle. |
|
Final Priority |
Type the change request's priority at the end of its lifecycle. |
|
RefersTo |
Type the ID numbers of change requests to which this change request refers, separated by spaces. |
|
ReferredToBy |
Type the ID numbers of change requests that refer to this change request, separated by spaces. |
|
SLA Name |
Type the name of the SLO currently used for the change request. |
|
SLA Due Date |
Specify the due date of the SLO currently used for this change request, by doing one of the following:
|
|
SLA Status |
Select the status of the SLO currently used for this change request. |
|
SLA Elapsed Time |
Specify the total amount of elapsed time for this change request, as specified in the SLA, by typing the amount of time and then selecting the units of time. |
|
Expires |
Specify the date on which this change request will expire, by doing one of the following:
|
|
Requested Source |
Type the IP address, IP range, network, device object, or DNS name of the connection source, as specified in the original request. |
|
Requested Action Type |
Type the action used in the change request's first row of traffic. This can be any of the following:
|
|
Requested Destination |
Type the IP address, IP range, network, device object, or DNS name of the connection destination, as specified in the original request. |
|
Requested Service |
Type the device service or port for the connection, as specified in the original request. |
|
Requested Action |
Type the device action to perform for the connection, as specified in the original request. |
|
Requested Source NAT |
Type the source NAT value to which the connection's source should be translated, as specified in the original request. |
|
Ticket Template Name |
Type the name of the change request's template. |
|
Ticket Template ID |
Type the ID of the change request's template. |
|
Requested Destination NAT |
Type the destination NAT value to which the connection's destination should be translated, as specified in the original request. |
|
Requested Port Translation |
Type the port value to which the connection's port should be translated, as specified in the original request. |
|
Workflow |
Select the workflow assigned to the change request. |
|
Owning Role |
Type the user role that currently owns the change request. |
|
Requested NAT Type |
Enter the type of NAT (Static or Dynamic), as specified in the original request. |
|
Additional Responsible Roles |
Specify the user roles, other than the owning role, that are responsible for handling the change request in its current lifecycle stage. Select any of the following:
To select multiple roles, hold down the Ctrl key while clicking on the desired roles. |
|
Pending Responsible Roles |
Specify the roles that are responsible for handling the change request in its current lifecycle stage, but which have not yet approved the change request. Select any of the following:
To select multiple roles, hold down the Ctrl key while clicking on the desired roles. |
|
CMS ticket id |
Type the ID number of a related change request in an external change management system that is integrated with FireFlow. |
|
Firewall Name |
Type the name of the device. |
|
Firewall IP Address |
Type the IP address of the device. |
|
Firewall Brand |
Type the name of the device vendor. |
|
Firewall Management Server |
Type the name of the device management server. |
|
Firewall Policy |
Type the name of the device security policy. |
|
Firewall Last Report |
Type the name of last report generated for the device. |
|
Firewall Last Report Date |
Type the date and time at which the last report for this device was generated. |
|
Change Description |
Type the change description. |
|
Requested UserGroup |
Type the user or user group that should be allowed/denied access to a URL, as specified during the Request stage. |
|
Change UserGroup |
Type the user or user group that should be allowed/denied access to a URL, as planned during the Plan stage. |
|
Requested URL |
Type the URL that should be allowed/blocked, as specified during the Request stage. |
|
Change URL |
Type the URL that should be allowed/blocked, as planned during the Plan stage. |
|
Requested Category |
Type the URL's Web filtering category, as specified during the Request stage. |
|
Change Category |
Type the URL's Web filtering category, as planned during the Plan stage. |
|
Requested Web Action |
Select the device Web filtering action to perform for the connection, as specified during the Request stage. |
|
Change Web Action |
Select the device Web filtering action to perform for the connection, as planed during the Plan stage. |
|
Organization Methodology |
Select the organizational methodology to be used for implementing a Web filtering change request, as specified during the Approve stage. |
|
Category to Update |
Type the Web filtering category that should be updated, in order to allow/block the URL. |
|
Change Source |
Type the IP address, IP range, network, device object, or DNS name of the connection source, as planned during the Plan stage. |
|
Requested Object Action Type |
Type the device action to perform for the object, as specified during the Request stage. |
|
Change Object Action Type |
Type the device action to perform for the object, as planned during the Plan stage. |
|
Change Destination |
Type the IP address, IP range, network, device object, or DNS name of the connection destination, as planned during the Plan stage. |
|
Change Service |
Type the device service or port for the connection, as planned during the Plan stage. |
|
Change Action |
Type the device action to perform for the connection, as planned during the Plan stage. |
|
Change Source NAT |
Type the source NAT value to which the connection's source should be translated, as planned during the Plan stage. |
|
Change Destination NAT |
Type the destination NAT value to which the connection's destination should be translated, as planned during the Plan stage. |
|
Change Port Translation |
Type the port value to which the connection's port should be translated, as planned during the Plan stage. |
|
Change NAT Type |
Type the type of NAT (Static or Dynamic), as planned during the Plan stage. |
|
Change Implementation Notes |
Type words that appear in the change request's implementation notes, if the change request has completed the Implement stage. |
|
Request Risk Check Result |
Type the number and/or and severity of risks that implementation of the planned change would entail. |
|
Initial Plan Result |
Type the results of initial planning. |
|
Form Type |
Select the type of request used for the change request (Traffic Change, Object Change, or Generic Change). |
|
Change Validation Result |
Type the results of change validation. |
|
Risks Number |
Type the number of risks detected for the planned change, if the change request has completed the risk check in the Approve stage. |
|
Risks Details |
Type details about the risks detected for the planned change, if the change request has completed the risk check in the Approve stage. |
|
Translated Source |
Select the change request's source, as translated to IP addresses. |
|
Requested Object Action |
Select the requested action for an object change request (AddIPsToObject / RemoveIPsFromObject / NewObject / DeleteObject). |
|
Translated Destination |
Select the change request's destination, as translated to IP addresses. |
|
Change Object Action |
Select the action for an object change request, as specified during the Plan stage (AddIPsToObject / RemoveIPsFromObject / NewObject / DeleteObject). |
|
Translated Service |
Select the change request's service, as translated to ports. |
|
Requested Object Name |
Type an object's name, as specified in the original object change request. |
|
Automatically Implemented |
Select whether the requested change should be automatically implemented. |
|
Change Object Name |
Type an object's name, as specified for an object change request in the Plan stage. |
|
Already Works Firewalls |
Type the names of devices on which the requested change already works. |
|
Requested IPs To Add |
Type the IP addresses to add to an object, as specified in the original object change request. |
|
Change IPs To Add |
Type the IP addresses to add to an object, as specified for an object change request in the Plan stage. |
|
Requested IPs To Remove |
Type the IP addresses to remove from an object, as specified in the original object change request. |
|
Change IPs To Remove |
Type the IP addresses to remove from an object, as specified for an object change request in the Plan stage. |
|
Requested Object Scope |
Select the object scope, as specified in the original object change request. |
|
Change Object Scope |
Select the object scope, as specified for an object change request in the Plan stage. |
|
Is Work Order Editable |
Specify whether the work order is editable. |
|
Change Full Data |
Specify the change that has been matched to the change request's full data. |
|
Is Active Change Applicable |
Specify whether ActiveChange can be used to implement the requested change. |
|
Object Change Validation Result |
Type the results of object change validation. |
|
Create tickets from attachment |
Select whether the change request was created from a file. |
|
Affected Rules Result |
Type the device rules that are affected by a suggested object change request. |
|
Firewall Provider-1 |
Type the name or IP address of the MDSM managing the device. This field is relevant for Check Point devices only. |
|
Rule Removal Identifier |
Type the identifier of a rule removal request. |
|
Rule Removal Display Id |
Type the display ID of a rule to be removed via a rule removal request. |
|
Rule Removal Snippet |
Type a snippet of a rule to be removed via a rule removal request. |
|
Rule Removal Line Num |
Type the line number of a rule to be removed via a rule removal request. |
|
Rule Removal Rule Action |
Type the action of a rule to be removed via a rule removal request. |
|
Rule Removal Related Query |
Type a query related to a rule to be removed via a rule removal request. |
|
Rule Removal Related Tickets |
Type the ID numbers of change requests related to a rule removal request. |
|
Rule Removal Related Tickets Requestors |
Type the names of requestors who submitted change requests related to a rule removal request. |
|
Rule Removal Users to Notify |
Type the names of users to notify for a rule removal request. |
|
Requested Rule Removal Action |
Select a rule removal request's action. |
|
Change Rule Removal Action |
Select the action to which a rule removal request's original action was changed. |
|
Rule Removal Hit Count |
Type the number of times a rule to be removed via a rule removal request was used over a certain period of time. If desired, the period of time can be specified in the Rule Removal Hit Count Duration field. |
|
Rule Removal Hit Count Duration |
Type the number of days over which a rule to be removed via a rule removal request was used to block/allow connections. |
|
Rule Removal Last Used on |
Type the date on which a rule to be removed via a rule removal request was last used. |
|
Rule Removal First Log Date |
Type the date of oldest log that was consulted to obtain usage information about a rule to be removed via a rule removal request. |
|
Rule Removal Last Log Date |
Type the date of newest log that was consulted to obtain usage information about a rule to be removed via a rule removal request. |
|
Rule Removal Usage Info |
Type information about the usage of a rule that is to be removed. |
|
Rule Removal Ticket Origin |
Type the origin of a rule removal request. This can be any of the following:
This field is relevant for change requests originating in AlgoSec Firewall Analyzer only. |
|
Rule Removal Show Related Tickets |
Type the IDs of change requests are related to a rule that is to be removed. |
|
Risk Level |
Type the change request's highest risk level, as determined by a risk check. |
|
Recertification Related Tickets Calculation Date |
Type the date on which related change requests will be recertified. |
|
Recertification Candidate Devices |
Type the names of devices for which change requests that are candidates for recertification were issued. |
|
Recertified Traffic Ticket |
Type the name of the traffic change request that is being recertified. |
|
Rule Removal Notify Not responded |
Type the names of related change requestors that have not yet responded regarding a rule removal request. |
|
Recertification Status |
Select the status of a recertification request. This can be any of the following:
|
|
Application Default Services |
Type the protocol/port that the application uses by default (for example, tcp/80). |
|
Initial Plan Result For Allow Traffic |
Type the results of initial planning for a change request's Allow traffic. |
|
Initial Plan Result For Drop Traffic |
Type the results of initial planning for a change request's Drop traffic. |
|
Firewall Name for Traffic to be Allowed |
Type the name of the device for which traffic should be allowed, according to a change request. |
|
Firewall Name for Traffic to be Dropped |
Type the name of the device for which traffic should be blocked, according to a change request. |
|
Implementation Recommendations |
Type the Implementation Recommendations generated for a change request. |
Use any of the following operators when performing an advanced search in FireFlow:
|
Operator |
Description |
|---|---|
|
less than |
Search for change requests in which the property in the left column is less than the number in the right column. For example, if the criterion is Id less than 7, the search will return all change requests with ID numbers less than 7. |
|
equal to |
Search for change requests in which the property in the left column is equal to the number in the right column. For example, if the criterion is Id equal to 7, the search will return the change request with ID number 7. |
|
greater than |
Search for change requests in which the property in the left column is greater than the number in the right column. For example, if the criterion is Id greater than 7, the search will return all change requests with ID numbers greater than 7. |
|
not equal to |
Search for change requests in which the property in the left column is not equal to the number in the right column. For example, if the criterion is Id not equal to 7, the search will return all change requests with ID numbers other than 7. |
|
matches |
Search for change requests in which the property in the left column contains the value in the right column. For example, if the criterion is Subject matches Allow MS-RPC, the search will return all change requests whose subject contains "Allow MS-RPC". |
|
doesn't match |
Search for change requests in which the property in the left column does not contain the value in the right column. For example, if the criterion is Subject matches Allow MS-RPC, the search will return all change requests whose subjects do not contain "Allow MS-RPC". |
|
is |
Search for change requests in which the property in the left column matches exactly the value in the right column. For example, if the criterion is Status is resolved, the search will return all change requests with the status "resolved". |
|
isn't |
Search for change requests in which the property in the left column does not match exactly the value in the right column. For example, if the criterion is Status isn't resolved, the search will return all change requests with a status other than "resolved". |
|
before |
Search for change requests in which the property in the left column occurs before the date in the right column. For example, if the criterion is Created Before 2008-12-05, the search will return all change requests that were created before December 5, 2008. |
|
on |
Search for change requests in which the property in the left column occurs on the date in the right column. For example, if the criterion is Created On 2008-12-05, the search will return all change requests that were created on December 5, 2008. |
|
after |
Search for change requests in which the property in the left column occurs after the date in the right column. For example, if the criterion is Created After 2008-12-05, the search will return all change requests that were created after December 5, 2008. |
Use the following fields to determine how advanced search results are displayed:
|
Link |
Specify whether items in the column should be linked, by selecting one of the following:
|
|
Title |
Type the name of the column. |
|
Size |
Specify the text size of items in the column, by selecting one of the following:
|
|
Style |
Specify the font style of items in the column, by selecting one of the following:
|
Save an advanced search
Save an advanced search to load and run the same search again, or regularly display the search results on your FireFlow home page.
For more details, see Load a saved search
Do the following:
-
In the Query Builder page, define a search. For details, see Define an advanced search.
-
Scroll to the Saved Searches area.

-
In the Privacy drop-down list, specify who should be allowed to load this search:
My saved searches Make this search available to yourself only. Admin's saved searches Make this search available to all administrators Controller's saved searches Make this search available to all controllers Network's saved searches Make this search available to all network operations users Security saved searches Make this search available to all information security users FireFlow's saved searches Make this search available to all FireFlow users. - In the Description field, type a name for the search.
- Click Save.
The search is saved and will be available to the specified user role for loading.
Load a saved search
This procedure describes how to load a saved advanced search.
For more details, see Define an advanced search and Save an advanced search.
Do the following:
-
In the Query Builder page, reveal the Saved Searches area.
The Saved Searches area appears.
- In the Load saved search drop-down list, select the search you want to load.
- Click Load.
The search is loaded.
Copy a saved search
If you want to create and save a new advanced search that is similar to an existing saved search, you can copy the saved search.
Do the following:
- Load the search you want to copy. For details, see Load a saved search.
-
Click Save as New.
The Description field displays the name of the original search, followed by the word "copy".
For example, "Resolved Change requests copy"
- In the Description field, modify the search name as desired.
- Modify the search criteria as desired. For details, see Define an advanced search.
- Click Update.
The search is saved with the same privacy settings as the original search, and will be available to that user role for loading.
Delete a saved search
Delete any advanced search that you've saved in FireFlow.
Do the following:
- Load the search you want to delete. For details, see Load a saved search.
- Click Delete.
The search is deleted.
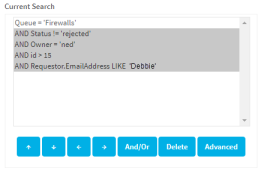
Advanced search example
The following example describes a sample use case for an advanced search in FireFlow.
-
Debbie cannot remember the change request ID number, aside that it was above 15.
-
Ned remembers handling the change request himself, and is certain that he did not reject it, but also does not have the specific ID.
Debbie has since hung up, but now Ned is concerned that he missed the expiration date and wants to be sure to handle it.
Ned does the following:
-
In FireFlow, he clicks Advanced Search in the main menu on the left.
-
On the Query Builder page, in the Add Criteria area, Ned defines the search query as follows:
- Ned selects the AND aggregator
-
In the ID row, Ned selects the greater than operator, and enters a value of 15.

-
In the Status row, Ned selects the isn't operator and then selects the rejected value from the dropdown on the right.

-
In the Owner row, Ned selects the is operator and enters Ned as the value.

-
In the Requestor EmailAddress row, Ned switches the field to Requestor RealName, selects the matches operator, and then enters Debbie as the value.

-
Ned clicks Add these terms to add the specified criteria to the Current search area.
-
In the Display columns area, Ned does the following:
- Selects Due in the Add Columns box.
- Selects Take in the Link drop-down list.
- Enters Due Date in the Title field.
- Selects Large in the Size drop-down list.
- Selects Bold in the Style drop-down list.
- Clicks to add the columns to the Show Columns box on the right.

- Ned clicks Search to start searching for Debbie's change request.
