
This topic describes how you can deploy ASMS on Amazon AWS or Microsoft Azure to manage your devices from the cloud.
Note: Each installation package includes software for the full AlgoSec Security Management Suite. Functionality for each ASMS product is enabled via license, and not by installation.
Deploy ASMS on AWS
Deploy ASMS on an AWS instance using an ASMS AMI available from the AlgoSec Portal.
If you are deploying on AWS, we recommend:
-
Ensuring that your machine is compatible with CentOS6. We recommend machines from the Amazon EC2 General Purpose M4 family.
- Ensuring that your AWS instance includes high performance storage, such as SSD disks
For more details, see the AWS Documentation.
Do the following:
-
Deploy your AWS AMI. For details, see Download ASMS software packages.
On the Download AlgoSecSecurity Management Suite > AMI page, select an AWS Region and enter your AWS Account ID.
The AlgoSec AMI is shared with your account. When the setup process is complete, you are notified and provided with the details required to access your new instance with ASMS.
-
If you are deploying clusters or distributed architectures, continue with Deploy clusters and distributed architectures.
Otherwise, continue with deploying ASMS products, including populating your environment with devices and users. For details, see ASMS deployment checklist.
Deploy ASMS on Microsoft Azure
Deploy ASMS on Microsoft Azure by converting a VHD file available from the AlgoSec portal to an Azure image.
Do the following:
- Download the ASMS Azure files.
- Create an Azure image from the VHD.
-
Log in to your Azure virtual machine as the root user.
You may need to unlock the root user before logging in. If so, run:
sudo passwd -u root
If you are deploying clusters or distributed architectures, continue with Deploy clusters and distributed architectures.
Otherwise, continue with deploying ASMS products, including populating your environment with devices and users. For details, see ASMS deployment checklist.
When you click Download on the Download AlgoSecSecurity Management Suite > New Installation page, a VHD file is downloaded to your local machine.
For more details, see Download ASMS software packages.
Create an Azure image from the VHD
The following steps describe how to convert your ASMS VHD file to an Azure image, and refer to areas of the Azure portal. For more details, see the Microsoft Azure documentation.
Note: Converting a VHD file to an Azure image has a variety of options and methods.
Use the steps described below when deploying your ASMS installation to prevent unexpected errors.
Do the following:
-
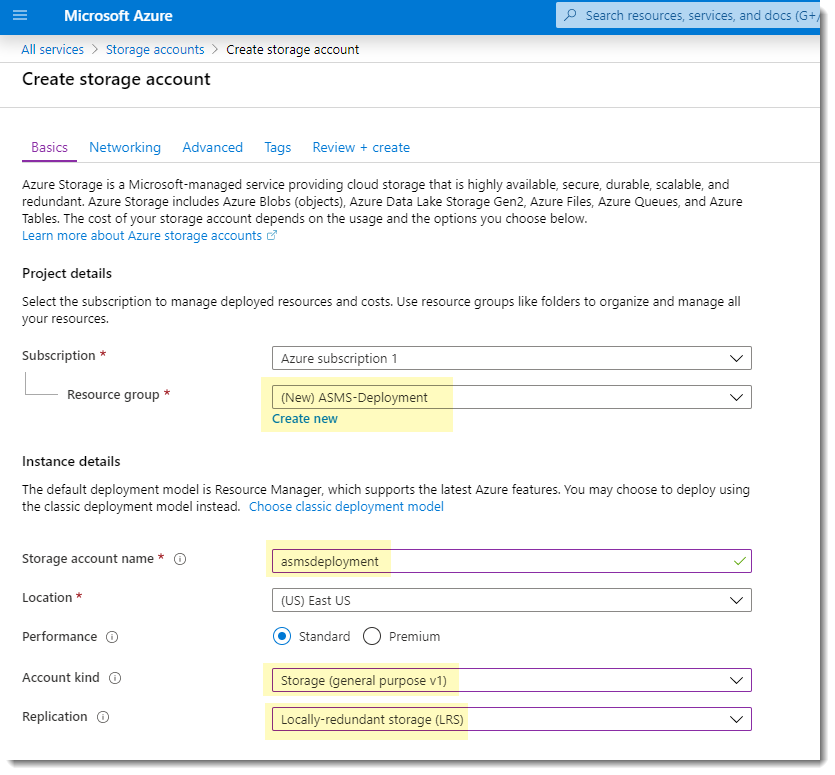
Create a new Azure storage account.
Define your settings as follows:
Resource Group Under the Resource Group field, click Create new to create a new resource group.
Enter a meaningful name for your new resource group, such as ASMS-Deployment.
Storage account name Enter a meaningful name for your storage account, such as asmsdeployment. Account kind Select Storage (general purpose v1). Replication Select LRS (Locally-redundant storage). For example:
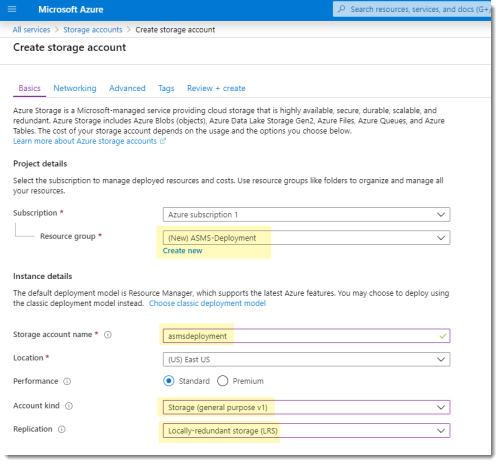
Continue in the wizard to create the new storage account and wait while it's deployed.
-
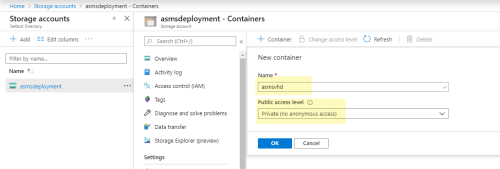
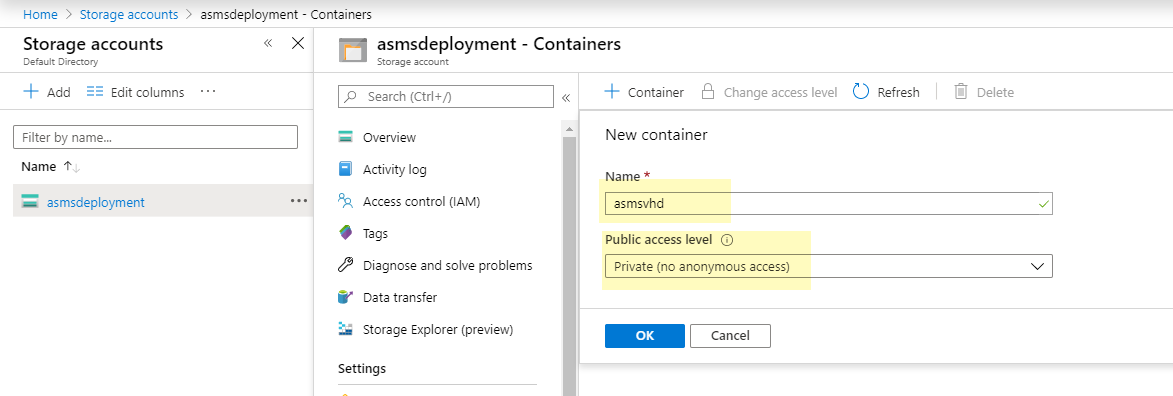
Once the new storage account is deployed, navigate to the Storage accounts area, and click the new storage account to view details.
-
In your new storage account, click Containers, and then
 to add a new container.
Define your new container with a meaningful name and a Public access level of Private (no anonymous access).
For example:
-
Switch to the Azure CLI, and ensure that the PowerShell Az module is installed.
If it's not installed, run the following:
Install-Module -Name Az -AllowClobber -Scope AllUsers
Tip: You may need to configure the Set-ExecutionPolicy cmdlet.
For more details, see Set-ExecutionPolicy and Install the Azure PowerShell module in the Microsoft documentation.
-
Connect to the Azure account from the CLI. Run:
Connect-AzAccount
When prompted, enter your credentials to log in.
-
Copy the VHD file downloaded from the AlgoSec portal to your Azure resource group.
From the CLI, run:
Add-AzVhd -ResourceGroupName "ASMS-Deployment" -Destination "https://asmsdeployment.blob.core.windows.net/asmsvhd/<VHD_NAME>.vhd" -LocalFilePath "<VHD_NAME>.vhd"
In this command, replace <VHD_NAME>.vhd with the exact name of the file you downloaded.
For example: AlgoSec-app-3000.10.100-asms-75-co6.vhd
Note: While the VHD that AlgoSec provides is dynamic, and the Azure requires a fixed hard disk, the upload process converts the dynamic file to a fixed file format.
Additionally, while you can convert this dynamic file to a fixed file manually, this requires a very large upload, and also runs the risk of errors. We recommend using the commands provided here to perform this upload.
-
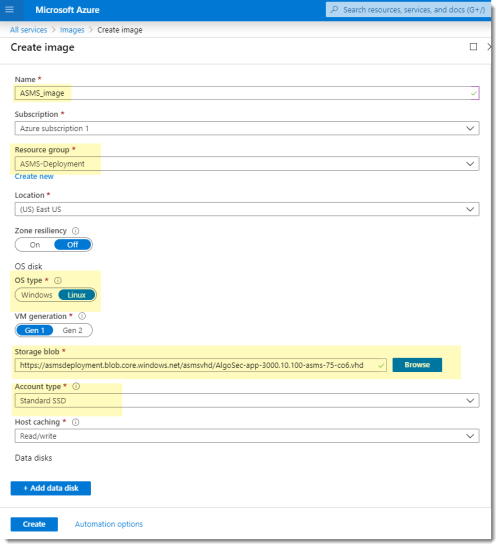
Return to the Azure portal to create your image. Navigate to Images, and click
 .
.In the Create image pane, enter the following details:
Name Enter a meaningful name. For example, ASMS_image. Resource group Select the new resource group you created for ASMS. OS type Select Linux. Storage blob Click Browse, and navigate to the VHD you uploaded via the CLI. Account type Select Standard SSD. For example:
-
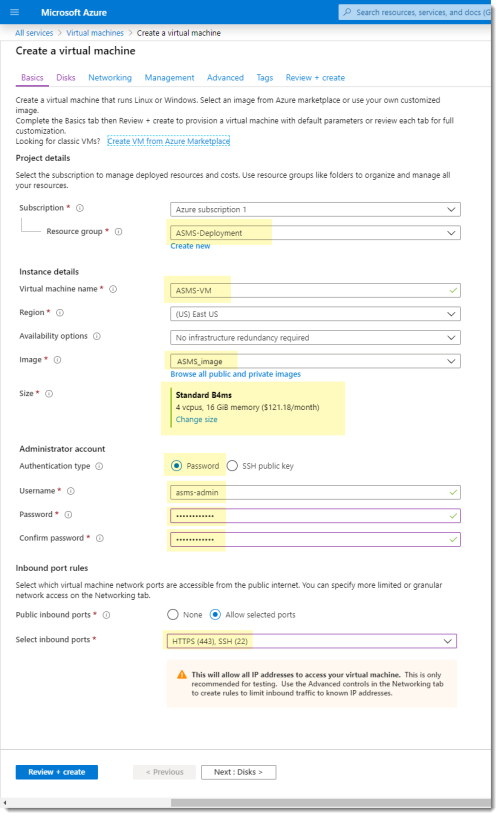
Navigate to the Azure Virtual machines area, and click
to create a new virtual machine.On the Create a virtual machine page, enter the following details:
Resource group Select the resource group you created earlier. Virtual machine name Enter a meaningful name for your virtual machine. Image Navigate to and select the image you created earlier. Size Click Change size, and select a minimum of B4ms. Authentication type Select Password. Username / Password Enter credentials to access the new virtual machine.
Note: Although you must set these credentials now, you'll need to log in to the machine as user root in order to deploy ASMS.
Select inbound ports Select HTTPS (443) and SSH (22). For example:
-
Click Next: Disks > to continue, and then select Standard SSD.
-
Continue through the wizard to create your virtual machine with ASMS installed.


When you're done, log in to your machine to deploy and set up your ASMS system. Continue with step 3 above.
â See also:
