
This section describes common maintenance procedures to perform on your ASMS system.
Reboot the appliance
This procedure describes how to reboot your appliance, which is sometimes required as part of other maintenance and configuration procedures.
Note: Perform a graceful shutdown and restart of the ASMS services to prevent unexpected behavior. For details, see ASMS graceful shutdown and startup in AlgoPedia.
Do the following:
-
Connect to the ASMS Administration Interface. For details, see Connect to the Administration Interface.
-
Press CTRL+C to exit the menu.
-
Run the following command:
reboot
If needed, Hardware Appliances can also be rebooted by pressing the power button on the front panel of the appliance for 10 seconds, and then pressing it again. We do not recommend this method as part of regular operation.
Reset the appliance to factory defaults
This procedure describes how to reset the appliance to factory defaults, and must be performed if you are reusing an appliance in a new role.
For example, you might do this if you appliance was previously used as a Central Manager, and you now want to use it as a Load Unit or Remote Agent.
Note: Resetting the appliance to factory defaults erases all of the information on the appliance, including configurations, user data, and so on, and returns it to its initial, out-of-the-box state.
Do the following:
-
We recommend backing up your data before you reset the appliance.
-
Connect to the ASMS Administration Interface. For details, see Connect to the Administration Interface.
-
Run the following command:
reboot
-
When the appliance reboots and a message appears, press SPACE. Do this within 5 seconds to prevent the appliance from fully rebooting.
The appliance OS menu appears.
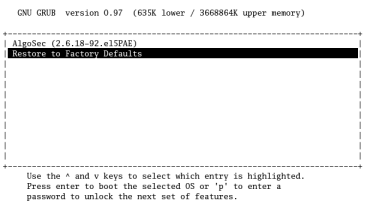
-
Use the arrow keys to select Restore to Factory Defaults, then press ENTER.
A warning message appears.
-
Enter erase.
Another warning message appears.
-
Enter YES. Make sure you use capital letters.
The system is formatted and re-installed, and all data is deleted. This process can take several minutes.
At the end of the process, the system is automatically restarted.
- Continue by configuring your machine again. For details, see Configure ASMS machines.
Migrate the Central Manager
This procedure describes how to migrate the ASMS Central Manager to another appliance, including a virtual appliance, AlgoSec hardware appliance, or an AWS/Azure instance. For example, you may want to do this while in the process of decommissioning end-of-life appliances or moving up to the cloud.
Note: Migration from a native Linux server is not supported. If you must migrate to a different deployment, perform a backup to an external backup server. Then connect the target appliance to the same backup server and perform ASMS restore from the backup server to the target appliance . See Backup and restore
Note: Migration can be performed only from the Central Manager that is being migrated.
Additionally, if you are working with HA clusters, this procedure breaks those clusters. Rebuild them when the migration is complete.
Do the following:
-
Verify the system specifications on the source and target machines.
ASMS versions Ensure that the ASMS version and build installed on both the source and target machines are identical.
License Ensure that a valid ASMS license is installed on the target machine. For more details, see Install a license.
System requirements Review the specifications on the target machine to ensure compliance. For more details, see System requirements.
Additionally, verify how much storage is being used on the /data partition on the source machine. You must have at least the same amount of storage plus another 5% free on the target machine's /data partition.
-
Disable any monitoring or analysis processes any devices managed by the Central Manager. Migration may fail if there are devices currently being monitored or analyzed.
-
Connect to the Central Manager administration interface via SSH and log in as root.
For details, see Connect to the Administration Interface.
- In the main menu, enter 16 to migrate ASMS units.
- Enter 1 to migrate a Central Manger.
- Enter the IP address and root password of the target machine that will host the new Central Manager.
-
The migration tool runs prerequisite checks on the target machine configuration and ASMS versions. If all checks pass, confirm the details by entering y.
The migration begins and displays a confirmation message when complete.
- If you are migrating a system with HA/DR clusters, rebuild your broken clusters. For details, see Build a cluster.
After migration, the system is configured as follows:
| Source machine |
We recommend that you do not use the source machine after migrating without resetting it to factory settings. Therefore, all services on the source machine are disabled. For more details, see Reset the appliance to factory defaults. |
| Remote Agents |
Remote Agents connected to the Central Manager will be automatically reconnected to the new Central Manager. |
Relocate devices
This procedure describes how to relocate devices between nodes in distributed architectures, providing a full Remote Agent migration tool.
For example, you may want to do this while in the process of decommissioning end-of-life appliances or moving up to the cloud.
Relocation is performed in the background without system downtime, and supports the following options:
- From the ASMS Central Manager to Remote Agents.
- From Remote Agents to the ASMS Central Manager.
- Between different Remote Agents.
Relocating a device relocates all device-related data, including reports.
Do the following:
- If you are relocating devices from a Central Manager to a Remote Agent, ensure that your devices are collected together in a device group in AFA. When relocating devices from a Central Manager, you must relocate a group, even if you are only relocating a single device. The group being relocated should include only top-level devices.
- Ensure that the ASMS version and build installed on both your source and target machines are identical.
- Disable any monitoring or analysis processes for the devices you want to relocate. Relocation may fail for devices that are currently being monitored or analyzed.
-
Connect to the Central Manager administration interface via SSH and log in as root.
For details, see Connect to the Administration Interface.
-
In the main menu, enter 16 to migrate ASMS units.
-
Enter 2 to relocate devices between nodes.
-
The detected nodes and their IPs are displayed. Select the following when prompted:
-
The source node, where the devices are currently located.
When relocating from the Central Manager to a Remote Agent, you must also specify a device group to relocate.
- The target node, where you want to move the devices.
-
-
Enter a time limit, in minutes, after which you want the relocation process to time-out if not completed.
The default value is 0, and leaves no time limit.
-
If prompted, determine whether you want to disable monitoring, scheduled analysis, and log collection for all relocated devices.
Tip: We recommend disabling these functions, especially when relocating devices to the Central Manager, to reduce CPU load on the Central Manager machine. For more details, see Default configurations for relocated devices.
-
Press ENTER to start the relocation process. Relocation is performed in the background and the log file location is displayed.
Just before the relocation is complete, the system checks the connectivity to the new device. If the check passes, the relocation processes is completed. If the connectivity check fails, the devices remain on the source node.
Note: If you have relocated management devices and their children, AFA runs an automatic connectivity check on the management device only. For any child, managed devices, manually verify that connectivity is active between ASMS and the device.
If connectivity is down, edit the device configuration in the AFA Administration area.
-
After relocation is complete, edit the device configuration if needed, such as to reconfigure a syslog server or rescheduling analysis, in the AFA Administration area. For details, see Default configurations for relocated devices
Relocation configures the system as follows, depending on the relocation you have performed:
|
From the ASMS Central Manager to Remote Agents |
Monitoring, scheduled analysis, and syslog messaging is enabled for all relocated devices. |
|
From Remote Agents to the ASMS Central Manager |
Relocated devices are added to a single group on the Central Manager. This group is named after the source Remote Agent, enabling you to relocate the devices again as needed. Note: If you are relocating management devices, such as a Palo Alto Panorama or Juniper Space Security Director, this group includes only the management device names, although both management and managed devices are relocated as configured. Monitoring, scheduled analysis, and syslog messages is disabled for all relocated devices to reduce load on the Central Manager.* |
|
Between different Remote Agents |
Monitoring, scheduled analysis, and syslog message is kept unchanged for each relocated device.* |
| Local syslog configuration |
When relocating devices that use a local syslog server, this configuration is also automatically relocated to the target node. No changes are made for external syslog servers. |
Re-enable monitoring, scheduled analysis, and syslog messaging
If monitoring, scheduled analysis, and syslog messages are disabled on your device after relocating, use the enableDevices and enableDevicesOnRemoteAgent APIs to re-enable these again.
If you want to relocate specific devices together, do so by creating a group and then relocating that group via API.
For example, you may want to do this if you have two Remote Agents, each with their own devices.
If the first Remote Agent is being disabled temporarily for maintenance purposes, group its devices to retain the membership details. Then use the relocation API call to relocate that group to the second Remote Agent. When the maintenance is complete, relocate that same group back again to the first Remote Agent.
When creating this group, verify the following:
- Verify that you include only devices that are managed by this same Remote Agent
-
Verify that you include any management devices required, such as Palo Alto Panorama or Juniper Space Security Director devices.
All devices managed by these parent devices are relocated together with their management devices, and do not need to be included in the group.
- Verify that all devices included in the group are accessible from the target machine.
Use the relocation REST API call and the treeNames parameter to define the name of the group you want to relocate.
OPSEC certificates for Check Point devices are generated per IP. Therefore, while most relocations of Check Point devices to new Remote Agents should succeed, you may have unexpected issues. In such cases, regenerate the certificate and re-install the certificate on the device.
For more details, see OPSEC Setup.
To check relocation progress or to cancel relocation, note the UUID displayed in the CLI, and use one of the following REST API requests:
- GET device-relocation-controller
- DELETE device-relocation-controller
For each of these API requests, use the UUID as the value for the uuid parameter.
Tip: We recommend using the ASMS Swagger API documentation to perform these API requests.
For more details, see ASMS Swagger documentation.
Use case scenario: Migrating an entire ASMS system
The following procedure describes a sample process for migrating your entire ASMS system to new appliances.
For example, you may want to do this if you are moving your data centers to a new location or to the cloud, moving to a new set of upgraded appliances, or if you're adding additional appliances to your system.
Tip: Migrating an entire ASMS system is a complicated process. If you are migrating a complex deployment with Remote Agents across geographic locations, consider that the migration may required a few days.
In such cases, consider performing each Remote Agent migration and device relocation in incremental steps.
Click each step in the following image to jump down for more details.

| Step | Procedures |
|---|---|
|
1. Start by migrating your Central Manager. Run through the entire migration and verify that everything works as expected when done. |
For details, see: |
|
2. Migrate Load Units by removing the existing units and adding new ones. |
For details, see: |
|
3. Relocate devices as needed from legacy Remote Agents to new Remote Agents. When you're done, remote the legacy Remote Agents from your system. |
For details, see: |
| 4. Run sanity checks again to ensure that ASMS is running again as expected. | For details, see Basic sanity checks. |
For more details, see also ASMS system architecture.
Contact AlgoSec technical support
This procedure describes how to contact AlgoSec support, and the files the send with your support case.
Do the following:
-
Access the Support Home page on the AlgoSec portal.
-
Click
 Submit a Support Case.
 -
Complete the fields and submit the ticket. Make sure to attach any relevant logs to your case.
Create support logs from ASMS as follows:
Create AFA support logsDo the following:
- In AFA, click your username at the top-right, and select Support.
- (Optional) In the Support dialog, enable Debug mode if needed, and then reproduce the issue so that the details are logged. In this case, return to the Support dialog again when you're done.
-
Select either General support file, or the specific item you want to include in your log file.
If you select any option other than the General support file, define the devices you want to generate the log file for. To add a device to the list, start entering a device name in the text box at the bottom of the dialog, and then select the device from the dropdown list displayed.
- Click Generate Files.
- Scroll down further to the table of support files. Click the Details link in the File Path column to access the support file you created.
Create FireFlow support logsDo the following:
- In FireFlow, click your username at the top-right, and select Support.
-
(Optional) In the Support dialog, enable Debug mode if needed, and then reproduce the issue so that the details are logged. In this case, return to the Support dialog again when you're done.
-
Click the Download General Support Zip link to download the file.
Create a general support log file via CLIIf your UI is unavailable, generate a general support log file via CLI.
Access the algosec_conf CLI menu, and enter 18 to collect log files. These will be general system logs and include data for the entire system, and not per device. For more details, see Connect to the Administration Interface.
HA support logsCreate HA support logs, if the case relates to high availability issues. For more details, see Collect cluster logs for AlgoSec technical support.
â See also:
