
Early availability features
This topic describes how to enable ASMS's Early Availability features.
ASMS's Early Availability features enable you to access new functionality and support earlier than general availability in hopes that customers provide feedback on the design and implementation. Early Availability features have shorter QA cycles and therefore are disabled by default.
Warning: We recommend that you do not keep Early Availability features in use in production. Either enable only in testing systems, or disable them in production systems when returning to general use.
Cisco Meraki devices in AFA
Important: We recommend that you enable this Early Availability feature only in a lab environment.
Support for Cisco Meraki is available as an early availability (EA) feature. ASMS supports Cisco Meraki devices as follows:
- Policy Visibility
- Report Generation
- Topology
- Change History
- Risks Calculation
- Map Visibility
- Regulatory Compliance
- Traffic Simulation Query
-
Group Policy Support for VLANs **
** Added to version a32.00 via upgrade. Please ask Customer Support for details.
The following sections describe how ASMS connects to Cisco Meraki devices:
- Network connectivity
- Device permissions
- Adding a new configuration parameter
- Obtaining Meraki API Key
- Add Cisco Meraki
From AFA we communicate with Meraki via Rest API HTTPS protocol.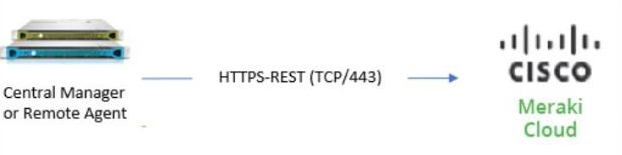
ASMS requires the API key to communicate with the Meraki via the Meraki SaaS application. The API key is preset in AFA for the Admin. See Obtaining Meraki API Key
Adding a new configuration parameter
-
In the AFA Administration area, navigate to the Options>Advanced Configuration tab.
-
Click Add to add a new configuration parameter, and enter the following details:
Name ALGOSEC_EA_CISCOMERAKI Value Enter one of the following:
-
yes = Enable Meraki device support
-
no (Default) = Disable Meraki device support
-
- Click OK
The API key is needed for configuring a Meraki Account. To connect to the Meraki cloud we have to iterate the API key.
To iterate the API key we must possess the Admin user in the Meraki, as AFA does.
Obtain or create your Meraki API key as follows:
- Browse to the Meraki dashboard: https://account.meraki.com/secure/login/dashboard_login
- Go to your Meraki Account.
- Click on User Profile.
- On the Edit Account tab, Scroll down to API access/ API keys section. The API key for onboarding your Meraki device is displayed.
- Copy the API key.
Note: You can also generate new API key by clicking on the button.
Now that you have the API key, you can continue with the procedure below that adds the Cisco Meraki to AFA.
Do the following:
- In AFA, Go to Administration
- Click the Devices Setup tab
- From New drop-down, select Devices
- Select Cisco Meraki.
The Step 1 of 2 form is:
- In the fields provided enter:
- Display name Note: The display name must not contain spaces.
- Authentication key
-
Under Geographic Distribution, select the remote agent that should perform data collection for the device. To specify that the device is managed locally, select Central Manager.This field is relevant when a Geographic Distribution architecture is configured.
- Click Next
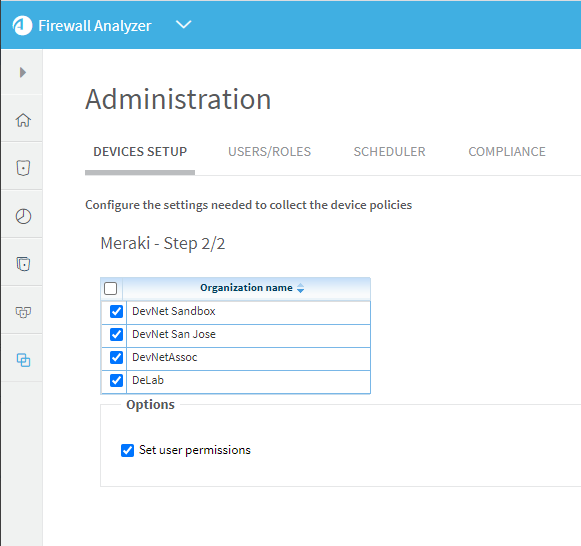
Step 2 of 2 is displayed:
- Select the relevant organizations of the account from the organizations listed.
-
Select the required option:
Set user permissions
Select this option to set user permissions for this device.
- Click Finish.

Cisco ISE devices in AFA
- Support includes FireFlow, but without ActiveChange
- Support does not include any AppViz features that rely on FireFlow
- Support does not include using a Geographic Distribution Remote Agent to manage Cisco ISE devices.
The following sections describe ASMS's connection to CISCO ISE devices:
- Network connectivity
- Device permissions
- Enable / disable early availability support for Cisco ISE
- Add a Cisco ISE device to AFA
Network connectivity
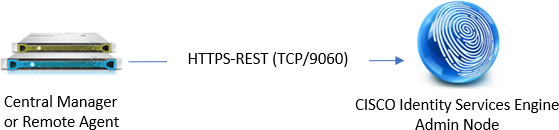
The following diagram shows an ASMS Central Manager or Remote Agent connecting to a Cisco ISE device.
Device permissions
ASMS connects to Cisco ISE devices via the Admin Node, using the ERS API.
To do so, ASMS requires an Administrator user with Read/Write permissions and the ERS-Operator group assignment.
Additionally, ASMS requires:
- A REST connection over port 9060
- Cisco ISE TrustSec SXP feature enabled for the device
Enable / disable early availability support for Cisco ISE
Do the following:
-
In the AFA Administration area, navigate to the Options > Advanced Configuration tab.
-
Click Add to add a new configuration parameter, and enter the following details:
Name ALGOSEC_EA_CISCOISE Value Enter one of the following:
- Yes = enable advanced map support
- No (default)= disable advanced map support
- Click OK.
This procedure describes how to add a Cisco ISE device to AFA.
Do the following:
- Access the Devices Setup page. For details, see Access the DEVICES SETUP page.
- In the vendor and device selection page, select Cisco > CISCO ISE.
-
Complete the fields as needed.
 Access Information
Enter details for accessing your device.
Host
Enter the device's host name or IP address.
User Name
Enter the username to use for device access.
Password
Enter the password to use for device access.
Geographic Distribution
Select the remote agent that should perform data collection for the device.
To specify that the device is managed locally, select Central Manager.
This field is relevant when a Geographic Distribution architecture is configured.
Options
Select the following as needed:
Real-time change monitoring
Select this option to enable real-time change monitoring. For details, see Configure real-time monitoring.
Set user permissions
Select this option to set user permissions for this device.
-
Click Finish. The new device is added to the device tree.
-
If you selected Set user permissions, the Edit users dialog box appears.
In the list of users displayed, select one or more users to provide access to reports for this account.
To select multiple users, press the CTRL button while selecting.
Click OK to close the dialog.
A success message appears to confirm that the device is added.
Arista devices in ASMS
This section describes the ASMS Early Availability support for Arista devices:
- Network connectivity
- Device permissions
- Enable / Disable support for Arista
- Add an Arista device to AFA
The following image shows an ASMS Central Manager or Remote Agent connected to an Arista device over HTTPS-REST.

To analyze Arista devices, ASMS connects to Arista EOS devices using the REST-based eAPI, ensuring high performance and efficient data collection.
ASMS requires a user with Read permissions, and a REST connection over port 443.
The user must also have permissions are required to run the following commands via API Explorer:
- enable
- show version
- show interfaces
- show ip interface
- show ip route vrf ( all | <vrf-name> )
- show ip access lists
- show ip access-lists summary
If the REST eAPI is not yet enabled, run the following using the Arista CLI:
Arista(config)#management api http-commands
Arista(config-mgmt-api-http-cmds)#no shut
Enable / Disable support for Arista
This procedure describes how to enable or disable support for Arista devices in ASMS.
Do the following:
-
In AFA, click your username, and select Administration > Advanced Configuration.
-
Click Add to add a new configuration parameter.
-
Define your parameter values as follows:
Name ALGOSEC_EA_ARISTA Value One of the following:
- yes = Enable Arista device support
- no = Disable Arista device support
For more details, see Advanced Configuration. Continue with Add an Arista device to AFA.
This procedure describes how to add an Arista EOS device to AFA.
-
Access the Devices Setup page. For details, see Access the DEVICES SETUP page
-
In the vendor device selection page, click Arista > Arista EOS.
-
Complete the following fields:
Host Enter the host name of the Arista device.
This is the name that will be displayed in the devices tree.
User Name Enter the username to use when accessing the device. Password Enter the password to use when accessing the device. Enable Password Enter the enable password to use when accessing the device. Note: In the Geographic Distribution area, you must select Central Manager.
Arista devices cannot be managed by Remote Agents.
- Click Next, and then select the managed devices you want to add to AFA.
-
Select the following as needed:
Real-time change monitoring
Select this option to enable real-time alerting upon configuration changes. For details, see Configure real-time monitoring.
Set user permissions
Select this option to set user permissions for this device.
- Click Finish. The new device is added to the device tree.
-
If you selected Set user permissions, the Edit users dialog box appears.
In the list of users displayed, select one or more users to provide access to reports for this account.
To select multiple users, press the CTRL button while selecting.
Click OK to close the dialog.
A success message appears to confirm that the device is added.
Enable/Disable ActiveChange for Azure
ActiveChange for Microsoft Azure is available as an early availability feature. Early availability features may be limited in their scope and have undergone a shortened testing cycle. They are disabled by default.
When ActiveChange for Azure is enabled, you can add and remove rules from the policy directly from FireFlow. Note that you cannot create new objects; you are limited to using existing objects. The work order will never recommend creating new objects regardless of whether ActiveChange is enabled.
Note: The following procedure enables ActiveChange for Azure in the ASMS, but does not automatically enable ActiveChange for specific Azure subscriptions. In order to enable ActiveChange for a specific Azure subscription, you must select the Enable ActiveChange checkbox when defining the Azure in AFA.
Note: AFA does not currently support the use of a Geographical Distribution Remote Agent to manage this device.
To enable/disable early availability ActiveChange for Azure:
-
In the toolbar, click your username.
A drop-down menu appears.
-
Select Administration.
The Administration page appears, displaying the Options tab.
-
Click the Advanced Configuration tab.
The Advanced Configuration page appears.
-
Click Add.
The Add New Configuration Parameter dialog is displayed.
- In the Name field, type AlgoSec_EA_Azure_ActiveChange.
- In the Value field, type one of the following:
- Type yes to enable advanced map support.
- Type no to disable advanced map support. This is the default setting.
- Click OK.
Enable support for Check Point R80 layers
Enabling this feature expands AFA support to include inline layers and ordered layers (global and domain-level). AFA supports these layers in the policy tab (including searching and exporting) and in change monitoring (in the Changes tab directly in the UI and in reports). Additionally, relevant AFA API responses will include layer information.
AFA represents layers with layer specific columns and action values. In the policy tab, each layer is grouped by headings.

Before enabling this feature, AFA supports only the global policy layer and the domain-level first ordered layer. Inline layers and rules in a second (or more) domain-level ordered layer are ignored, and rules with an action that calls an inline layer are treated as allow rules. All early availability features are disabled by default.
Note: Additional layer support is not extended to policy optimization, risk analysis, or traffic simulation queries. For these functionalities, rules in a second (or more) domain-level ordered layers are ignored, and rules with an action that calls an inline layer are treated as allow rules.
When early availability support is enabled, FireFlow and AppViz are not supported for Check Point R80 devices with policies with inline layer rules or rules implied from the 2nd and beyond ordered layers.
Warning: After enabling, this feature cannot be disabled again. Additionally, ActiveChange will not be supported after enabling layers support, on any layer.
If you are using ActiveChange for Check Point devices, we recommend that you do not enable this feature on your production environment.
Enable early availability support for Check Point R80 Layers
Do the following:
-
In the toolbar, click your username and select Administration to access the AFA Administration area.
-
Click the Advanced Configuration tab.
-
On the Advanced Configuration page, click Add.
-
In the Add New Configuration Parameter dialog, enter the following:
Name AlgoSec_EA_CKP_R80_Layers Value This parameter is set to no by default.
Define the value as yes to enable it. Once enabled, this feature cannot be disabled again.
- Click OK.
Tip: If you add a Check Point R80 device from a configuration file based on a recent report to an AFA system with this flag enabled, make sure that the configuration file is also generated from an AFA system with this flag enabled.
For more details, see Add other devices and routing elements.
