
Relevant AppViz administrators
This section describes how to manage AppViz users, roles, and permissions.
Roles and permissions
AppViz supports the ability to customize application permissions for individual users or roles. You can manage permissions from the perspective of the user/role, or form the perspective of the application. The table below describes the default permissions for each user type.
|
Role |
Permissions |
|---|---|
|
Unprivileged user (FireFlow requestor) |
|
|
Privileged user |
|
|
Administrator |
All permissions |
Note: Users automatically have permissions for any applications they create.
Create new unprivileged users
This procedure describes how to create a new unprivileged user for a AppViz application. Users are created in FireFlow, and are visible in both FireFlow and AppViz.
Do the following:
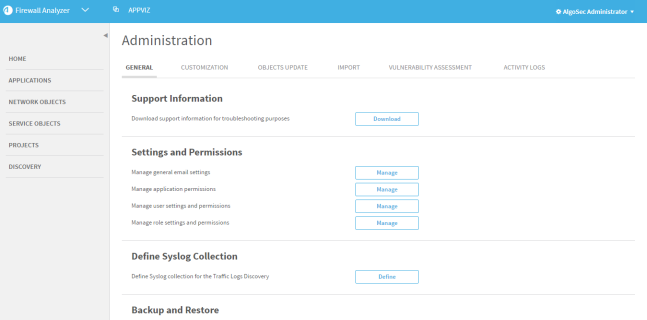
- In AppViz, at the top-right, click your username and select Administration.
-
In the Administration area, navigate to the GENERAL tab > Settings and Permissions > Manage application permissions, and click Manage.
The Application Permissions page appears, displaying a list of applications on the left.
- On the right, click Add Users.
-
At the bottom of the dialog that appears, click Create Users in FireFlow.
Continue with creating your user as a requestor in FireFlow.
Manage permissions for applications
You can give single users, or all users with a specific role, permission to view or edit an application that they do not have permission for by default. The procedure below describes how to manage user permissions for a specific application.
To manage permissions for an application:
- In AppViz, at the top-right, click your username and select Administration.
-
In the Administration area, navigate to the GENERAL tab > Settings and Permissions > Manage application permissions, and click Manage.
The Application Permissions page appears, displaying a list of applications on the left.
- Do one of the following:
- Select an application from the list.
- Perform a simple search for an application by doing the following:
Type any part of the application name in the search box, and click
 .
.The matching applications appear below the search box.
Select an application from the list.
The Authorized Roles and Users area for the selected application appears on the right.
Note: A role or user will appear disabled in the list for one of the following reasons: the user inherited permission to the application from a role, or the user or role has User has edit all applications permission.
- To give single users permission to view or edit the application, do the following:
Click +Add Users.
The Add Users window appears.
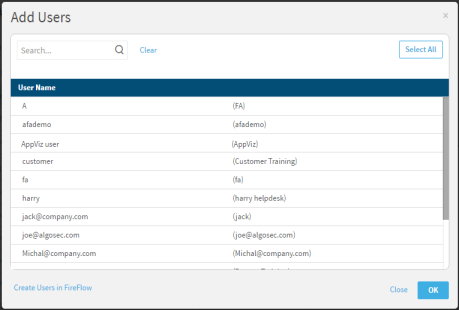
Do one of the following:
- Select users from the list.
- Perform a simple search for a user by entering any part of the user's name or username in the search box, and click . The matching users appear below the search box.
- To deselect users, click Clear.
Click OK.
Once added, the user(s) appear in a list below the application. By default they are only given permission to view the application.
To give the user permission to edit an application, click the Can View drop-down list for the application and select Can Edit.
-
To give all users with a specific role permission to view or edit the application, do the following:
-
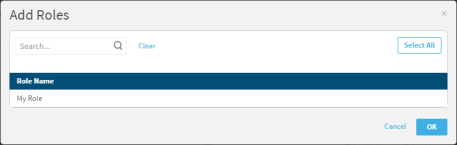
Click +Add Roles.
The Add Roles window appears.
- Do one of the following:
- Select roles from the list.
- Perform a simple search for a role by typing any part of the role's name in the search box, and clicking . The matching roles appear below the search box. Select roles from the list.
- To deselect roles, click Clear.
-
Click OK.
The role(s) appear in a list below the application. By default they are only given permission to view the application.
- To give the role permission to edit an application, click the Can View drop-down list for the application and select Can Edit.
-
- To remove the permissions of a user or role for the application, click
 .
. - To remove all user and role permissions for the application, click Remove all.
- Click Save Changes.
Manage permissions for users
You can manage permissions for users in two ways:
- You can grant permissions to individual users. This gives users permission to view or edit an application that they do not have permission for by default.
- You can assign users a role; consequently, the users with the role receive all the permissions of the role.
The procedure below describes how to manage application permissions for a specific user.
-
In the toolbar, click your username.
A drop-down list appears.
-
In the drop-down list, select Administration.
The administration page appears in the workspace.
-
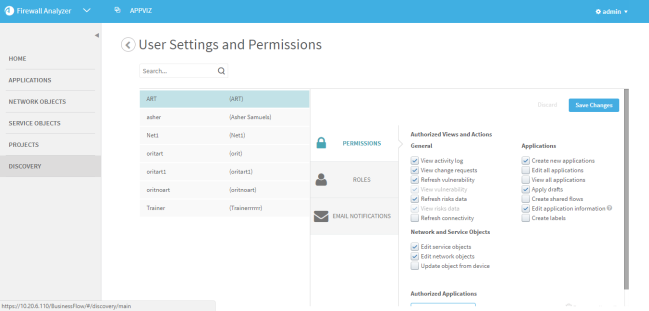
In the Settings and Permissions area, next to Manage user settings and permissions, click Manage.
The User Settings and Permission page appears.
- Do one of the following:
- Select a user from the list.
- Perform a simple search for a user by doing the following:
Type any part of the user's name or username in the search box, and click
.The matching users appear below the search box.
Select a user from the list.
The information for the selected user appears on the right.
- In the Authorized Views and Actions area, edit the permissions given to the user as needed. For details, see Authorized views and actions fields.
- To give the user permission to view or edit an application, do the following:
In the Authorized Applications area, click +Add Applications.
The Add Applications wizard appears.
Select applications using the information in Use the Add Applications wizard.
The selected application(s) appear in a list below the user. By default the user is given permission to view the application.
- To give the role permission to edit an application, click the Can View drop-down list for the application and select Can Edit.
- To revoke the user's permissions to an application, click .
- To revoke the user's permissions for all applications, click Remove all applications.
- Click Save Changes.
|
In this field... |
Do this... |
|---|---|
| General |
|
|
View activity log |
Select this check box to give the user permission to view the activity log tab of applications and network objects. |
|
View change requests |
Select this check box to give the user permission to view the change requests tab of applications, network objects, and service objects. |
|
Refresh vulnerability |
Select this check box to give the user permission to update the vulnerability assessment of network objects. All users with permission to update the vulnerability assessment have permission to view vulnerability, as well. |
|
View vulnerability |
Select this check box to give the user permission to view the vulnerability tab of applications. |
|
Refresh risks data |
Select this check box to give user permission to refresh risks data. |
|
View risks data |
Select this check box to give user permission to view risks data. |
|
Refresh connectivity |
Select this check box to give the user permission to update the connectivity of applications. |
| Applications |
|
|
Create new applications |
Select this check box to give user permission to create new applications. |
|
Edit all applications |
Select this check box to give user permission to edit all applications. All users with permission to edit all applications automatically have the View all applications permission and the Edit application information permission. |
|
View all applications |
Select this check box to give user permission to view all applications. |
|
Apply drafts |
Select this check box to give the user permission to apply drafts to applications. Note: If a user has this permission, they will only be able to apply drafts to applications they have permission to edit. |
|
Create shared flows |
Select this check box to give user permission to create shared traffic flows. |
|
Edit application information |
Select this check box to give user permission to edit application custom fields, labels, and contacts. |
|
Create labels |
Select this check box to give user permission to create user-defined application labels. |
| Network and Service Objects |
|
|
Edit service objects |
Select this check box to give user permission to edit service objects. |
|
Edit network objects |
Select this check box to give user permission to edit network objects. |
|
Update object from device |
Select this check box to give the user permission to synchronize a device object's definition in AppViz with the definition on the device. |
You can manage user permissions by assigning roles to users. All users with a specific role receive all of the permissions assigned to the role. The procedure below describes how to assign and revoke roles.
Note: When fetching data from an LDAP server, you cannot manually assign/revoke roles. You must map roles using the LDAP Group DN. For details, see Map LDAP groups to roles .
To assign/revoke user roles:
-
In the toolbar, click your username.
A drop-down list appears.
-
In the drop-down list, select Administration.
The administration page appears in the workspace.
-
In the Settings and Permissions area, next to Manage user settings and permissions, click Manage.
The User Permission page appears.
- Do one of the following:
- Select a user from the list.
- Perform a simple search for a user by doing the following:
Type any part of the user's name or username in the search box, and click
.The matching users appear below the search box.
Select a user from the list.
The information for the selected user appears on the right.
-
Click the Roles tab.
The Assigned Roles area appears.
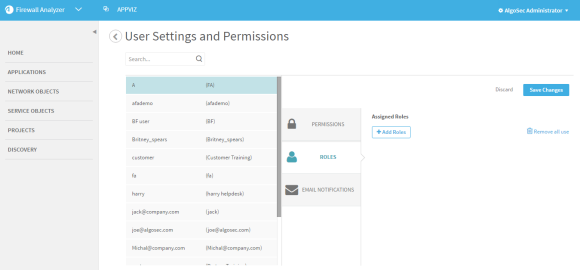
- Edit the roles given to the user, by doing the following:
In the Assigned Roles area, click +Add Roles.
The Add Roles window appears.
- Do one of the following:
- Select roles from the list.
- Perform a simple search for a role by doing the following:
Type any part of the role's name in the search box, and click
.The matching roles appear below the search box.
- Select roles from the list.
- To deselect roles, click Clear.
Click OK.
The roles appear in the Assigned Roles list.
- To remove the revoke the role from the user, click .
- To revoke all of the user's roles, click Remove all users.
- Click Save Changes.
Manage user roles
Do any of the following:
You can give roles permission to view or edit specific applications. Users assigned a role inherit all permissions granted to the role. The procedure below describes how to manage application permissions for roles.
To assign/revoke role permissions:
-
In the toolbar, click your username.
A drop-down list appears.
-
In the drop-down list, select Administration.
The administration page appears in the workspace.
-
In the Settings and Permissions area, next to Manage role settings and permissions, click Manage.
The Role Settings and Permissions page appears.
- Do one of the following:
- Select a role from the list.
- Perform a simple search for a role by doing the following:
Type any part of the role's name in the search box, and click
.The matching roles appear below the search box.
Select a role from the list.
The information for the selected role appears on the right.
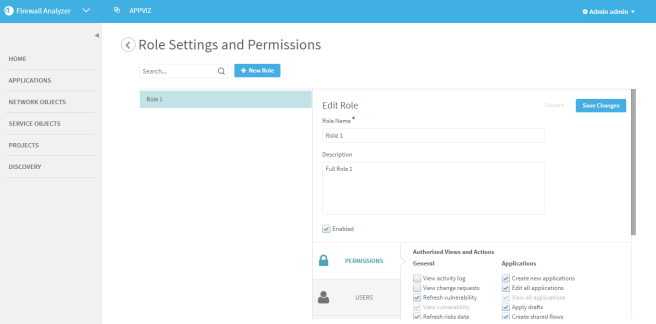
- In the Authorized Views and Actions area, edit the permissions given to the role. For details, see Authorized views and actions fields.
- To give the role permission to view or edit an application, do the following:
In the Authorized Applications area, click +Add Applications.
The Add Applications wizard appears.
Select applications using the information in Use the Add Applications wizard.
The selected applications appear in a list. By default, the role is given permission to view the applications.
- To give the role permission to edit an application, click the Can View drop-down list for the application and select Can Edit.
- To revoke the role's permissions to an application, click .
- To revoke the user's permissions for all applications, click Remove all applications.
- Click Save Changes.
To add users to a role:
-
In the toolbar, click your username.
A drop-down list appears.
-
In the drop-down list, select Administration.
The administration page appears in the workspace.
-
In the Settings and Permissions area, next to Manage role settings and permissions, click Manage.
The Role Settings and Permission page appears.
- Do one of the following:
- Select a role from the list.
- Perform a simple search for a role by doing the following:
Type any part of the role's name in the search box, and click
.The matching roles appear below the search box.
Select a role from the list.
The information for the selected role appears on the right.
-
Click the Users tab.
The Users tab appears.
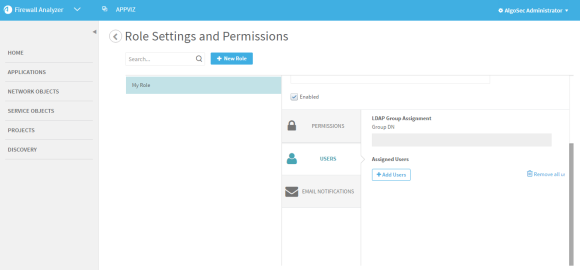
-
Edit the users assigned the role, by doing the following:
-
In the Assigned Users area, click +Add Users.
The Add Users wizard opens.
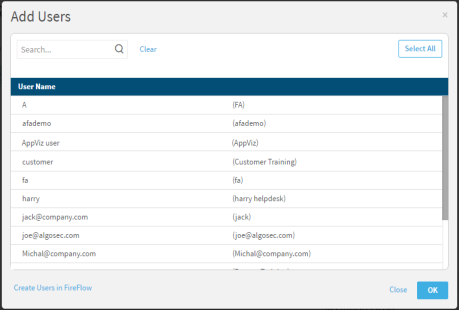
- Do one of the following:
- Select users from the list.
- Perform a simple search for a user by doing the following:
Type any part of the user's name or username in the search box, and click
.The matching users appear below the search box.
- Select users from the list.
- To deselect users, click Clear.
-
Click OK.
The user(s) appear in the Assigned Users area.

-
- To revoke the role from the user, click .
- To revoke all of the role's users, click Remove all users.
- Click Save Changes.
To create a new role:
-
In the toolbar, click your username.
A drop-down list appears.
-
In the drop-down list, select Administration.
The administration page appears in the workspace.
-
In the Settings and Permissions area, next to Manage role settings and permissions, click Manage.
The Role Settings and Permission page appears.
-
Click +New Role.
New fields appear on the right.

- Complete the fields as needed. For details, see New role fields.
- Continue completing the fields. For details, see Authorized views and actions fields.
- To give the role permission to view or edit an application, do the following:
In the Authorized Applications area, click +Add Applications.
The Add Applications wizard appears.
Select applications using the information in Use the Add Applications wizard.
The selected applications appear in a list. By default, the role is given permission to view the applications.
- To give the role permission to edit the applications, do the following:
- For the desired application, click Can View.
- In the drop down menu, select Can Edit.
- To revoke the role's permissions to an application, click .
- To revoke the role's permissions for all applications, click Remove all users.
- Click Save Changes.
|
In this field... |
Do this... |
|---|---|
|
Role Name |
Type the name of the role. |
|
Description |
Type a description for the role. This field is optional. |
|
Enabled |
Default is Enabled. Clear check box to disable the role. |
If you are importing user data from an LDAP server, you can map LDAP groups to AppViz roles. The user will be assigned the relevant role upon login.
Note: If your environment is configured to import user information from an LDAP server, changes to user settings must be made only on the LDAP server (changes made in the AlgoSec Suite may be overridden the next time the user logs in).
To map LDAP groups to a role:
-
In the toolbar, click your username.
A drop-down list appears.
-
In the drop-down list, select Administration.
The administration page appears in the workspace.
-
In the Settings and Permissions area, next to Manage role settings and permissions, click Manage.
The Role Settings and Permissions page appears.
- Do one of the following:
- Select a role from the list.
- Perform a simple search for a role by doing the following:
Type any part of the role's name in the search box, and click
.The matching roles appear below the search box.
Select a role from the list.
The Edit Role area for the selected role appears on the right.
-
Click the Users tab.
The Users tab appears.
-
In the Group DN field, type the LDAP group DN you wish to map to the role.
Note: This field is disabled for the Administrator role. Administrators have all roles.
- Click Save Changes.
To delete a role:
-
In the toolbar, click your username.
A drop-down list appears.
-
In the drop-down list, select Administration.
The administration page appears in the workspace.
-
In the Settings and Permissions area, next to Manage role settings and permissions, click Manage.
The Role Settings and Permission page appears, with a list of all roles on the left.
-
Hover over the desired role and click
 .
. A confirmation message appears.
- Click OK.
