
This topic describes how to manage projects in AppViz.
Project interface

Project Areas
|
Area |
Description |
|---|---|
|
Progress Bar |
The project's progress bar displays the project's completeness. |
|
Actions |
This area provides the option to:
|
|
Affected Applications |
This area displays the applications affected by the project and change requests that were initiated for the project. These appear sorted in the following categories:
You can view an application by clicking on the application's name, or view the change request (in FireFlow) by clicking on the change request's ID. |
|
Project Information |
Displays the following information about the project:
|
|
General Information |
Displays general information that is entered by the creator or project user. |
|
Project Tasks |
Displays the project's tasks. |
Start a new project
To start a project:
-
Go to the Projects area. For details, see Welcome to AppViz.
-
Click +New Project.
A menu appears.

-
Select the project type.
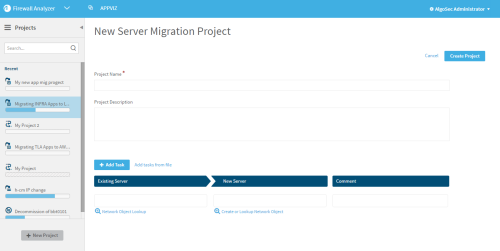
The new project form appears in the workspace.
-
Complete the fields as needed. For details, see:
-
Click Create Project.
One of the following occurs:
- For Server Migration and Server Decommission projects, the project is created and appears in the workspace.
-
For Application Migration and Application Lifecycle projects, the project is created and the Plan Project dialog is displayed.

- For Application Migration and Application Lifecycle projects, do one of the following:
To start planning the project, click Start Planning.
For details, see:
To skip planning for now, click Not Now.
The project appears in the workspace.

|
In this field... |
Do this... |
|---|---|
|
Project Name |
Type the name of the project. |
|
Project Description |
Type a description of the project. |
|
+ Add Task |
Click this button to add a new task to the project. Each task represents a migration from one server to another. |
|
Add tasks from file |
Click this link to upload a CSV file of many tasks to the project. The headers must be the following: Existing IP, New IP, Comment |
|
Existing Server |
Do one of the following:
Only single hosts (not groups or ranges) appear in the wizard. |
|
New Server |
Do one of the following:
Only single hosts (not groups or ranges) appear in the wizard. |
|
Comment |
Type a comment for the task. This field is optional. |
|
|
Click this icon to delete a task from the project. |
|
In this field... |
Do this... |
|---|---|
| Project |
|
|
Project Name |
Type the name of the project. |
|
Project Description |
Optionally, type a description of the project. |
|
Save Project |
Click to create the project. You are asked whether you want to start planning now or wait until later. |
|
Plan |
Click this button to start planning. |
| Plan - Objects for Migrations |
|
|
Applications |
Click Add Applications. For details, see Network objects applications. The selected applications are listed in the left panel and all of their network objects are listed in the center panel under View and Add Network Objects. |
|
View and Add Network Objects |
In this area select the network objects to include in the migration. To filter the list, you can combine one or more of the following:
To select objects, do the following:
|
|
View Diagrams |
Select a network object and click |
| Server Migration List |
List of network objects selected for migration. |
|
|
To delete a network object from the server migration list, hover over the object and click the trash icon. |
|
In this field... |
Do this... |
|---|---|
|
Project Name |
Type the name of the project. |
|
Project Description |
Type a description of the project. |
|
+ Add Task |
Click this button to add a new task to the project. Each task represents the decommissioning of a single server. |
|
Add tasks from file |
Click this link to upload a CSV file of many tasks to the project. The headers must be the following: Server IP, Comment |
|
Server IP |
Do one of the following:
Only single servers (not groups) appear in the wizard. |
|
Comment |
Type a comment for the task. This field is optional. |
|
|
Click this icon to delete a task from the project. |
|
In this field... |
Do this... |
|---|---|
|
Project Name |
Type the name of the project. |
|
Project Description |
Type a description of the project. |
Update a project's applications
Updating applications creates draft revisions (or edits current drafts) for specified affected applications; these drafts detail the specific changes the project requires for the application. If desired, you can then apply the application drafts for all or some of the applications.
To update applications:
-
View the project for which you want to update applications. For details, see Projects.
-
In the Actions area, click Update.
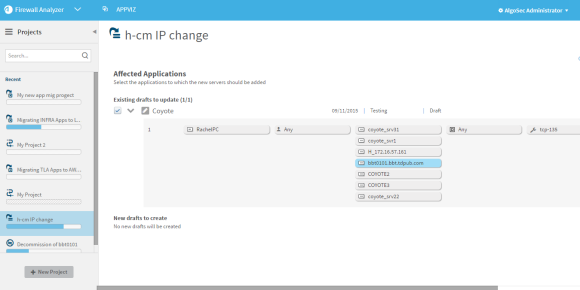
The Affected Applications page appears.

The project's affected applications appear, sorted in the following lists:
- Existing drafts to update. Applications with a current draft revision. Updating these applications will edit the draft revision of the application with the requirements for the project.
- New drafts to create. Applications which do not have a current draft revision. Updating these applications will create a draft revision of the application with the requirements for the project.
- Flows that will not be updated. Affected applications which contain flows which contain the decommissioned server. This is only relevant for decommission projects.
-
Shared flows to be updated
Note: Shared flows with no instances do not cause a new draft to be created.
- Applications to decommission
- Applications to clone
-
Select the check box next to each application you want to update.
You can view an application's affected flows by clicking
 .
.
-
Click Update Applications.
A new draft with the change dictated by the project is created for each selected application (or the existing draft is updated), and the Apply Drafts page appears.

- Do one of the following:
- To exit without applying the application drafts, click No thanks.
-
To apply some or all of the application drafts, do the following:
Note: AppChange will create one change request for each application.
- Select the check box next to each application whose draft you want to apply.
-
Click Apply Selected.
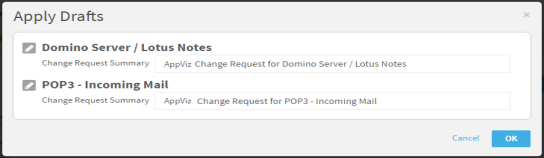
The Apply Drafts dialog is displayed.
-
(Optional) Change the subject of the change request that will open in FireFlow for each application by editing the Change Request Summary field.
Note: You can optionally customize a default change request summary specifically for Decommission change requests. For details, see Customize interactions with AFA and FireFlow.
-
Click OK.
The drafts are applied and the change requests are created in FireFlow.
The project appears.
Edit a project
To edit projects:
-
View the project you want to edit. For details, see Projects.
-
In the Actions area, click Edit.
The project's details appear in an editable format.

-
Edit the fields as needed. For details, see:
-
Click Save Changes.
The changes are saved.
Apply all application drafts
You have the option to simultaneously apply the drafts of many or all a project's affected applications. Otherwise, this can be accomplished immediately after creating the drafts (as a part of updating applications) or manually, one application at a time.
Note: AppChange will create one change request for each application.
To apply all application drafts:
-
View the project you want to edit. For details, see Projects.
-
In the Actions area, click Apply Drafts.
The Apply Drafts page appears.

-
Select the check box next to the application drafts you want to apply.
If an application's draft includes changes other than the changes relevant to the project, a warning message appears when the application is selected.
-
Click Apply Selected.
The Apply Drafts dialog is displayed, with a list of the selected applications.
- (Optional) Change the subject of the change request that will open in FireFlow for each application by editing the Change Request Summary field.
-
Click OK.
The drafts are applied, and the change requests are created in FireFlow.
Discard a project
Note: You can only discard projects which have not been started.
To discard projects:
-
View the project you want to edit. For details, see Projects.
-
In the Actions area, click Discard.
A confirmation message appears.

-
Click Discard.
The project is discarded.
Close a project
Note: You can only close projects which have reached completion.
To close projects:
-
View the project you want to edit. For details, see Projects.
-
In the Actions area, click Close.
The project is closed without confirmation.
Decommission retired servers
Once a Server Migration or Application Migration project is completed, you can automatically open a decommission project to decommission the retired servers.
To decommission the retired servers:
-
View the project you want to edit. For details, see Projects.
-
In the Actions area, click Decommission.
The new decommission project appears with editable fields. The servers to decommission are already added as tasks for the project.
- Edit the fields as desired. For details, see Server decommission project fields.
-
Click Save Changes.
The project is created and appears.
Export project content to PDF
To export project content:
-
View the project you want to edit. For details, see Projects.
-
In the Actions area, click Export.
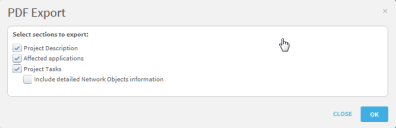
The PDF Export dialog is displayed.
-
Select the information to export, and click OK.
Your browser will prompt you to save or open the PDF file.
