
ActiveChange parameters
Configure Logging for Rules created by ActiveChange for Check Point devices
By default, ActiveChange creates rules with logging enabled (the device will track the rule's activities in logs). You can configure ActiveChange to create rules for Check Point devices without logging by setting DefaultTrackOption to the value "None".
| Configuration Parameter Name | Value |
|---|---|
| DefaultTrackOption |
Log To configure ActiveChange to create rules with logging. (Default) None To configure ActiveChange to create rules without logging. |
Configuring Logging for Rules Created by ActiveChange for Juniper SRX Devices
By default, ActiveChange creates rules with logging enabled (the device will track the rule's activities in logs), and the log will be set at both the session init and session close times. If desired, you can configure ActiveChange to create rules without logging or change when the activities of the rule are logged.
| Configuration Parameter Name | Value |
|---|---|
| SRXActiveChangeDefaultAddLogToNewRule |
session-init. To configure ActiveChange to create rules with logging and set the log at the session init time. session-close. To configure ActiveChange to create rules with logging and set the log at the session close time. session-init-close. To configure ActiveChange to create rules with logging and set the log at both the session init and session close times. (Default) none. To configure ActiveChange to create rules without logging. |
|
JuniperSpaceActiveChangeInstallPolicy |
The value assigned to this parameter determines whether ActiveChange installs the saved policy on the Juniper SRX devices. |
Configuring Logging for Rules Created by ActiveChange for Cisco ASA Devices
By default, ActiveChange assigns new rules on Cisco firewalls' log levels in accordance with the following criteria:
- Rules with an Allow action are assigned the device's default log level.
- Rules with a Drop action are assigned the log level, informational.
If desired, you can customize the log levels for each of these rule types.
Supported log levels include emergencies, alerts, alert, critical, errors, error, warnings, warning, notifications, notification, informational, debugging, disable, and default.
| Configuration Parameter Name | Value |
|---|---|
| CiscoLogLevelForAllow |
The desired log level for rules with an Allow action. The default value is the device's default log level. |
| CiscoLogLevelForDrop |
The desired log level for rules with a Drop action. The default value is informational. |
Configuring Logging for Rules Created by ActiveChange for Cisco Firepower Devices
By default, ActiveChange creates rules with logging enabled (the device will track the rule's activities in logs).
AlgoSec recommends using the default beginningOfConnection setting only. When working with Cisco Firepower, using the endOfConnection setting alone for FTD, deny rules will not be logged, and using both settings simultaneously counts these rules twice.
| Configuration Parameter Name | Value |
|---|---|
| CiscoFTDLogLevel |
beginningOfConnection. Enable logging in the beginning of the connection. endOfConnection. Enable logging in the end of the connection. both. Enable logging both in the beginning and in the end of the connection. None. Disable any logging. |
Configuring Logging for Rules Created by ActiveChange for Cisco IOS Routers
By default, ActiveChange creates rules with logging enabled (the device will track the rule's activities in logs). If desired, you can configure ActiveChange to create rules without logging.
| Configuration Parameter Name | Value |
|---|---|
| IOSLogForAllow |
0. To configure ActiveChange to create allow rules without logging. 1. To configure ActiveChange to create allow rules with logging. (Default) |
| IOSLogForDrop |
0. To configure ActiveChange to create drop rules without logging. 1. To configure ActiveChange to create drop rules with logging. (Default) |
Configuring Logging for Rules Created by ActiveChange for Fortimanager Devices
By default, rules for Fortimanager devices are created with logging enabled in the following situations:
- For rules with an "allow" action, logging is enabled only for security events.
- For rules with a "drop" action, logging is always enabled.
If desired, you can customize the log levels for each of these rule types.
| Configuration Parameter Name | Value |
|---|---|
| FortinetLogLevelForAllow |
no. Rules with the action "allow" will be created with logging disabled. security. Rules with the action "allow" will only be created with logging enabled for security events. (Default) all. All rules with the action "allow" will be created with logging enabled. |
| FortinetLogSessionsStartForAllow |
0. Logs for "allow" rules are generated when the session starts. 1. Logs for "allow" rules are generated when the session ends. (Default) Note: This parameter is only relevant when FortinetLogLevelForAllow is set to all. |
| FortinetLogCaptureForAllow |
0. Logging for "allow" rules does not capture packets. (Default) 1. Logging for "allow" rules captures packets. Note: This parameter is only relevant when FortinetLogLevelForAllow is set to all. |
| FortinetLogForDrop |
0. Rules with the action "drop" will be created with logging disabled. 1. Rules with the action "drop" will be created with logging enabled. (Default) |
Configuring Maximum Number Rules Generated from Cisco IOS Router Work Order
| Configuration Parameter Name | Value |
|---|---|
| IOSMaxNumberOfRules |
The desired maximum number of rules. The default value is 5000. |
Configuring Implementation Behavior for Cisco Firepower
By default, FireFlow will implement changes for Cisco Firepower devices on the policy, but not install the new policy on the devices. If desired, you can change this.
| Configuration Parameter Name | Value |
|---|---|
| CiscoFirepowerActiveChangeInstallPolicy |
0. To configure ActiveChange to save changes to the policy. (Default) 1. To configure ActiveChange to save changes to the policy and install the policy on the devices. |
Configuring Implementation Behavior for Palo Alto Panorama Devices
By default, FireFlow will implement changes for Panorama/Palo Alto devices on the policy, but not commit the changes to Panorama. If desired, you can change this.
| Configuration Parameter Name | Value |
|---|---|
| PanoramaActiveChangeCommit |
None. FireFlow saves the changes to the policy only. (Default) Panorama. FireFlow saves the changes to the policy and commits the changes to Panorama. Full. FireFlow saves the changes to the policy, commits the changes to Panorama, and commits the changes to the device groups. |
| PanoramaCommitCurrentUserOnly | All.FireFlow commits all pending changes from all users. (Default) User. FireFlow commits only pending changes made by the user defined on the Panorama. |
Committing is asynchronous, and may take 30 minutes or more to complete. FireFlow will continuously poll Panorama for the status of the commit until it completes. By default, FireFlow will send a request every 1500 milliseconds, for a maximum of 120 times (30 minutes of polling). You can optionally customize the polling interval and the maximum number of polls in AlgoSec Firewall Analyzer.
To customize polling
- Switch to AFA.
-
In the toolbar, click your username.
A drop-down list appears.
-
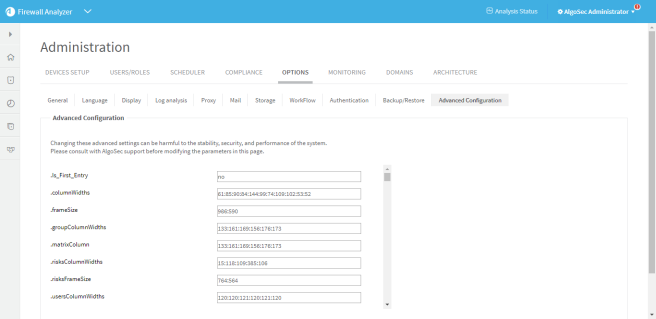
Select Administration.
The Administration page appears, displaying the Options tab.
-
Click the Advanced Configuration tab.
The Advanced Configuration tab appears.
-
To customize the polling interval, do the following:
-
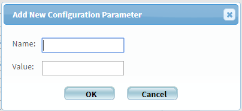
Click Add.
The Add New Configuration Parameter dialog is displayed.
- In the Name field, Active_Change_Commit_Poll_Interval.
- In the Value field, type the desired interval in miliseconds.
- Click OK.
-
-
To customize the maximum number of polls, do the following:
-
Click Add.
The Add New Configuration Parameter dialog is displayed.
- In the Name field, Active_Change_Commit_Poll_Max_Tries.
- In the Value field, type the desired maximum number of polls.
- Click OK.
-
- Click OK.
- Restart FireFlow. For details, see Restart FireFlow.
Configuring Implementation Behavior for Check Point Devices
By default, FireFlow will implement changes for Check Point devices on the policy and install the new policy on the devices. Additionally, FireFlow will re-assign the saved global policy to its managed entities (so that all lower level domains will be able to see the changes to the global policy).
If desired, you can change this. You can specify that FireFlow should only save the changes to the policy, but not install the new policy on the devices, or that FireFlow should still install the policy on the devices, but not re-assign the saved global policy to its managed entities.
Note: When re-assigning is enabled, the policy will only be re-assigned to management entities that exist in the AFA device tree.
| Configuration Parameter Name | Value |
|---|---|
CheckPointActiveChangeInstallPolicy
|
0. To disable installing the new policy. 1. To enable installing the new policy. (Default) |
CheckPointActiveChangeReassign
|
None. To not re-assign the saved policy to the managed entities. Reassign. To re-assign the saved policy to the managed entities. (Default) |
- Switch to AFA.
-
In the toolbar, click your username.
A drop-down menu appears.
-
Select Administration.
The Administration page appears, displaying the Options tab.
-
Click the Advanced Configuration tab.
The Advanced Configuration page appears.
-
Click Add.
The Add New Configuration Parameter dialog is displayed.
- In the Name field, type CKP_ACTIVE_CHANGE_INSTALL_POLICY_ON_CHANGE.
-
In the Value field, type one of the following:
- Type 1 to enable installing the new policy.
- Type 0 to disable installing the new policy. (Default)
- Click OK.
- Click OK.
Configure implementation behavior for FortiManager devices
By default, FireFlow will implement changes for FortiManager devices on the policy, but will not install the new policy on the devices.
You can change this as needed using the following parameter:
| Configuration Parameter Name | Value |
|---|---|
FORTIMANAGER_ACTIVE_CHANGE_INSTALL
|
Save. To save the current policy settings. (Default) Install all. Toinstall the new policy on the devices. |
Configure ActiveChange for FortiManager to install the new policy
Do the following:
-
Switch to FireFlow.
-
Click the Advanced Configuration tab.
The Advanced Configuration page appears.
-
Click Add.
The Add New Configuration Parameter dialog is displayed.
-
In the Name field, type FORTIMANAGER_ACTIVE_CHANGE_INSTALL.
-
In the Value field, type one of the following:
- Type Save to save the current policy settings . (Default)
- Type Install all to install the new policy settings on the devices.
- Click OK.
- Click OK.
Configure the maximum number of parallel device implementations
FireFlow offers the ability to implement on multiple devices simultaneously. By default, the maximum number of devices with which you can implement a policy change in parallel is 32. If desired, you can change this.
Do the following:
-
Switch to AFA. For details, see Logins and other basics.
-
In the toolbar, click your username.
A drop-down list appears.
-
Select Administration.
The Administration page appears, displaying the Options tab.
-
Click the Advanced Configuration tab.
The Advanced Configuration tab appears.
-
Click Add.
The Add New Configuration Parameter dialog is displayed.
-
In the Name field, type MULTI_PUSH_MAX_PARALLEL.
-
In the Value field, type the number of device implementations that should be permitted to be executed in parallel.
-
Click OK, and then click OK again.
-
Restart Apache Tomcat, by doing the following:
- Log in to the FireFlow server using the username "root" and the related password.
- Run the following command:
- service apache-tomcat restart
Apache Tomcat is restarted.
Configuring a Custom Rollback Notification for ActiveChange
FireFlow provides a rollback feature when implementation on a device fails. It is possible that a failure could occur where FireFlow has no ability to rollback the changes. If desired, you can create a custom notification with rollback instructions.
To configure a custom rollback notification for ActiveChange
- Create an html file with the desired notification, name it <device brand name>RecoveryProcedure.html, and save it to /usr/share/fireflow/local/etc/site/RecoveryProcedures.
Example file names
- For a Cisco ASA - Cisco_AsaRecoveryProcedure.html
- For a CIsco router - Cisco_RouterRecoveryProcedure.html
- For a Juniper SRX - JunosRecoveryProcedure.html
- For a Panorama - PanoramaRecoveryProcedure.html
Enabling VMWare NSX ActiveChange Rollback
In order to allow rollback for VMWare NSX ActiveChange, it is mandatory to enable the NSX auto configuration draft save feature. If this feature is disabled, no drafts will be saved.
If this feature is disabled and you want to enable auto save on the NSX, run the following PUT request with the appropriate Basic authorization:
PUT /api/4.0/firewall/config/globalconfiguration
Content-Type: application/xml
<?xml version="1.0" encoding="UTF-8"?>
<globalConfiguration>
<autoDraftDisabled>false</autoDraftDisabled>
</globalConfiguration>
Response example:
Success
If you want to keep this feature disabled, but still to allow the ActiveChange functionality (without being able to rollback to previous configurations [not recommended]), use the following method:
In the file data/algosec-ms/config/ms-devicemanager-prod.properties,
modify the threshold for last draft age parameter:
devicedriver.nsx.backupDraftAgeThresholdDays
Note: If the age of the last draft is more than this value, implementation will be aborted.
The default value is 1 day.
To override it, use the following:
devicedriver.nsx.backupDraftAgeThresholdDays=30
