
Resolve or return change requests
Relevant for: Network operations users
This topic describes how network operations users can resolve a change request that has been implemented and validated correctly, or return the change request to an earlier stage in the workflow for more changes.
Resolve a change request
If the requestor responded via email that the requested change was implemented successfully, you can resolve the change request.
Note: If the requestor marked the change request as Change Works in the Requestor Web Interface, then the change request has already been resolved, and you can skip this step.
Do the following:
- View the change request. For details, see View change requests.
- At the top of the page, click Resolve.
If you are resolving a Web Filtering change request, a confirmation message appears. Click OK.
The change request moves on to the Match stage.
Return a change request to the Implement stage
If the requester determined that the requested change was not implemented successfully, return the change request to the Implement stage for re-implementation.
Do the following:
- View the change request. For details, see View change requests.
-
At the top of the page, click Re-Implement.
The Re-Implement Change Request page is displayed.
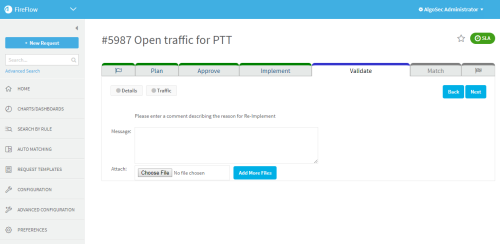
- In the Message text box, type an explanation of why you are returning the change request to the Implement stage.
-
To attach files to your message:
-
In the Attach field, do one of the following:
- Type the path to the file in the field provided.
- Click Browse, browse to the desired file, and click Open.
- To add more attachments, click Add More Files and repeat the previous step.
-
- Click Next.

The change request is returned to the Implement stage for re-implementation.
For more details, see Implement changes.
Return a web filter change request for reorganization
Do the following:
- View the change request. For details, see View change requests.
-
At the top of the page, click Re-Organize.
The Message field appears.
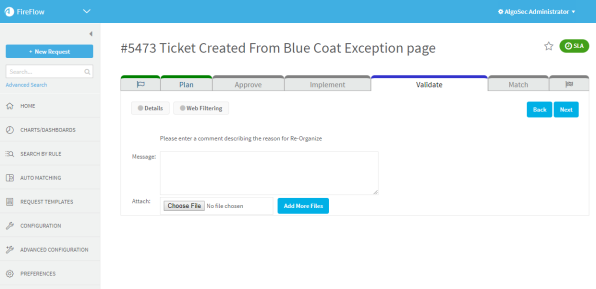
- In the Message text box, type an explanation of why you are returning the change request for re-organization.
-
To attach files to your message:
-
In the Attach field, do one of the following:
- Type the path to the file in the field provided.
- Click Browse, browse to the desired file, and click Open.
- To add more attachments, click Add More Files and repeat the previous step.
-
- Click Next.
The change request is returned to the Approve stage for re-organization.
For more details, see Approve planned changes.
