
This section describes the basic procedures required to set up your initial ASMS environment
If you are setting up AFA only, install your licenses as part of the procedure to Define the first ASMS Administrator. If you are setting up both AFA and FireFlow, see ASMS licensing.
Define the first ASMS Administrator
This procedure describes how to define the first ASMS Administrator user, and must be performed before other users can be added to the system.
Do the following:
-
Access your AFA user interface. In your browser, browse to https://<AFA_server>/ where <AFA_server> is the AFA server IP address or DNS name.
Contact your local network administrator for this value. For more details, see AFA server DNS name / IP address recommendations .
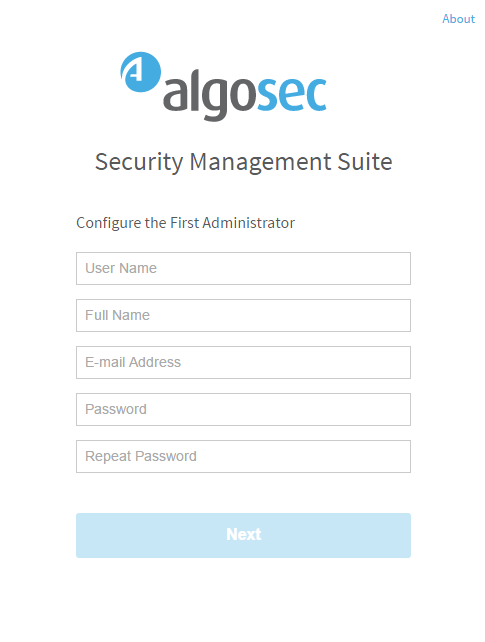
The Configure the First Administrator dialog appears.

Tip: If a warning message about the Web server's certificate appears, click Accept or OK, depending on your browser and security settings.
For more details, see Security certificate recommendations.
-
In the Configure the First Administrator dialog, enter the following values:
Username Enter a username for the administrator. Full name Enter the administrator user's full name. E-Mail Address Enter the email address you want ASMS to use to contact the administrator.
Password Enter a password for the administrator.
The password must have a minimum of 4 characters (letters or numbers).
Repeat Enter your password again. -
Click Next to log in to AFA as the new administrator.
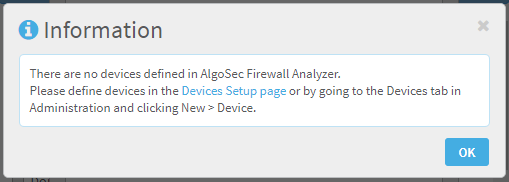
Since this is your first login to ASMS, a message appears to notify you that you don't have any devices defined yet.
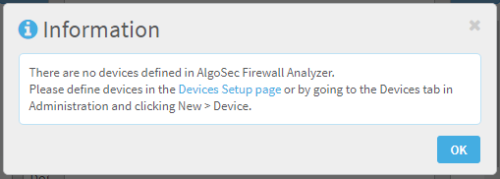
From here, do one of the following:
-
Click the Devices Setup page link to start defining devices immediately.
-
Click OK to close the window and install a license. In the Welcome dialog that appears, click Install License.
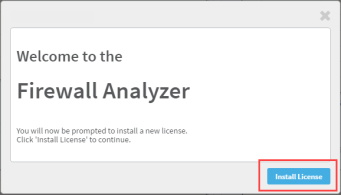
License installation
While you can define devices immediately, you cannot run an analysis until you install a license. If you are also setting up FireFlow, install your license only after that procedure is complete. For details, see:
When your license is installed, the Welcome dialog appears:
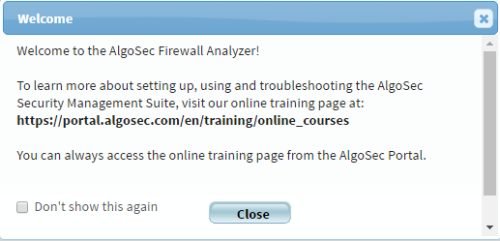
Click Close to access the AFA Home page.
-
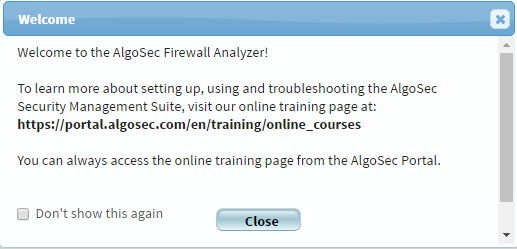
Tip: Training courses are accessible from the AlgoSec portal.
Run the FireFlow setup program
This procedure describes how to set up FireFlow. It must be done after defining your first AFA Administrator. For more details, see Define the first ASMS Administrator.
You can run this procedure again later, if you want to change any specific FireFlow configuration settings.
Note: when running the FireFlow setup program to change specific settings, FireFlow configuration maintains existing values.
Do the following:
-
Start a session as follows, depending on your deployment mode:
AlgoSec Hardware Appliances Initiate an SSH session to the appliance's IP address.
The default IP address is 192.168.1.1.
ASMS deployed on virtual machines Open the VM's console. The system prompts you to log in.
-
Log in as user: root
If you are working with a virtual appliance or an AlgoSec Hardware Appliance, the default password is algosec.
-
Access the Administration Interface (the algosec_conf menu). For details, see Connect to and Utilize the Administration Interface.
-
Enter 14 to set up the FireFlow configuration.
For each prompt, enter the requested data, including:
Server Settings dialog Configure the FireFlow server's email address and database password.
This email address is used to send all email coming from FireFlow.
Predefined Users dialog Configure a special user, named FireFlow_batch.
FireFlow users this username to perform batch operations in AFA.
Outgoing Email dialog Configure the outgoing SMTP email details for both AlgoSec Firewall Analyzer and FireFlow. Incoming Email dialog
This enables users to submit change requests to FireFlow via email, and to add comments to tickets by replying to FireFlow system-generated emails. See Incoming mail configuration methods for an explanation of and prerequisites for Incoming mail configuration options.
Follow the steps in this dialog to configure FireFlow to fetch emails from a dedicated mail server mailbox, using POP3 or IMAP (basic authentication) or Microsoft Graph API (using modern authentication, only for MS Exchange Online).
Alternatively, if you wish to configure sendmail to receive forwarded emails as an MTA, consult the FireFlow User Guide Configure sendmail to receive forwarded emails as an MTA.
When complete, the Setup Config is done dialog appears.
Additional optional configurations
You may also want to configure the following AFA and FireFlow settings:
| Device rule comments |
AFA and FireFlow are configured to use the following regular expression in all device rule comments: FireFlow #<ticket ID> where <ticket ID> is the ID number of the FireFlow ticket. For more details, see Manage workflow options. |
| Device analysis schedule |
By default, automatic device analysis is scheduled for the ALL_FIREWALLS group, which includes all devices in the system, for 1:00 AM, daily. For more details, see Schedule analysis. |
Log in to ASMS to continue your configurations. For details, see Logins and other basics.
