Add cloud devices
Relevant for: AFA Administrators
This topic describes how to add an AWS account or an Azure subscription to AFA, to be managed and analyzed similarly to on-premises devices. ASMS supports GCP Project policy visibility and risks for GCP firewalls added in CloudFlow.
AWS (Amazon Web Service) accounts in AFA
Add an AWS account to AFA to analyze data using the AWS access key ID you provide.
Tip: You can also add an AWS account, using the Assume-Role method. For more details, see AWS account fields and options using the assume-role method.
Analyzed data includes all of the security groups protecting EC2 instances and application load balancers (ALBs), from all AWS regions related to the configured access key. AFA separates these instances into groups called security sets. Each AWS security set is a group of instances or ALBs with the same security group and network ACLs, as well as network policies.
For details, see:
- Network connection
- Permissions required for AWS
- Add an AWS account to AFA
- Enable CloudFlow to perform AWS data collection and feed the ASMS network map
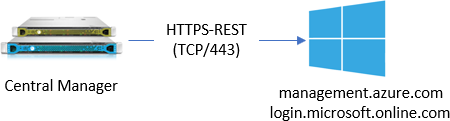
The following diagram shows an ASMS Central Manager connecting to an AWS account via HTTPS-REST (TCP/443).

Tip: ASMS also supports connecting to AWS via a proxy server, which can be configured when adding the device to AFA. For more details, see Define a proxy server .
ASMS requires the following permissions for your AWS accounts:
AFA requires minimal read-only access permissions to access AWS and collect data.
This includes the following AWS access keys:
- Access Key ID
- Secret Access Key
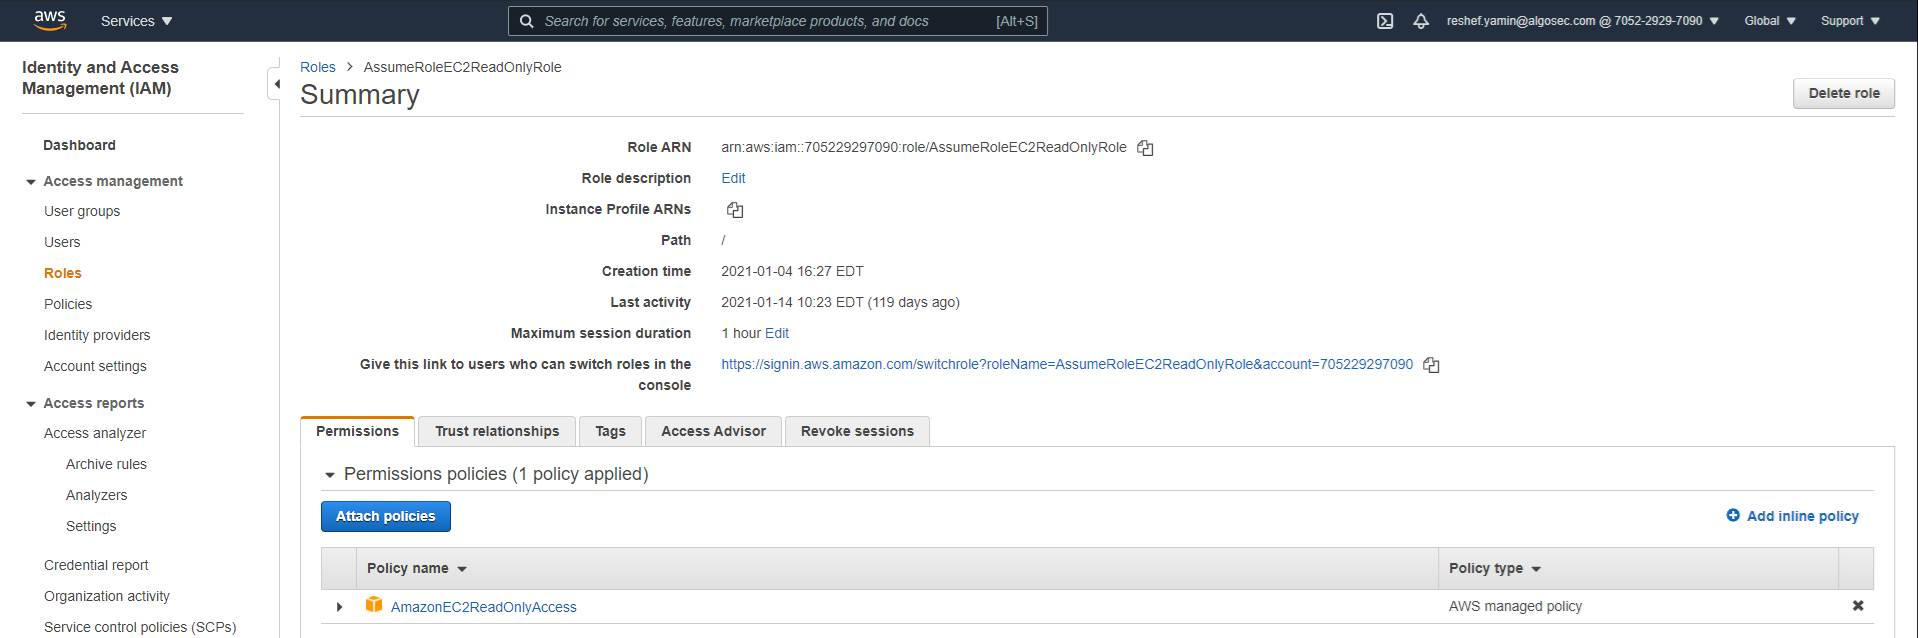
We recommend creating a specific IAM user with access keys instead of relying on root user access keys.
The AmazonEC2ReadOnlyAccess policy must be attached to the IAM user.
For example:
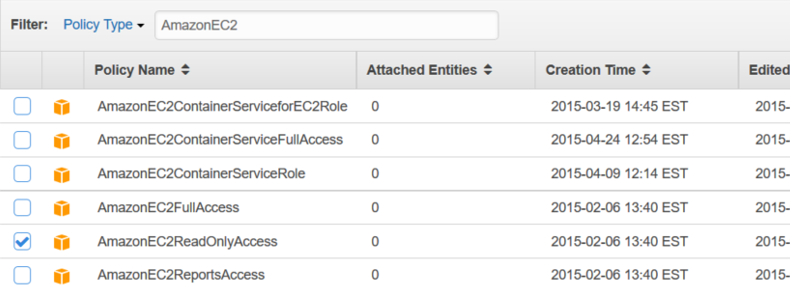
This enables the following permissions for ASMS to perform data collection for target AWS accounts:
|
Required IAM permission* |
API permission |
Purpose |
ASMS functionality |
|---|---|---|---|
|
*Click for link to Amazon API Docs |
|||
| Access level: READ | |||
ec2:Describe* |
describeInstances |
Gets all of the AWS data needed for ASMS |
Devices tree, network map & TSQ |
describeVpcs |
Devices tree, network map & TSQ | ||
describeSecurityGroups |
Policy visibility, TSQ | ||
describeNetworkAcls |
Policy visibility, TSQ | ||
describeNetworkInterfaces |
Network map & TSQ | ||
describeInternetGateways |
VPN support in network map & TSQ | ||
describeRouteTables |
Network map & TSQ | ||
describeRegions |
Devices tree | ||
describeSubnets |
Network map & TSQ | ||
describeVpnGateways |
VPN support in network map & TSQ | ||
describeVpcPeeringConnections |
Network map & TSQ | ||
describeVpnConnections |
VPN support in network map & TSQ | ||
elasticloadbalancing:Describe* |
describeLoadBalancers |
Gets the specified load balancers or all load balancers | Network map & TSQ |
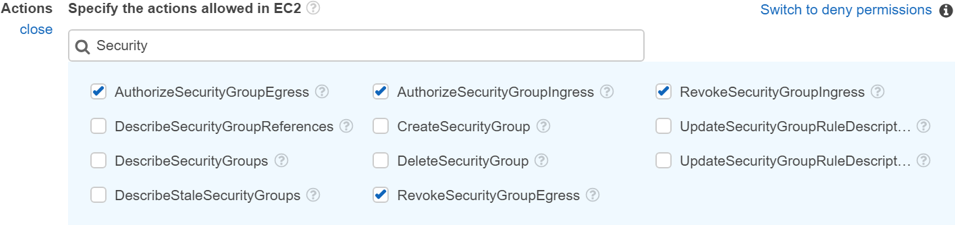
When ActiveChange is enabled, the IAM user must have read-only permissions, plus the following additional permissions:
| # |
Required IAM permission* |
API permission |
Purpose |
ASMS functionality |
|---|---|---|---|---|
|
*Click for link to Amazon API Docs |
||||
| Access level: WRITE | ||||
| 1 | ec2:AuthorizeSecurityGroupIngress |
AuthorizeSecurityGroupIngress |
Adds the specified inbound (ingress) rules to a security group |
Active change |
| 2 | ec2:RevokeSecurityGroupEgress |
RevokeSecurityGroupEgress |
Removes the specified outbound (egress) rules from the specified security group | Active change |
| 3 | ec2:RevokeSecurityGroupIngress |
RevokeSecurityGroupIngress |
Removes the specified inbound (ingress) rules from a security group | Active change |
| 4 | ec2:AuthorizeSecurityGroupEgress |
AuthorizeSecurityGroupEgress |
Adds the specified outbound (egress) rules to a security group for use with a VPC | Active change |
For example:
You can add an AWS account to ASMS in two ways:
-
Using the standard method: Add an account by providing regular credentials - Access Key ID, Secret Access Key
-
Using the assume-role method: By using the assumed role method, you can leverage the same authentication credentials for multiple accounts. To implement this, add target AWS accounts to ASMS and configure them to assume the role of an existing AWS base account. During each target account setup, provide the base account's Access Key ID and Secret Access Key and enter the target account's Role ARN.
Note: The setup of target accounts is a sequential process and does not involve simultaneous onboarding of multiple accounts.
Note: The base account does not have to be onboarded to ASMS.
Do the following:
-
Access the DEVICES SETUP page. For details, see Access the DEVICES SETUP page.
-
Click New > Devices.
-
In the vendor and device selection page, select Amazon > Web Services (AWS) EC2.
-
Configure the fields and options as needed:
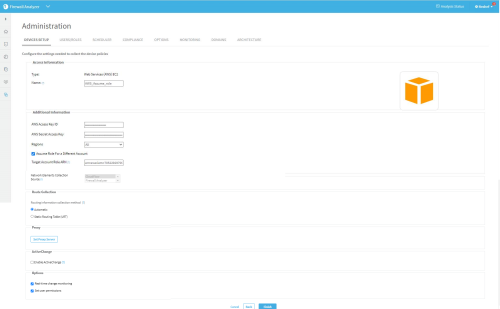
 AWS account fields and options using the standard method
Access Information
The device type is automatically defined.
In the Name field, enter the name that you want to appear in the device tree for this account.
Tip: Use the account's host or route name.
Additional Information
Enter the following details to define access to your AWS account:
- AWS Access Key ID. Enter your access key, supplied by Amazon.
- AWS Secret Key ID. Enter your secret key, supplied by Amazon.
-
Regions. Select a region. For example:
- All
- China (Beijing)
- GovCloud
For more details, see Permissions required for AWS.
Route Collection
Select one of the following to determine how AFA should acquire the device's routing data.
-
Automatic. Automatically generate routing data upon analysis or monitoring.
-
Static Routing Table (URT). Take the device's routing data from a static file that you provide.
For details, see Specify routing data manually.
-
Network Elements Collection Source This read-only field displays the source module that collects the network elements of the subject AWS account and updates the network map.

The default source is CloudFlow. This means you need to setup the subject AWS account in both Firewall Analyzer AND CloudFlow. Doing this enables broader support for AWS network elements.
For further details and instructions on how to modify this setting, see "Configuring the AWS Network Elements Collection Source (ASMS A32.10 and above)" in Algopedia.
Click Set Proxy Server to configure a proxy server to connect all cloud devices defined in AFA, including both AWS and Azure.
For more details, see Define a proxy server .
ActiveChange Select Enable ActiveChange for this device.
Options Select the following options for your AWS account as needed:
- Real-time change monitoring.Select this option to enable real-time alerting upon configuration changes. For more details, see Configure real-time monitoring.
- Set user permissions. Select this option to set user permissions for this device.
AWS account fields and options using the assume-role method
Access Information
The device type is automatically defined.
In the Name field, enter the name that you want to appear in the device tree for this account.
Tip: For example, AWS_Assume_Role
Additional Information
Enter the following details:
-
Provide the credentials of existing AWS account:
-
AWS Access Key ID. Enter the access key, supplied by Amazon.
-
AWS Secret Key ID. Enter the secret key, supplied by Amazon.
-
-
Specify the Region of the new, target account, you wish to onboard to AFA:
- All
- China (Beijing)
- GovCloud
-
Assume Role for a Different Account. Select to add a target account that assumes the role of the existing AWS account accessed above.
Define the Target Account Role ARN (add the Amazon Resource Name (ARN) of the role to assume.)
TIP: Get the Target Account Role ARN in AWS:
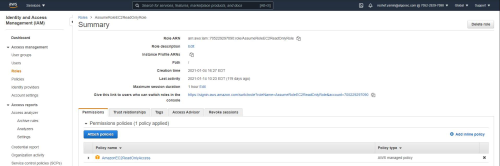
For more details, see Permissions required for AWS.
-
Network Elements Collection Source This read-only field displays the source module that collects the network elements of the subject AWS account and updates the network map.
The default source is CloudFlow. This means you need to setup the subject AWS account in both Firewall Analyzer AND CloudFlow. Doing this enables broader support for AWS network elements.
To change Network Elements Collection Source change the setting of the relevant parameter. See AWS_Network_Elements_Parse_From_AFA.
For further details and instructions on how to modify this setting, see Configuring the AWS Network Elements Collection Source (ASMS A32.10 and above) in Algopedia.
Route Collection
Select one of the following to determine how AFA should acquire the device's routing data.
-
Automatic. Automatically generate routing data upon analysis or monitoring.
-
Static Routing Table (URT). Take the device's routing data from a static file that you provide.
For details, see Specify routing data manually.
Click Set Proxy Server to configure a proxy server to connect all cloud devices defined in AFA, including both AWS and Azure.
For more details, see Define a proxy server .
ActiveChange Select Enable ActiveChange for this device.
Options Select the following options for your AWS account as needed:
- Real-time change monitoring.Select this option to enable real-time alerting upon configuration changes. For more details, see Configure real-time monitoring.
- Set user permissions. Select this option to set user permissions for this device.
-
Click Finish. The new device is added to the device tree.
-
If you selected Set user permissions, the Edit users dialog box appears.
In the list of users displayed, select one or more users to provide access to reports for this account.
To select multiple users, press the CTRL button while selecting.
Click OK to close the dialog.

A success message appears to confirm that the subscription is added.
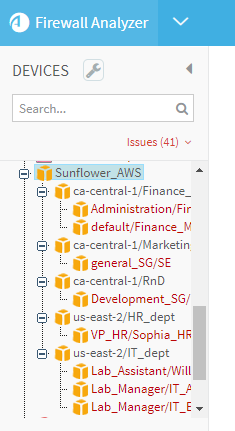
In the device tree, AWS subscriptions are shown in three levels: the user account, region/VPC, and security set.
For example:
Tip: In the onboarding stage, communication may be temporarily directed to the public services of the AWS firewall when using a third party proxy. Wait 10-15 minutes to sync the proxy settings inside the ASMS services.
To verify that proxy setting have been synced to all nodes, on the Central Manager run the following code:
/bin/algosec_conf --verify-proxy-configuration
Bulk Update of AWS Account Credentials
An API facilitates access/key password updating, which some customers require to do periodically for their AWS accounts, without reloading the accounts, which can be very time-consuming. See Bulk update keys of AWS cloud accounts
Enable CloudFlow to perform AWS data collection and feed the ASMS network map
By default CloudFlow (CF) performs AWS data collection and feeds the ASMS network map using a designated CloudFlow-ASMS integration. To enable the advantages of this functionality, do the following:
-
Integrate CloudFlow and ASMS. See ASMS Integration.
-
Setup the subject AWS account in both Firewall Analyzer (AFA) AND CloudFlow.
Notes:
(1) There MAY be a need to set the 'AWS_Network_Elements_Parse_From_AFA' parameter. Refer to the Algopedia article Configuring the AWS Network Elements Collection Source (ASMS A32.10 and above).
(2) The AlgoPedia article Configuring the AWS Network Elements Collection Source (ASMS A32.10 and above) explains the advantages of this workflow, how to continue working in the previous manner if required and how to bring the advantages of this workflow to earlier ASMS versions.
(3) When the ASMS-CloudFlow integration is configured to fetch Routing Data from CloudFlow, ASMS still connects to AWS to collect the Security Data [Rules, Security Groups, etc.].
Microsoft Azure subscriptions in AFA
When you add an Azure subscription to AFA, all VMs related to your subscription are represented in the device tree.
AFA separates the instances into groups called security sets. Each Azure security set is a group of VMs with the same security group and subnet security groups, as well as network policies. VMs with no security groups are assigned to a security set called Unprotected VMs. To enable accurate traffic simulation, AFA automatically creates a rule to allow all traffic for these VMs.
For more details, see:
The following diagram shows an ASMS Central Manager connecting to an Azure subscription via HTTPS-REST (TCP/443).
Tip: ASMS also supports connecting to Azure via a proxy server, which can be configured when adding the device to AFA. For more details, see Define a proxy server .
Permissions required for Azure
ASMS requires the following permissions for your Azure subscriptions:
AFA requires minimal Reader access permissions defined for the subscription to access Azure and collect data.
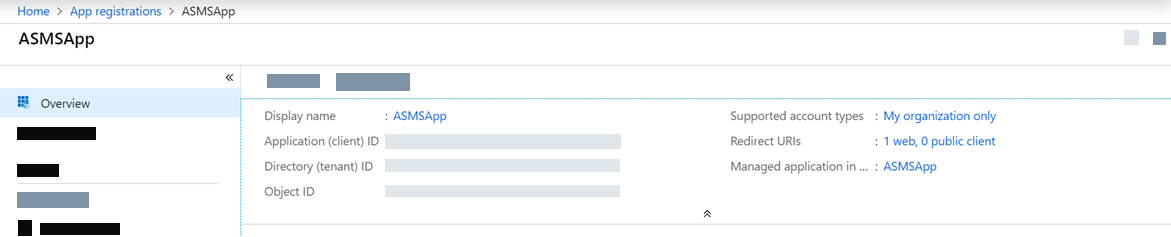
We recommend creating an App Registration with specific permissions instead of sharing an account with other applications.
For example:
The IAM permissions should be Reader.
For example:

| # |
Required IAM permission* |
Purpose |
ASMS functionality |
|---|---|---|---|
|
*Click for link to Microsoft API Docs |
|||
| Access level: READ | |||
| 1 | Microsoft.Network/networkSecurityGroups/read |
Gets all network security groups in a subscription |
Policy visibility, TSQ, and AFF |
|
2 |
Microsoft.Network/virtualNetworks/read |
Gets all virtual networks in a subscription |
Devices tree, network map, TSQ, and AFF |
| 3 | Microsoft.Network/networkInterfaces/read |
Gets all network interfaces in a subscription |
Network map, TSQ, and AFF |
| 4 | Microsoft.Network/publicIPAddresses/read |
Gets all the public IP addresses in a subscription | Topology, network map, TSQ, and AFF |
| 5 | Microsoft.Compute/virtualMachines/read |
Lists all of the virtual machines in the specified subscription |
Devices tree |
| 6 | Microsoft.Network/routeTables/read |
Gets all the route tables in the specified subscription | TSQ and AFF |
| 7 | Microsoft.Network/virtualNetworkGateways/read |
Gets all virtual network gateways in the specified subscription | VPN support in network map, TSQ, and AFF |
| 8 | Microsoft.Network/localnetworkgateways/read |
Gets all local network gateways in the specified subscription | VPN support in network map, TSQ, and AFF |
| 9 | Microsoft.Network/connections/read |
Gets all the virtual network gateways connections in the specified subscription | VPN support in network map, TSQ, and AFF |
| 10 | Microsoft.Web/hostingEnvironments/read |
Gets all app service environments for a subscription | Devices tree |
| 11 | Microsoft.Network/locations/serviceTags/read |
Gets a list of service tag information resources | Content of the network objects in the policy, TSQ, and AFF |
| 12 | Microsoft.Network/locations/serviceTagDetails/read |
Gets a list of service tag information resources | Content of the network objects in the policy, TSQ, and AFF |
When ActiveChange is enabled, the IAM user permissions must be updated to Contributor.
For example:

|
Required IAM permission* |
Purpose |
ASMS functionality |
|---|---|---|
|
*Click for link to Microsoft API Docs |
||
| Access level: WRITE | ||
Microsoft.Network/networkSecurityGroups/write (create-or-update) Microsoft.Network/networkSecurityGroups/write (delete) |
Creates or updates a network security group in the specified resource group |
NSG Active change |
Add a Microsoft Azure subscription to AFA
Do the following:
-
In your Azure subscription, configure an Active Directory Application to use to connect to AFA.
For details, see How to configure a Microsoft Azure Active Directory application in AlgoPedia
 .
. - In AFA, access the Devices Setup page. For details, see Access the DEVICES SETUP page.
-
In the vendor and device selection page, select Microsoft > Azure.
-
Configure the fields and options as needed.
Azure subscription field and options
Access Information
Enter the following details:
- Name. The Azure subscription's host name or IP address.
- Subscription ID. The Azure subscription's ID.
- Tenant ID. The Active Directory Application tenant ID. For more details, see Azure documentation .
- Application ID. The application client ID.
- Key. The application key.
Route Collection
Select one of the following to determine how AFA should acquire the device's routing data.
-
Automatic. Automatically generate routing data upon analysis or monitoring.
-
Static Routing Table (URT). Take the device's routing data from a static file that you provide.
For details, see Specify routing data manually.
Click Set Proxy Server to configure a proxy server to connect all cloud devices defined in AFA, including both AWS and Azure.
For more details, see Define a proxy server .
ActiveChange Select Enable ActiveChange for this device.
Mapping After running a report for an Azure subscription, its topology will be displayed in the network map (with no configuration required). Options Select the following options for your AWS account as needed:
- Real-time change monitoring.Select this option to enable real-time alerting upon configuration changes. For more details, see Configure real-time monitoring.
- Set user permissions. Select this option to set user permissions for this device.
-
Click Finish.
The new device is added to the device tree.
-
If you selected Set user permissions, the Edit users dialog box appears.
In the list of users displayed, select one or more users to provide access to reports for this account.
To select multiple users, press the CTRL button while selecting.
Click OK to close the dialog.
A success message appears to confirm that the account is added.
Tip: In the onboarding stage, communication may be temporarily directed to the public services of the Azure Cloud firewall when using a third party proxy. Wait 10-15 minutes to sync the proxy settings inside the ASMS services.
To verify that proxy setting have been synced to all nodes, on the Central Manager run the following code:
/bin/algosec_conf --verify-proxy-configuration
Device tree display of attached NSGs
In the device tree, Azure has a three-tier hierarchy:
-
Subscription (customer-given name for the subscription when onboarded to AFA)
-
Region/VNet
-
Security set (a container for one or two NSGs assigned to one or more instances)
For example:
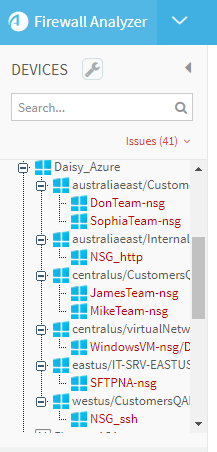
Note; When two NSGs exist ion the security set, they are both shown separate by a /(For example, WindowsVM-nsg/DT3019).
Unattached NSGs in the Azure Device Tree
Unattached Network Security Groups include unassigned NSGs or NSGs assigned to services that are not supported.
Unattached NSGs in the device tree are shown with the same three-tier hierarchy as attached NSGs except that the second tier is shown as region/Unattached_Network_Security_Groups.
For example:
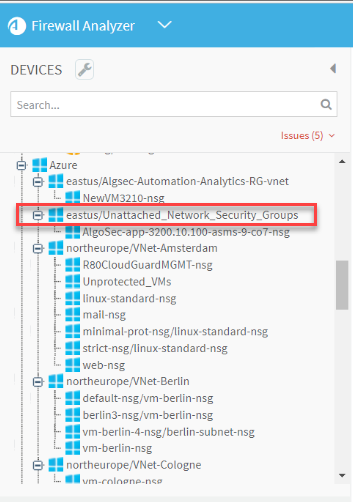
Note: Network Map/TSQ/Routing Query are not relevant for unattached NSGs.
GCP (Google Cloud Platform) projects in AFA
ASMS supports GCP Project policy visibility and risks for Google Cloud added in CloudFlow.
Note: To enable this feature, you must first:
-
Integrate ASMS with CloudFlow, see ASMS integration to SaaS services.
-
Onboard your GCP Project, see Onboard GCP Project.
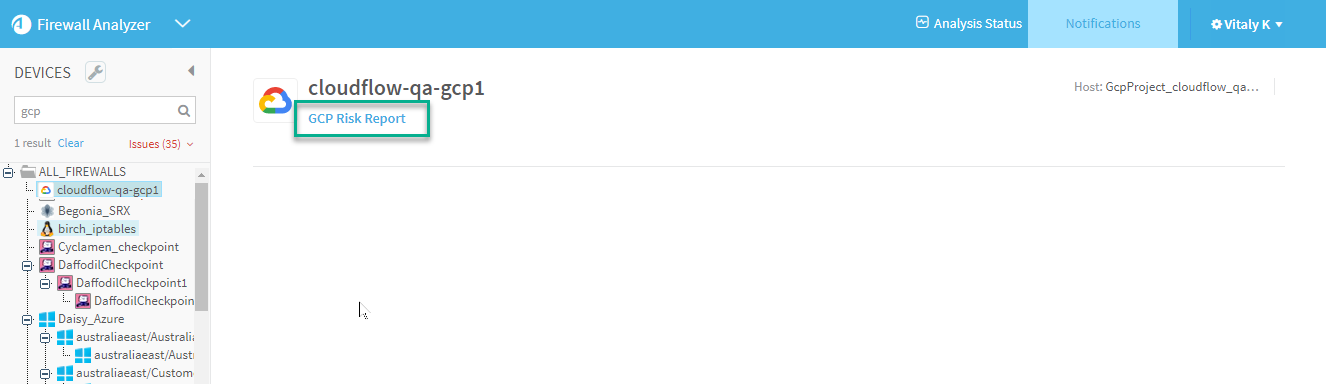
To open the GCP Risk Report in CloudFlow from ASMS.
Do the following:
-
In the ASMS device tree, select the GCP Project.
-
Click the link to GCP Risk Report to open the report in CloudFlow.