Manage vulnerability assessment scanners
Relevant for AppViz administrators
This section describes how to manage vulnerability assessment scanner information, either by integrating directly with scanners, or importing vulnerabilities manually from files.
Tip: Once you configure vulnerability assessment scanners in AppViz, your AFA reports also include vulnerability data in the Risky Rules page. For more details, see Device report pages.
Supported vulnerability assessment service providers
AppViz supports the following scanners:
-
Qualys - QualysGuard (v7.0 and above). QualysGuard licenses must have KB permissions to integrate with AppViz, including API permissions.
- Rapid 7 - Nexpose
- Tenable - Nessus Vulnerability Scanner, versions 6 and above
- Tenable - Nessus Manager
- Tenable - SecurityCenter
If your vulnerability scanner is not supported, AppViz enables you to import vulnerability data using our API instead. For details, see Import vulnerability data.
Vulnerability scanner configuration prerequisites
Configuring a vulnerability scanner in AppViz requires the following:
| Connections |
An open connection between the ASMS and the scanner. Default ports:
|
| Credentials | Credentials for a user with read permissions for all scans and API access |
| API address |
A full API address for the scanner. |
Define general vulnerability assessment settings
Do the following:
-
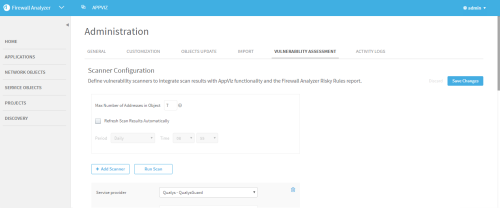
In the toolbar, click your username, and then select Administration.
-
Click the VULNERABILITY ASSESSMENT tab. For example:
-
Define the following general vulnerability settings:
Max Number of Addresses in Object Enter the maximum network object size.
Only vulnerability information for network objects with this number of IP addresses or less will appear in ASMS.
For example, an object with an IP range of 10.20.0.0/16 includes 65,536 IP addresses. It will therefore be ignored while performing vulnerability queries.
Default = 256,
Max = 1024
Refresh Scan Results Automatically Determines whether AppViz refreshes vulnerability data automatically, and if so, how often and when.
Default = Enabled, and set to Daily at 00:00.
- Click Save Changes.

Add a vulnerability scanner
Tip: For Qualys users, make sure that user access is allowed for APIs. Go to Qualys -> User Profile -> User Role and select the API checkbox of the Allow access to field.
Do the following:
-
In the toolbar, click your username, and then select Administration.
-
Click the VULNERABILITY ASSESSMENT tab.
-
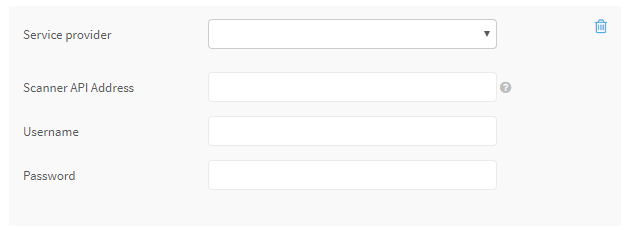
To add a new scanner, click + Add Scanner. A new scanner definition area is added towards the bottom of the screen.

Tip: If you already have scanners configured, you may need to scroll down to view the new area.
Populate the fields as follows:
Service provider Select the scanner type you want to add. Scanner API address Enter the scanner's server URL. Username / Password Enter the credentials used to access the scanner server. -
Click Save Changes.
Your new scanner is added to the grid, and scanning begins. It may take some time until the initial vulnerability scan is complete.
Delete a scanner
To delete a scanner configuration, click the Delete  button next to the scanner you want to delete.
Each of the scanners you configure enables you to do the following:
| Update |
Update vulnerability data from this scanner. This performs a manual refresh for the selected scanner, and is useful if you don't have refresh automatically selected, or if you want to run a manual update in between scheduled refreshes. |
| Disable | Disable the scanner without losing the scanner configuration data. |
Run a vulnerability scan
This section describes how to run a vulnerability scan from the AppViz Administration area.
Before you start, you must have vulnerability scanners configured. For details, see Add a vulnerability scanner.
Do the following:
-
In the toolbar, click your username, and then select Administration.
-
Click the VULNERABILITY ASSESSMENT tab. For example:
- Click Run Scan. A full scan is run on all vulnerability scanners configured.
Tip: Optionally, enable AppViz to run scans automatically by refreshing scan results periodically. For details, see Define general vulnerability assessment settings.
Import vulnerability assessment information
This section describes how to import your vulnerability data into AppViz from a CSV file using the command line.
Use this process when AppViz does not support integrating directly with your vulnerability scanner, and you do not want to use the API.
Do the following:
Note: We do not recommend using this procedure to import vulnerability data, and keep this process documented for backwards compatibility only. Instead, we recommend importing vulnerability data via API. For details, see Import vulnerability data.
In the /home/bflow/config/vulnerability_from_file directory, create the following CSV files:
| Vulnerability data |
Name the file with a prefix that includes: vulnerability_info. For example: vulnerability_info_dataJun12-19.csv Include the following column headers in the file: Mandatory column headers (in this order):
Optional column headers: CVEs (Strings divided by ',') |
| Server-vulnerability mapping |
Name the file with a prefix that includes: servers_vulnerability. For example: servers_vulnerability_dataJun12-19.csv Include the following column headers in the file: Mandatory column headers (in this order):
Optional column headers: Date (Unix timestamps, in milliseconds). Default is the current date and time. Note: Each entry can contain only one vulnerability. If a single server has more than one vulnerability, the server must be represented on multiple lines. |
Note: Invalid data in either file will fail the entire import operation.
Continue with Import vulnerability data.
Once your have both your vulnerability data and server-vulnerability mapping CSV files ready in the /home/bflow/config/vulnerability_from_file, you're ready to import vulnerability data into AppViz.
For more details, see Prepare your CSV files.
Do the following:
Open a terminal and run one of the following:
-
Import both vulnerability and server mapping data together:
Note: Use this command if you this is the first time you are importing vulnerability data.
-
Import vulnerability data only:
BusinessFlow-CLI.sh -t import_vulnerability_information
-
Import mapping data only:
BusinessFlow-CLI.sh -t import_servers_vulnerability
The vulnerabilities are imported.
Note: Vulnerabilities with a CVSS score of 0 are not supported and fail the validation.