Early availability features
This topic describes features available as Early Availability (EA) and how to enable ASMS's Early Availability features.
ASMS's Early Availability features enable you to access new functionality and support earlier than general availability. Customers partaking of Early Availability often provide invaluable feedback on the design and implementation of these features. Early Availability features have shorter QA cycles than GA features, and therefore are disabled by default.
Warning: We recommend that you do not use Early Availability features in production. They should be enabled only in testing systems, and disabled in production systems.
Enable ActiveChange for MSO-managed Cisco ACI tenants
ActiveChange for Cisco ACI tenants managed by a Cisco MSO (Multi-Site Orchestrator) is available as an early availability feature.
Note: By default, ActiveChange is supported for tenants managed by an APIC.
With this early availability feature enabled, you can add, modify and remove rules from the policy directly from FireFlow.
When Cisco ACI tenants are managed by an MSO, each APIC in turn can manage one or more tenants. Each tenant contains one schema, with one or more associated templates. Schemas and templates are configured in FireFlow in order to implement ActiveChange on the device.
To enable/disable early availability ActiveChange for MSO-managed Cisco ACI in AFA
-
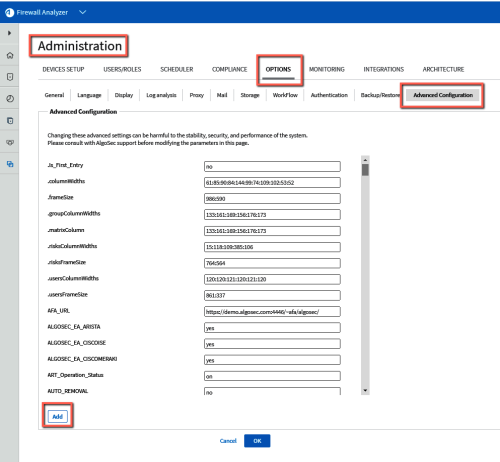
In the AFA Administration area, navigate to the Options > Advanced Configuration tab.
-
Click ADD to add a new configuration parameter, and enter the following details
Name AlgoSec_EA_MSO_ActiveChange Value Enter one of the following:
- true = Enable MSO-managed Cisco ACI tenants ActiveChange support
- false (default) = Disable MSO-managed Cisco ACI tenants ActiveChange support
-
Click OK

Note: After switching EA/GA mode, we recommend you restart your system.
Configure ActiveChange behavior for MSO-managed Cisco ACI tenants in FireFlow
In ACI MSO, there is no default value for the schema and template. In order to implement ActiveChange for the MSO-managed Cisco ACI tenants, user-defined schema and templates are required for each tenant.
| Configuration Parameter Name | Value |
|---|---|
| CiscoMsoActiveChangePolicyTargets |
Defines policy targets (schema and templates) for each tenant. Format: { <Apic ID/Name> : {<tenant Name> : { "schema":<Schema name>, "templates":[<template1>,<template2>...]}}} Limitation: In this Early Availability version, if you define more than one template for a schema, ActiveChange selects only the first template in the list (defined in the FireFlow parameter CiscoACIMSOActiveChangePolicyTargets, see below). For example, Schema Payroll has templates Detroit, Baltimore and Abu Dhabi. Since changes are applied to the MSO and deployed on the first template defined in the schema, ActiveChange only selects Detroit. Changes will be made only on the Filters and Contracts that are defined in the template that is configured in FireFlow. |
| CiscoMsoActiverChangeCommit |
By default, FireFlow will apply changes on the MSO and deploy the changes to the relevant MSO-managed Cisco ACI APICs. If required, you can change this so changes will be applied only to the MSO and you can manually commit the changes to the APICs later. The value assigned to this parameter determines whether or not ActiveChange deploys changes to APICs. The possible values are:
|
To configure ActiveChange behavior for MSO-managed Cisco ACI tenants:
-
Switch to FireFlow.
-
Click the Advanced Configuration tab.
The Advanced Configuration page is displayed.
-
In FireFlow Configuration, Click ActiveChange and filter for CiscoACIMSOActiveChangePolicyTargets or just scroll to find it.
-
Click on the edit icon next to the current value field. Define the schema and templates for one tenant.
For example:
Copy{
"10_20_30_40": {
"10_20_30_40_ActiveChangeEA": {
"schema": "Payroll",
"templates": [
"Detroit",
"Baltimore",
"Abu Dhabi"
]
}
}
} - Click Update below the current value field to update the value.
-
Filter for CiscoMsoActiverChangeCommit or just scroll to find it.
Assign a value to this parameter to determine whether or not ActiveChange deploys changes to APICs.
-
Click Update below the current value field to update the value.
- Click Store Changes at the top of the page.
- Restart FireFlow.
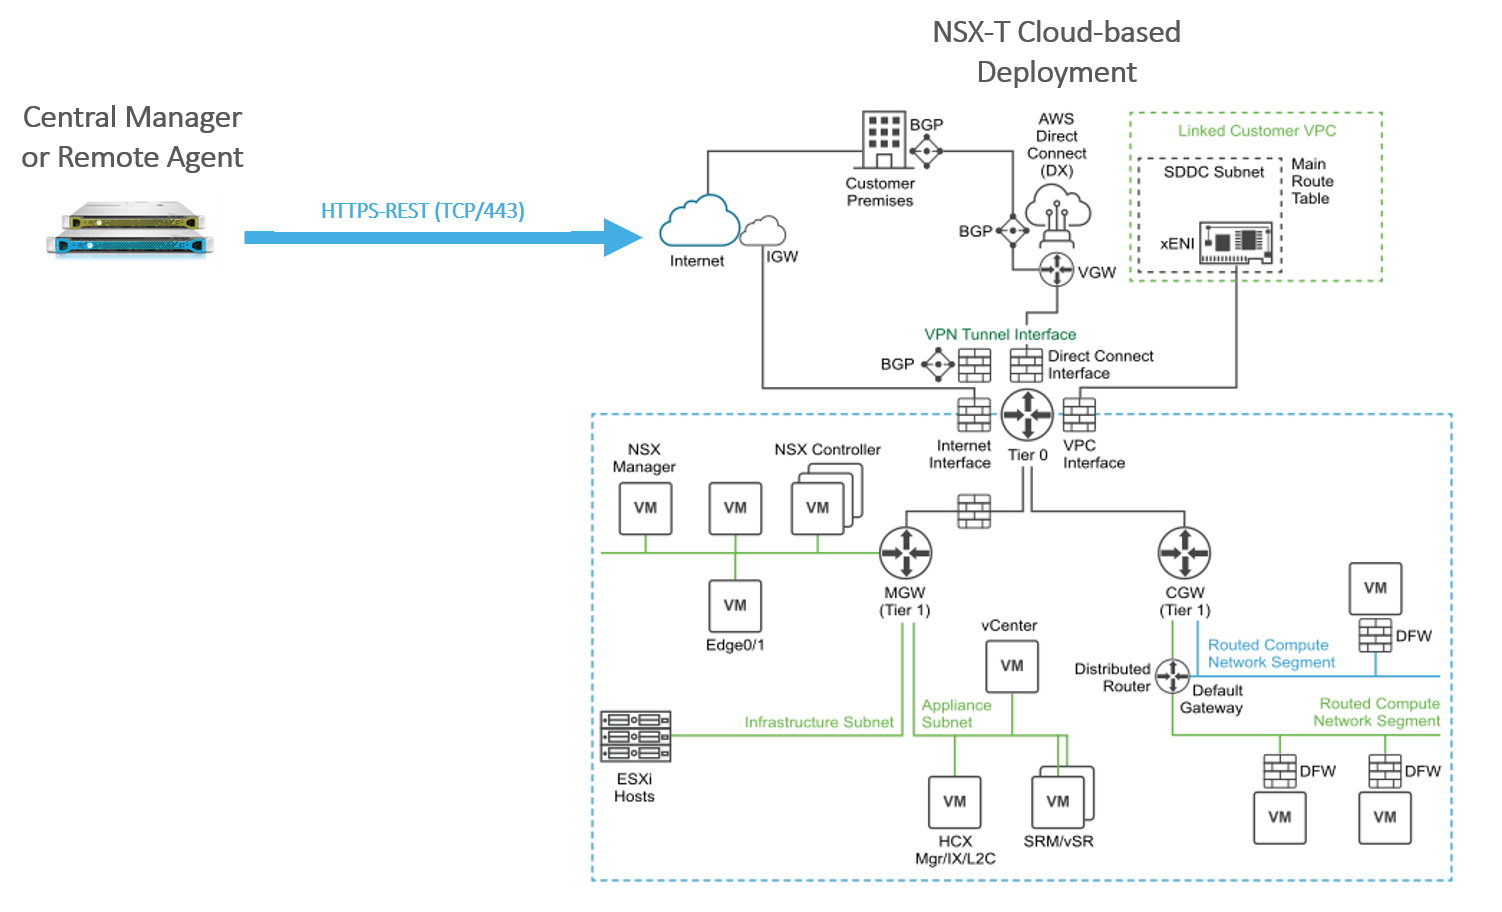
Support for NSX-T deployed on AWS (VMC)
This section describes the ASMS Early Availability support for NSX-T deployed on AWS (VMC).
Important: We recommend that you enable this Early Availability feature only in a lab environment.
- Supported Features
- Unsupported Functionality
- Limitations
- Network connectivity
- Device permissions
- Enable / Disable early availability support for NSX-T deployed in AWS
- Add a VMware NSX-T to AFA
Supported Features
ASMS supports NSX-T deployed in AWS (VMC) as follows:
-
VRFs separation
-
Rules visibility
-
Report Generation
-
Topology
-
Change History
-
Risks Calculation
-
Map Visibility
-
Regulatory Compliance
-
Traffic Simulation Query
-
Monitor Cycle
Unsupported Functionality
The following functionality is not supported:
-
ActiveChange
-
L2 Rules
-
Changed by (Audit Logs collection)
-
Traffic-related recommendations
-
IPT and unused rules (Traffic Logs collection)
-
IPV6 rules and NSGroups with IPV6 content
Limitations
NSX-T on AWS has the same limitations as NSX-T on-premise, e. g.:
-
NSX-T is shown only in TSQ result mini map
-
ASMS supports only Distributed Firewall (for East-West traffic)
Network connectivity
VMware Cloud on AWS uses NSX-T to create and manage internal SDDC networks and provide endpoints for VPN connections from your on-premises network infrastructure.
Device permissions
ASMS requires minimal, read-only access permissions to access VMware NSX-T data centers and perform data collection.
The user accessing the VMware NSX-T Data Center for analysis and monitoring must have one of the following NSX-T roles:
- EA - Enterprise Administrator
- A - Auditor
- Custom role/permissions (use R flag for all features/components)
Note: If you are using the NSX Manager, we recommend using the built-in NSX Manager user to connect from ASMS.
Enable / Disable early availability support for NSX-T deployed in AWS
This procedure describes how to enable or disable support for NSX-T deployed in AWS in ASMS.
Do the following:
-
In AFA, click your username, and select Administration > Advanced Configuration.
-
Click Add to add a new configuration parameter.
-
Define the parameter value as follows:
Name AlgoSec_EA_NSXT_Cloud Value One of the following:
- yes = Enable NSX-T deployed in AWS device support
- no = Disable NSX-T deployed in AWS device support
For more details, see Advanced Configuration. Continue with Add a VMware NSX-T to AFA.
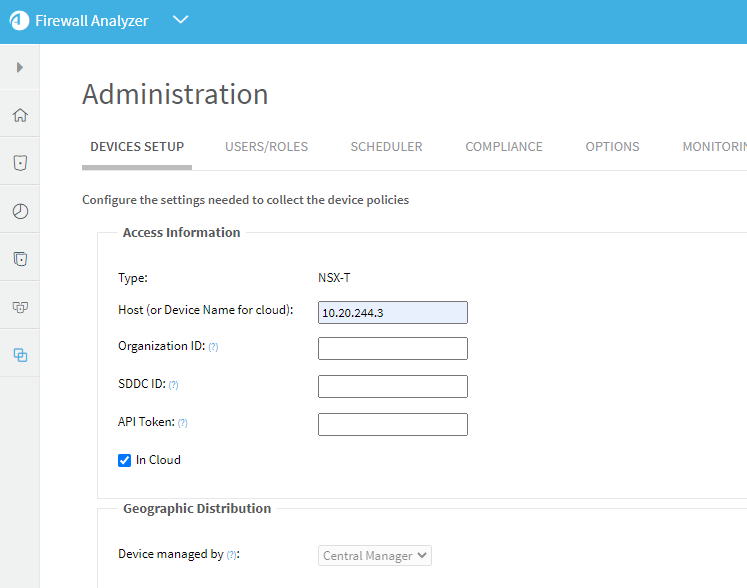
Add a VMware NSX-T to AFA
This procedure describes how to add a VMware NSX-T that is hosted on AWS (VMC) to AFA.
Do the following:
-
From the Administration area, access the Devices Setup page. For details, see Access the DEVICES SETUP page
-
Click New > Devices > VMware > NSX-T. In the vendor device selection page, click VMware > NSX-T.
-
For NSX-T that is hosted on AWS (VMC), select In Cloud.

-
Complete the fields as needed.
Access Information NSX-T that is hosted on AWS (VMC)
Device name
Give the device a name. This is the name that will be displayed in the devices tree.
Tip: To avoid future confusion, we recommend you use the SDDC name for the device name.
Organization ID Organization ID (from VMware Cloud interface) SDDC ID Software-Defined Data Center (SDDC) ID number (from VMware Cloud interface). Each SDDC needs to be added separately. API Token API token. Generate a token from your VMware Cloud services account. Specify the roles required for on-boarding:  Geographic Distribution
Select the remote agent that should perform data collection for the device.
To specify that the device is managed locally, select Central Manager.
This field is relevant when a Geographic Distribution architecture is configured.
Additional Information
Select the Learning mode option to specify that AFA traffic simulation should treat traffic that is not specified in a rule as blocked.
In reality, the default behavior for NSX-T devices is to allow all traffic that is not explicitly blocked. Learning mode enables you to better understand the specific traffic that needs to be allowed on the device.
Note: Learning mode is supported for NSX-T versions 3.0 and above.
Route Collection
Specify how AFA should acquire the device's routing information:
- Automatic. AFA will automatically generate the device's routing information upon analysis or monitoring.
- Static Routing Table (URT). AFA will take the device's routing information from a static file you provide. For details, see Specify routing data manually.
Options
Real-time change monitoring
Select this option to enable real-time change monitoring.
For details, see Configure real-time monitoring.
Set user permissions
Select this option to set user permissions for this device.
You can select the Learning mode option to specify that AFA traffic simulation should treat traffic that is not specified in a rule as blocked. By default, DBWs allow all traffic that is not explicitly blocked. Learning mode enables you to better understand the specific traffic that needs to be allowed on the device.
Note: Learning mode is not supported for NSX-T versions below 3.0.
- Click Finish. The new device is added to the device tree.
-
If you selected Set user permissions, the Edit users dialog box appears.
In the list of users displayed, select one or more users to provide access to reports for this account.
To select multiple users, press the CTRL button while selecting.
Click OK to close the dialog.
A success message appears to confirm that the device is added.
Palo Alto Networks Prisma Access devices in ASMS
Note: AlgoSec supports only Panorama Managed Prisma Access.
This section describes the ASMS Early Availability support for Palo Alto Networks Prisma Access devices:
- Supported features in Early Availability
- Limitations
- Network connectivity
- Device permissions
- Prisma Access visibility in the device tree
- Enable / Disable early availability support for Prisma Access
- Configure a Panorama device that manages a Prisma Access
Supported features in Early Availability
ASMS supports Prisma Access devices as follows:
-
Policy visibility
-
Risk analysis
-
Traffic Simulation Query
-
Remote Networks and Service Connections
The following functionality is not supported:
-
Changes
-
Policy optimization recommendations based on traffic like Intelligent Policy Tuner (IPT) and unused rules
-
FireFlow support
Limitations
Panorama Prisma Access has the following limitations:
-
Basic Search: Possible inaccurate results from RuleBase searches when using exact match.
The connection to Prisma Access is done via the Panorama device that manages it:
Use same permissions required for Palo Alto Panorama devices. See Panorama device permissions.
Prisma Access visibility in the device tree
Prisma Access is added under the existing Panorama tree as follows:
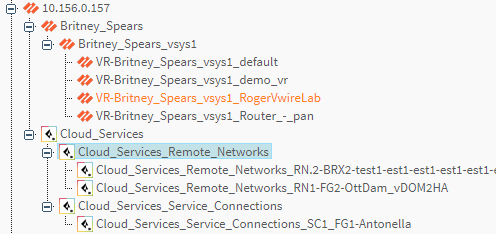
-
Level 1 Panorama Host (IP/Name )
-
Level 2 Cloud_Services (Prisma Access) managed by single Panorama devices
-
Level 3 Cloud_Services_Remote_Networks / Cloud_Services_Service_Connections
-
Level 4 Cloud_Services_Remote_Networks_<Remote_Network_Name> / Cloud_Services_Service_Connections_<Remote_Network_Name>
Enable / Disable early availability support for Prisma Access
By default Prisma Access is disabled. This procedure describes how to enable support for Prisma Access devices in ASMS.
Do the following:
-
In AFA, click your username, and select Administration > Advanced Configuration.
-
Click Add to add a new configuration parameter. For more details, see Advanced Configuration.
-
Define the parameter value as follows:
Name AlgoSec_EA_Panorama_Prisma_Support Value One of the following:
- yes = Enable Prisma Access device support
- no = Disable Prisma Access device support
-
Logout from ASMS and then login again.
-
If you already have Panorama device(s) that manage Prisma Access onboarded to ASMS, run Edit-Next (Edit device wizard) on this/these Panorama(s). If you do not have Panorama device(s) that manage Prisma Access onboarded, onboard them. See Add Palo Alto Networks devices.
-
Continue with Configure a Panorama device that manages a Prisma Access .
-
Continue with Configure a Panorama device that manages a Prisma Access .
Configure a Panorama device that manages a Prisma Access
This procedure describes how to configure Panorama device that manages a Prisma Access in AFA.
Do the following:
-
Access the Devices Setup page. For details, see Access the DEVICES SETUP page
-
In the device tree, select the Panorama device to configure for Prisma Access. Click Edit.
-
Click Next. You should be on the Panorama 2/2 page.
Prisma Access Tenants are shown with the prefix Cloud Services.
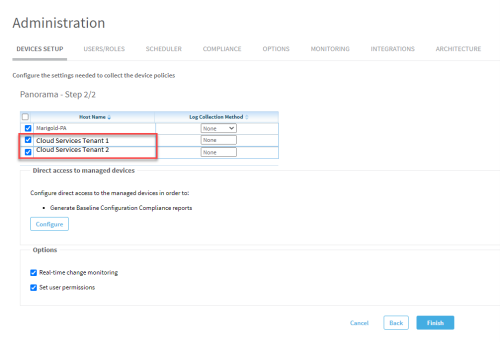
-
Select the check boxes of the tenants you want AFA to control.
Note: Log collection Method drop downs are disabled for Prisma Access tenants.
-
Click Finish. The tree of the Panorama is updated to include Prisma Access elements.

Grid view for Risks reports (EA)
This Early Availability feature allows you to view the list of risks (in the Risks Report page) in a grid view, offering the following:
-
Sortable columns
-
Filter by
-
Group by severity and incidence columns
-
Pinned columns
-
Choose which columns appear

Do the following:
-
Go to the Risks page.
-
Click Grid view.
Add/Update/Delete devices in bulk from xslx file
This section describes the ASMS Early Availability support for Add/Update/Delete devices in bulk from xslx file:
Note: The General Availability feature for bulk device operations (which is based on csv files) is still available for add and update operations for supported device brands. See Add/update multiple devices in bulk.
This Early Availability feature allows you to Add/Update/Delete devices in bulk from an xlsx file and offers you the following advantages:
-
Support for bulk delete devices.
-
Support for the following management devices:
-
PV1
-
CMA
-
Space
-
Panorama
-
Fortimanager
-
-
Support for these additional brands:
-
AWS
-
Azure
-
GCP
-
Cisco Meraki
-
Device from file (for more information about Device from File, see Alternate data collection methods)
-
-
Support to define optional fields
-
Support for commenting out a row: if you want to avoid executing a bulk operation from that row
Known Issue: Cisco Meraki onboarding with children
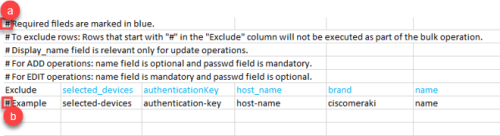
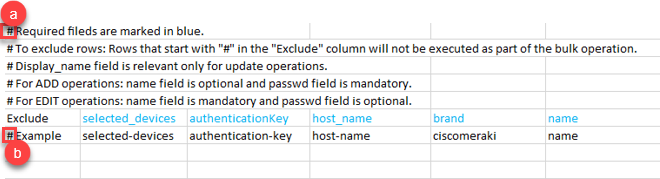
Currently there is no Children tab in the Cisco Meraki Excel template. To onboard children, you can use the 'selected_devices' column. The Children tab will be added in the future.
Enable / Disable early availability support for Bulk Add/Update/Delete devices
This procedure describes how to enable or disable support for Bulk Add/Update/Delete devices.
Do the following:
-
In AFA, click your username, and select Administration > Advanced Configuration.
-
Click Add to add a new configuration parameter.
-
Define the parameter value as follows:
Name Bulk_Add_Remove_EA Value One of the following:
- ON = Enable bulk Add/Update/Delete devices support using xlsx files.
- OFF = Use legacy bulk Add/Update devices support using csv files.
For more details, see Advanced Configuration. Continue with Bulk Add/Update/Delete devices.
Bulk Add/Update/Delete devices
To Add/Update/Delete devices in bulk, use the sample files. You download the sample files as part of the procedure, described in Step 4a below. The sample files are in excel (.xlsx) format.
Do the following:
-
Access the Devices Setup page. For details, see Access the DEVICES SETUP page.
-
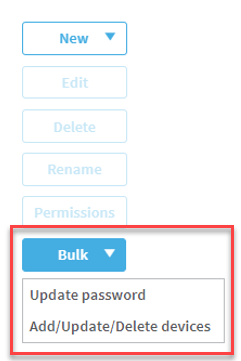
Click Bulk.

-
Click Add/Update/Delete devices. The Bulk Device Operations dialog appears.
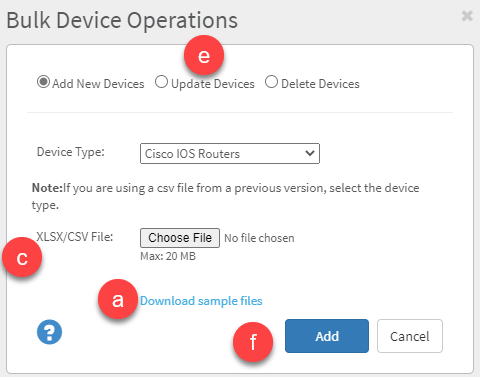

-
To use this EA feature:
-
Click Download sample files to download sample excel files.
-
Edit the files as required. See How to use the sample files.
-
XLSX/CSV file: Browse to and select your prepared xlsx file.
-
Ensure that the devices you plan to change are online and accessible by AFA via SSH.
-
Select one operation:
-
Add New Devices to bulk add devices
-
Update Devices to bulk update devices
-
Delete Devices to bulk delete devices
-
-
Click Add/Update/Delete as required. A confirmation message is displayed when the process is finished.
-
How to use the sample files
Tips:
-
To comment out rows from the sample file: (add a ‘#’ to the Exclude column of the row ) if you want to avoid executing a bulk operation from that row.
-
Note or instruction is excluded.
-
The device will not be considered in the add/update/delete operation.
-
-
Required fields are shown in blue in the header of the sample files.
-
All brands have their designated sample file. Each brand has its own set of parameters.
You can also use the Others.xlsx to add or update the following device brands in one place. (You can combine several brands together in the file):
-
F5
-
Cisco Identity Services Engine (ISE)
-
Cisco Application Centric Infrastructure (ACI)
-
Fortinet Fortigate
-
Juniper SRX
-
VMWare NSX-V
-
Palo Alto Firewall.
-
-
For all device types: The same single template file can be used for both add or update operation. However, you need to run the add and update operations separately.
-
For Management Devices (PV1, CMA, Juniper Space, Panorama, and Fortimanager): Fill out both the parent and children tabs. The expected behavior for working with child devices for management devices varies per brand.
Expected behavior per brand
Brand Adding Children Instructions Add all children automatically Add only selected children Panorama NA YES In Parent Sheet, set apply_children=yes and specify the child device details on the Children Sheet. Selection of children is optional. Juniper space NA YES In Parent Sheet, set apply_children=yes and specify the child device details on the Children Sheet. Selection of children is optional. Cisco Firepower NA YES In Parent Sheet, set apply_children=yes and specify the child device details on the Children Sheet. When set, you cannot add only the parent without specifying child devices. Fortimanager YES YES To add all children automatically, in Parent Sheet, set apply_children=yes (no need to add child devices to Children Sheet). To add selected children, in Parent Sheet, set apply_children=yes and specify the child device details on the Children Sheet. Checkpoint Smart Center YES YES To add all children automatically, in Parent Sheet, set apply_children=yes (no need to add child device to Children Sheet). To add selected children, in Parent Sheet, set apply_children=yes and specify the child device details on the Children Sheet. Checkpoint PV1 YES NO To add all children automatically, in Parent Sheet, set apply_children=yes (no need to add children to Children Sheet). -
Supported device brand values
Use the following Brand Name code values to indicate device brands:
Brand
Brand Name code
Web Services (AWS) EC2
aws
Azure
azure
Cisco Application Centric Infrastructure (ACI)
ciscoaci
Cisco ASA
pix
Cisco Identity Services Engine (ISE)
ciscoise
Cisco IOS
ios
Cisco Nexus Router
nexus
Checkpoint Smart Center
cma
Checkpoint Provider 1
pv1
F5 BIG-IP LTM and AFM
f5bigip_afm
Device from file
file
Cisco Firepower
firepower
Fortinet Fortigate
fortigate
Fortinet Fortimanager
fortimanager
Google Cloud Platform (GCP)
gcp_cloudflow
Juniper SRX
junos
Juniper Netscreen
nsc
Juniper Space
space_security_director
VMWare NSX-V
nsx
VMWare NSX-T
nsxt
Palo Alto Firewall
paloalto
Palo Alto Panorama
panorama
Cisco Meraki
ciscomeraki
-
Use the same file Delete.xlsx for all supported device brands simultaneously.