Relevant for: AFA Administrators
This topic describes how to manage AFA users and roles in the AFA Administration area.
Note: If you have an authentication server or SSO configured, user credentials must be managed on your external server. If your user roles are assigned based on LDAP group membership, roles must be managed on the LDAP server. In these cases, any changes made directly in AFA are overwritten the next time the user logs in. For more details, see Configure user authentication.
Tip: AFA users and roles provide the basis for authentication across both AFA and FireFlow. If you are an AFA administrator, but not a FireFlow administrator, you can also access FireFlow role and user management via the AFA Administration area.
Add or edit users
This procedure describes how to add and edit users in ASMS.
Tip: Alternately, manage users via an authentication server or SSO, or import users via a CSV file. For details, see Configure user authentication or Import users via CSV.
Do the following:
-
Click your username at the top-right to access the AFA Administration area.
-
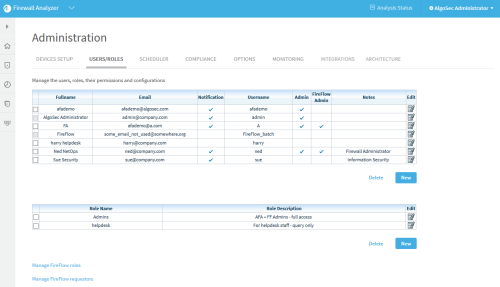
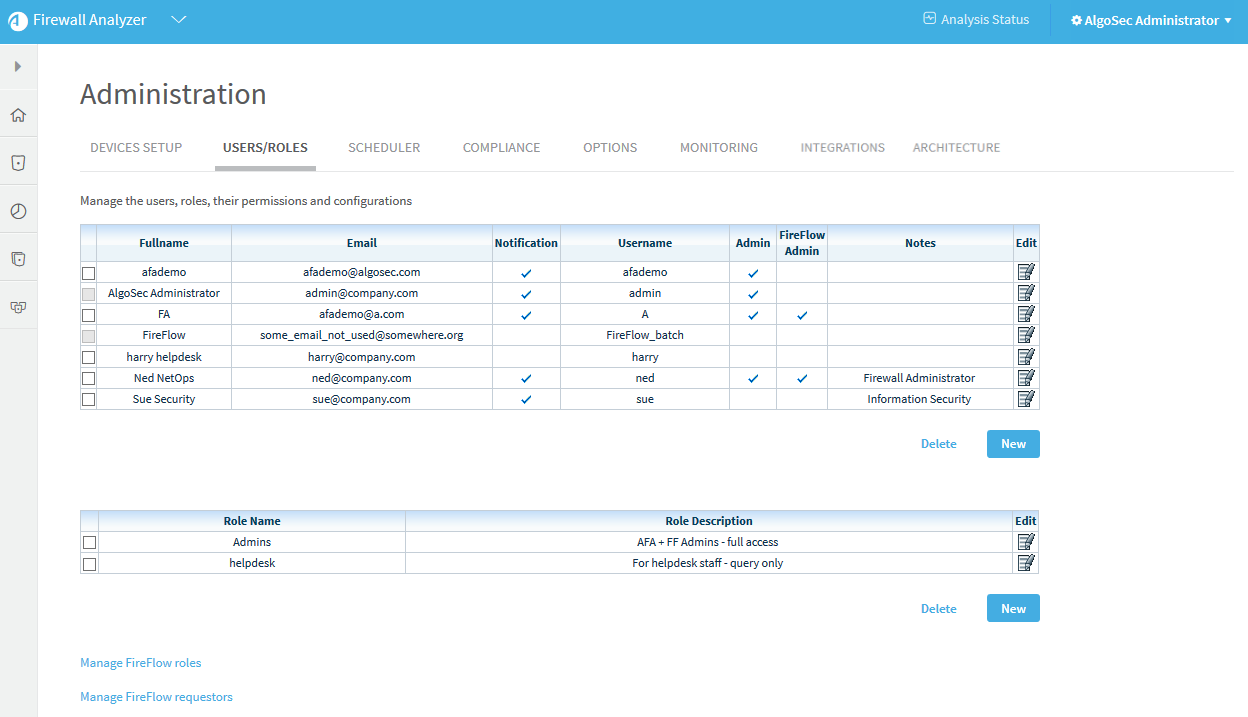
Click the USERS/ROLES tab to display the user and role tables. For example:
-
To add a new user, click the New button below the user table. To edit an existing user, click the edit
 button at the right side of the row you want to edit.
In the user form that appears, select and enter values as needed:
 User details
Username
Enter a username for the user.
Usernames can contain any alpha-numeric character and the following special characters: "@", "_", ".", or "-". See Password requirements.
Full name
Enter the user's full name.
E-Mail
Enter the user's e-mail address.
Notes
Enter any notes about the user.
Authentication
Select how to authenticate this user:
- Local. Authenticate the user against the local ASMS user database.
-
RADIUS. Authenticate the user against a RADIUS server.
-
LDAP. Select this option to enable user authentication against an LDAP server.
For more details, see Configure user authentication.
Note:
-
Only one authentication type per user is allowed
-
Users (including admins) cannot change their own user type
Landing Page
Select Firewall Analyzer or FireFlow. Select Automatic to use the default landing page for the selected role.
For more details, see Default landing pages per role.
Password
Current Password
A user changing their own password enters their current password in the Current Password field.
Admin
Password
The Admin, adding a new user or providing a new password for a user, enters their own Admin password in the Admin Password field.
Note: The administrator can choose to skip the step of having to enter the admin password each time for user password changes by setting the advanced configuration parameter CHANGE_PASS_WITHOUT_ADMIN_PASS=yes. For more details, see CHANGE_PASS_WITHOUT_ADMIN_PASS.
New password
Enter a password for the user. For details, see Password requirements.
Note (for admins): For local users who have not yet logged in after the upgrade to A32.50, any password you give them is valid. When the user logs in, they will be required to choose a new password meeting the stronger requirements.
Confirm password
Re-enter the password you entered in the New password field.
General Permissions
Administrator
Make the user an administrator.
FireFlow Administrator - Allow FireFlow Advanced Configuration
Make the user a FireFlow configuration administrator. This enables the user to perform advanced configuration tasks in FireFlow.
Enable Analysis from file
Allow the user to perform analyses from configuration files.
Enable Trusted Traffic -> global
Allow the user to view trusted traffic.
Roles
Select the user roles to assign to the user. The user is automatically granted permissions specified in the assigned roles.
Tip: If you assign additional permissions to this user, the user will have both the permissions inherited from their roles, as well as additional permissions assigned to the user.
Email Notifications
Define the scenarios in which this user receives notifications from AFA:
Changes in risks
The user is notified for each change detected in risks.
Changes in policy
The user is notified for each change detected in policies.
Every group report
The user is notified for each group report generated.
Every report
The user is notified for each report generated.
Every configuration change
The user is notified for each configuration change detected.
Rules and VPN Users about to expire
The user is notified when device rules and/or VPN users are about to expire.
Tip: To configure the number of days before rule or VPN user expiration that AFA should send a notification, complete the Days before expiration alerts field in the General sub-tab of the Options tab in the Administration area.
For details, see Define AFA preferences.
Error messages
The user receives error messages from AFA, such as for low disk space and license expiration.
This option is relevant for administrators only.
Changes in customization
The user is notified for each customization change detected, such as for topology, trusted traffic, and risk profile customizations.
This option is relevant for administrators only.
User notification emails include only device names and a link to the AFA.
Specific details about new reports and change alerts are omitted from emails to this user.
Tip: Alternately, hide change details for all user notifications. For details, see the hide_change_details parameter.
Authorized Views and Actions
Select the items this user can view or perform as follows:
Report
Select the report pages/information that the user can view. Select Full Report to indicate that the user can view all report information.
Pages that are not selected will be inaccessible to the user.
Note: A user can only be given access to Configuration and Logs information if they have access to the Explore Policy page.
Home Views
Select the Home page elements that the user can view. Select All Home Views To indicate that the user can view all Home page elements.
Pages that are not selected will be inaccessible to the user.
Reporting Tool
Select this option to allow the user to access the AlgoSec Reporting Tool (ART).
Note: Non-administration users that open the Reporting Tool will only see data relevant to the user's allowed firewalls.
Actions
Select the actions that the user can perform in AFA. Select All Actions to indicate that the user can perform all actions.
Controls used to perform actions that are not selected will be disabled.
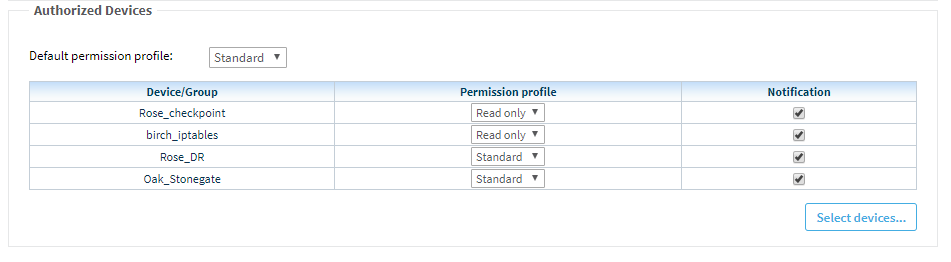
Authorized Devices
Select the user's default access level to devices. Do the following:
- Select a default permission profile to determine the permission level for the selected devices.
-
Click Select devices.... to select the devices you want to apply the selected permission level on.
The device tree appears.
-
Select the checkboxes next to each relevant device and click OK.
A table appears with your selected devices and permissions.
For example:

If needed, do either of the following:
- Select a different option from the Permission profile dropdown to change the profile for a specific device
- Clear or re-select the Notification checkbox to change notification settings for a specific device
- Click OK to save your changes.
Default landing pages per role
ASMS is configured with specific landing pages per user or role. Change this default to display a different page as needed.
-
Landing pages configured for specific users override any configuration for a user's role.
-
Users with multiple roles, with different landing pages for each role, will see the landing page with the highest priority.
Landing pages are prioritized for FireFlow first, and then AFA.
If no landing page is defined for the user, or any of the user's roles, landing pages are defined as follows:
| Permissions | Landing page |
|---|---|
| Administrators |
AlgoSec Firewall Analyzer |
| AFA Users |
First FireFlow, if licensed and activated, and then AFA. |
| Requestors (unprivileged users) |
AlgoSec Firewall Analyzer |
Unlock locked local accounts
This procedure describes how to manually unlock a local account.
Repeated attempts (by default, 10 attempts) to log into a local account with an incorrect password locks the account. The user can log in again after a login delay (by default, 5 minutes) or the admin can unlock the account manually.
Tip: You can configure the account lockout policy. For more details, see Configure the Account Lockout policy (for local users).
Note: If a user is logged in when a lock is applied to the account, the user can continue working. If the user needs to log in again, the account may be locked.
Do the following:
-
Log in with an admin role.
-
Under the Administration menu, select the USERS/ROLES tab.
-
Click the
Edit button of the locked account. -
Click the
 Unlock user button.
Note: If the admin user is locked out, log in to your ASMS machine via CLI with the username root. From the algosec_conf menu select option 9. Reset AFA admin password.
This resets the password and unlocks the admin user.
Add and edit user roles
This procedure describes how to add and edit user roles.
Tip: If you have an LDAP server configured, associate AFA user roles with specific LDAP user groups to have each user in the group automatically inherit the AFA role.
Do the following:
-
Click your username at the top-right to access the AFA Administration area.
-
Click the USERS/ROLES tab to display the user and role tables. For example:
-
To add a new role, click the New button under the role table. To edit an existing role, click the edit
 button in the row for the role you want to edit.
In the user form that appears, select and enter values as needed:
Role details
Role name
Enter a name for the role.
Role description
Enter a description of the role.
Role LDAP DN
Enter the DN of the LDAP group that corresponds to this role.
When users who are members of this LDAP group log in, they will automatically be granted this role.
For example: cn=network_users,ou=organization,o=mycompany,c=us
Note: This field is enabled only if you have AFA configured to fetch user data from an LDAP server.
To enable this field, select the Fetch user data from LDAP option on the OPTIONS > Authentication tab in the AFA Administration area. For details, see Import user data from an LDAP server.
Landing Page
Select Firewall Analyzer or FireFlow. Select Automatic to use the default landing page for the selected role.
For more details, see Default landing pages per role.
General Permissions
Administrator
Make all users with this role administrators.
FireFlow Administrator - Allow FireFlow Advanced Configuration
Make all users with this role FireFlow configuration administrators.
This enables these users to perform advanced configuration tasks in FireFlow.
Enable Analysis from file
Allow all users with this role to perform analyses from configuration files.
Enable Trusted Traffic -> global
Allow all users with this role to view and edit trusted traffic settings.
Authorized Views and Actions
Report
Select the report pages that users with this role can view.
- Select Full Report to indicate that users with this role can view all report pages.
- Pages that are not selected will be inaccessible to users with this role.
Home Views
Select the Home page elements that users with this role can view.
- Select All Home Views to indicate that users with this role can view all Home page elements.
- Pages that are not selected will be inaccessible to users with this role.
Actions
Select the actions that users with this role can perform in AFA.
- Select All Actions to indicate that users with this role can perform all actions.
- Controls used to perform actions that are not selected will be disabled.
Authorized Devices
Select the default device access provided to all users with this role. Do the following:
- Select a default permission profile to determine the permission level for the selected devices.
-
Click Select devices.... to select the devices you want to apply the selected permission level on.
The device tree appears.
-
Select the checkboxes next to each relevant device and click OK.
A table appears with your selected devices and permissions.
For example:
If needed, do either of the following:
- Select a different option from the Permission profile dropdown to change the profile for a specific device
- Clear or re-select the Notification checkbox to change notification settings for a specific device
- Click OK to save your changes.
Delete AFA users or roles
This procedure describes how to delete users from the local AFA database, or delete user roles.
Tip: Alternately, manage users via an authentication server or SSO. For details, see Configure user authentication.
Do the following:
-
Click your username at the top-right to access the AFA Administration area.
-
Click the USERS/ROLES tab to display the user and role tables. For example:
- Select the check box next to the user or role you want to delete, and click Delete.
- In the confirmation message that appears, click OK.
The selected user or role is deleted from AFA.
Username requirements
ASMS usernames can contain any alpha-numeric character and the following special characters:
- @ (at symbol)
- _ (underscore)
- . (period)
- - (hyphen)
-
/ (forward-slashes)
Use the following regular expression to confirm that your usernames meet ASMS requirements:
| Value | Regular Expression |
|---|---|
|
Username or username with LDAP domain |
^[a-zA-Z0-9@_.-\/]*$ |
Note: For local users, the system does not distinguish between matching usernames spelled with different cases (for example User_A and user_a).
Password requirements
This section describes the different password requirements based on the method used to log in.
General password requirements (for LDAP, Radius, SSO)
ASMS passwords can contain any alpha-numeric character or any special character, except for back-ticks (`).
Tip: You can use the following regular expression to confirm that your passwords meet ASMS requirements:
| Value | Regular Expression |
|---|---|
|
Password |
^[a-zA-Z0-9\x20-\x5F\x7B-\x7E]*$ |
Strong password requirements (for local users)
Local user password policy is configurable and has the following default requirements:
-
Must be at least 8 characters long
-
Must contain at least 1 uppercase letter (A-Z)
-
Must contain at least 1 lowercase letter (a-z)
-
Must contain at least 1 number (0-9)
-
Must contain at least 1 special character
! " # $ % & ' ( ) * + , - . / : ; < = > ? @ [ \ ] ^ _ ` { | } ~
-
Password cannot be the same as the username
-
Password cannot match any of the 3 most recently used passwords
Note: To customize the local user password policy, see Configure the Password policy (for local users)
Configure the Password policy (for local users)
This procedure describes how to modify the password policy parameters for local users.
| Parameter name | Default | Definition |
|---|---|---|
| hashIterations | 27500 | Number of times passwords are hashed before storage or verification. (For internal use only) |
| minimumPassLength | 8 | Minimum length of user password. |
| minimumDigitChars | 1 | The number of numerical digits required in the password string. |
| minimumUppercaseChars | 1 | The number of upper case letters required in the password string. |
| minimumLowercaseChars | 1 | The number of lower case letters required in the password string. |
| minimumSpecialChars | 1 | The number of special characters required in the password string. |
| passwordExpiryDays | 365 | The number of days the password is valid. When the number of days has expired, the user must change their password. |
| passwordNotUsername | true | When true, the password must be different from the username. |
| notRecentlyUsedPasswords | 3 | The new password must not match any of the last <notRecentlyUsedPasswords value> passwords that were used. |
Do the following:
-
In the CLI navigate to /home/afa/.fa/keycloak_config.
-
Edit password_policy.json and customize the parameter values as required.
For example:
{ "hashIterations": 27500, "minimumPassLength": 8, "minimumDigitChars": 1, "minimumUppercaseChars": 1, "minimumLowercaseChars": 1, "minimumSpecialChars": 1, "passwordExpiryDays": 365, "passwordNotUsername": true, "notRecentlyUsedPasswords": 3 } -
Run:
update_security_policies.pl
Important: If you made policy changes using the CLI with the Login page already open in the browser, you need to reload the page for the changes to take effect.
Note: When the admin updates the password policy, existing users are not asked to update their passwords even when they don't adhere to the new policy. (When the user later updates their password, it needs to meet the strong Password policy requirements)
Configure the Account Lockout policy (for local users)
This procedure describes how to modify lockout policy parameters for local user accounts.
| Parameter name | Default | Definition |
|---|---|---|
| bruteForceProtected | true |
When true, account lockout policy is enforced. When false, account lockout policy is not enforced. |
|
permanentLockout |
false |
When true, only an admin can unlock a locked user account. When false, a user account remains locked until either the login delay has elapsed (see login delay parameters) or an admin unlocks it. To unlock locked user accounts, see Unlock locked local accounts. |
| failureFactor | 10 | The maximum number of login failures allowed before locking the account. |
| quickLoginCheckMilliSeconds | 1000 (ms) | The minimum time allowed between login attempts. |
| minimumQuickLoginWaitSeconds | 300 (seconds) | The minimum time the user login is locked when login attempts are faster than the minimum allowed, as defined in quickLoginCheckMilliSeconds. |
| Login delay parameters (permanentLockout = false) | ||
|
waitIncrementSeconds |
300 (seconds) |
Login delay triggered when the number of failed user login attempts reaches the maximum allowed, as defined in failureFactor. The login delay increases with each failed login according to the following calculation: (waitIncrementSeconds * number of attempts after failureFactor is reached / failureFactor) rounded down to a whole number. |
| maxFailureWaitSeconds | 900 (seconds) | The maximum time a user account is temporarily locked. |
| maxDeltaTimeSeconds | 43200 (seconds) | The time when the failure count (failureFactor) resets. The timer runs from the last failed login. |
Do the following:
-
In the CLI navigate to /home/afa/.fa/keycloak_config.
-
Edit brute_force_policy.json and customize the parameter values as required.
For example:
{ "bruteForceProtected": true, "permanentLockout": false, "failureFactor": 10, "quickLoginCheckMilliSeconds": 1000, "minimumQuickLoginWaitSeconds": 300, "waitIncrementSeconds": 300, "maxFailureWaitSeconds": 900, "maxDeltaTimeSeconds": 43200 } -
Based on user type:
For root user, run:
/usr/share/fa/bin/update_security_policies
For afa user, run:
update_security_policies
Important: If you made policy changes using the CLI with the Login page already open in the browser, you need to reload the page for the changes to take effect.