Access Management
This topic describes management for user, API access keys, Single Sign-On (SSO), and user activity for AppViz.
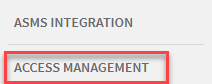
Open access management
To reach AppViz Access Management:
Click on Access Management at the lower left of your screen.
The Access Management page is displayed.
Access Management has four tabs: Users, API Access, SSO Setup, and User Activity.

Manage Users
From the Users tab you can:
-
See at a glance:
-
Instant User Count (total, filtered, searched)
-
User details of individual users
-
Note: Click on the ellipsis button to the right of each user to:
-
Reset MFA device available only if MFA is enabled for the user
-
Reset Password available only if user completed first-time login
-
Resend invitation available only if user has not completed first-time login
Add a new user
When SSO is disabled, Administrators can add a user, assigning any of the AppVizOut-of-the-box User Roles to the new user.
When SSO is enabled, the +Add User button is disabled.
-
Click +Add user above the Actions column.
-
Fill out the Add user form that is displayed according to the Add user fields table.
Note: Usernames must be unique.
After completing the fields, click the Add button at the bottom right of the Add user dialog.
The user is added to the list of users and is automatically sent a welcome email that enables a guided, seamless entrance into AppViz. See Inside the invitation email.
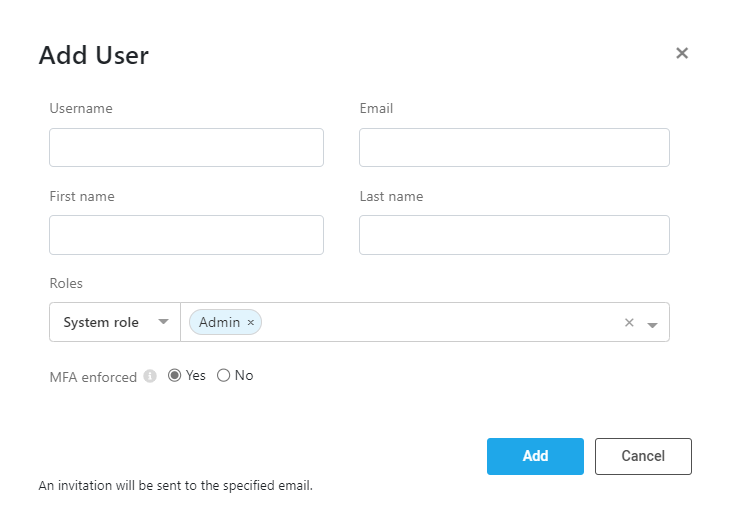
Add user fields table
| Field | Description |
| Username | The identifier of the user in AppViz. The username must be unique in your AppViz system, i.e. no two users can have the same username. Note: The username is permanent. To give a user a different username, the user must be deleted and a new user must be created for the user. |
| The email at which the user wishes or is authorized to receive messages from AppVizand the System Admin. | |
| First name | The user's first name. |
| Last name | The user's family name. |
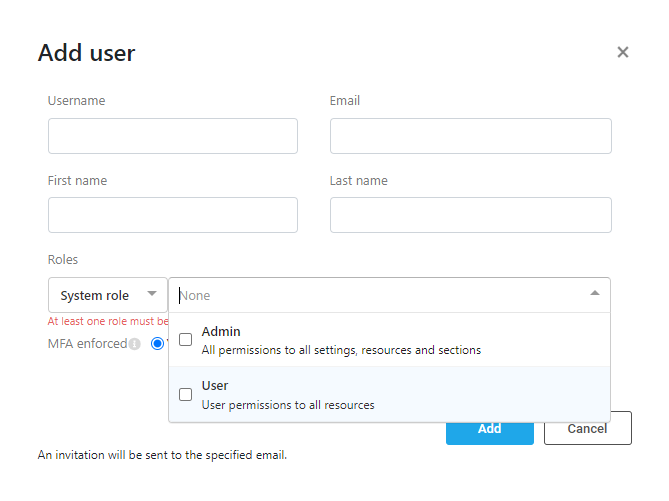
| Roles |
From the left drop down select System Role.
|
| MFA enforced | If yes is selected, user will need to authenticate after entering password, using an authenticator application. Note: The first time that a user enters after MFA enforced is set to yes, the user performs a one-time Authenticator setup. For more details on setting up Multiple Factor Authentication and logging into AppViz using it, refer to First login as MFA user and Subsequent MFA logins. |
Edit a user
Note: When SSO is enabled, user’s appear in the Access Management page USERS tab only after first login. They are assigned a default system role User, which can be edited later.
To edit a user:
1. Click on the vertical ellipsis  to the right of the user whose information needs editing.
2. On the options pop-up menu that is displayed, click Edit.
3. Modify the fields as required and then click Save to keep your changes or Cancel to discard them.
4. If required, change the MFA functionality for the user here.
Edit user fields
| Field | Description |
| Username | In edit mode, this field is read-only. |
| The email at which the user wishes or is authorized to receive messages from AppViz and the System Admin. | |
| First name | The user's first name. |
| Last name | The user's family name. |
| Roles |
From the left drop down select System Role.
|
| MFA | If yes is selected, user will need to authenticate after entering password. Note: First time user enters after MFA is set to yes, the user performs a one-time Authenticator setup. |
Delete user
There are many reasons for deleting users including when a user leaves your organization. Deleting unauthorized users is an important security feature that should be undertaken in a timely manner.
To delete a user:
-
Click on the ellipsis
to the right of the user's row in the user table. -
On the options pop-up menu that is displayed, click Delete.
A confirmation message asks if you are sure you want to delete this specific user: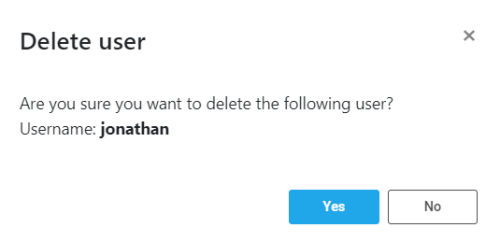
-
If you do not want to delete this user, click the x in the upper right corner of the message or click No.
To proceed with deleting the user, click the Yes button.
Upon clicking Yes, the User tab is refreshes and the deleted user is no longer in the list of users.

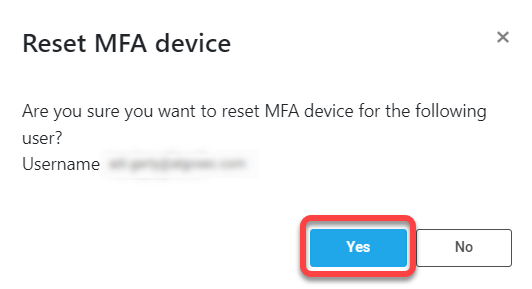
Reset MFA device
An Admin can cause a user to reset their MFA device.
Note: Reset MFA Device is only available if MFA authentication for the user is enabled.
-
Click on the vertical ellipsis
to the right of the user requiring MFA device reset. -
On the options pop-up menu that is displayed, click Reset MFA device.
-
On the confirmation message that is displayed, click Yes to continue.

As a result, the relevant user will be required to reset their MFA device during their next login to AppViz.
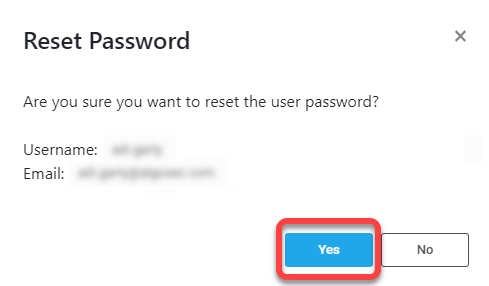
Reset Password
An Admin user can reset the user password.
-
Click on the vertical ellipsis
to the right of the user requiring a new password. -
On the options pop-up menu that is displayed, click Reset Password.
-
On the confirmation message that is displayed, click Yes to continue.

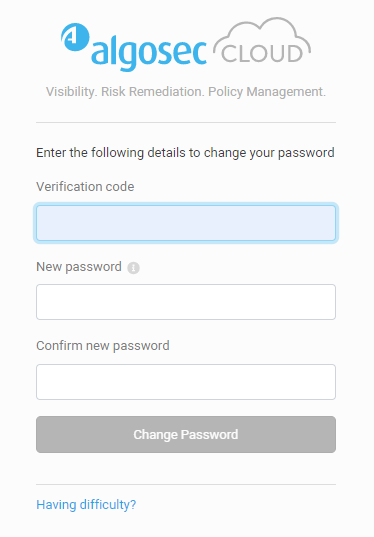
As a result, the relevant user receives an email that provides:
-
a link for resetting the password
-
a verification code.
When users follow the email instructions and click on the link, they are connected with the relevant tenant and presented with a form for entering the verification code and creating their new password:
-

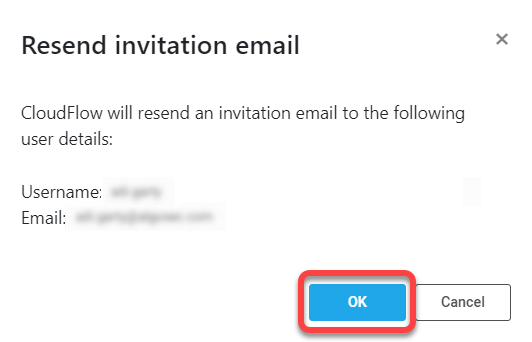
Resend invitation
Note: Resend invitation is available for users who have not logged into AppViz for the first time.
-
Click on the vertical ellipsis
to the right of the user requiring a new password. -
On the options pop-up menu that is displayed, click Resend invitation.
-
On the confirmation message that is displayed, click OK to continue.
Tip: Before clicking OK, double-check that the email address of the user is correct!

The invitation email is sent to the relevant user again. See Inside the invitation email.
Inside the invitation email
The invitation email is a templated email from AlgoSec AppViz to a new AlgoSec AppViz user in your organization. It provides the new user with:
-
All credentials required for login and a button for first-time login
-
One-click links to product resources and AppViz online help and more
A new user's first steps
Typically, the AlgoSec administrator in your organization registers qualified users in AlgoSec AppViz as described in these sections.
Each newly added user receives an email invitation. This is an automatic action of AppViz.
-
The email invitation includes all credentials needed by the user for logging into AppViz for the first time, a direct link to the AlgoSec AppViz SaaS URL and much useful information.
The email explicitly states that credentials will expire in 30 days. -
Typically, a new user will receive the email, follow the directions and begin using AppViz. In such cases, the Send invitation option is not displayed in the per-user actions menu . New users that don't start promptly can be reminded using the Send invitation action.
Filter and Search for Users
In large enterprises, it's important to be able to find specific users quickly. On the Users tab, users can be located quickly by entering text into the search field.
To filter for or find users:
-
Simply enter characters into the search field.
Users with no fields containing the entered text disappear temporarily from the list. -
Removing the characters from the filter restores the user list.

Manage API Access Keys
The ability to generate Access Keys is an important security feature, allowing authorized users to access, examine and use relevant AlgoSec APIs.
From the API Access tab you can:
-
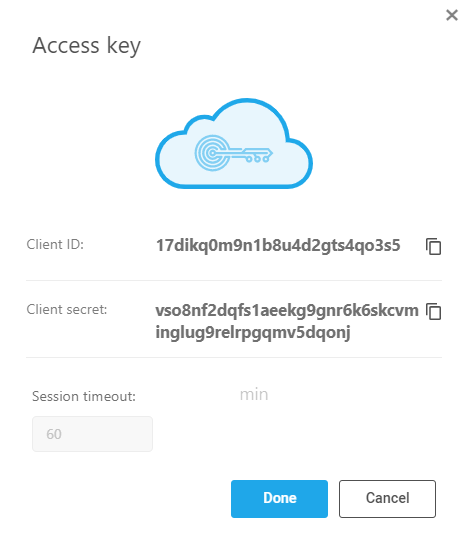
View an Access Key
When you view an access key you can copy the Client ID and the Client secret but you cannot edit any fields.
-
Click on the vertical ellipsis
to the right of the access key to view. -
On the options pop-up menu that is displayed, click view.
-
To get the API Token required for AppViz authorization, copy the Client ID and Client Secret to use in the Log in to the Tenant endpoint .
-
When you finish with the Access key view, click Done to close it.
-

Add a new API Access Key
-
From Settings > Access Management > API Access tab, click +Add key.
The Add Access Key dialog is displayed: -
Fill in the fields as indicated in this table, and then click Add in the lower right corner:
Edit an Access Key
To edit an access key:
-
Click on the vertical ellipsis
to the right of the access key that needs editing. -
On the options pop-up menu that is displayed, click Edit. The Edit access key dialog is displayed.
-
Optionally edit or use fields as follows:
-
Click Save to keep your changes or Cancel to discard them.
| Field | Description |
|---|---|
| Access key name | Edit freely. |
| Client ID | Copy this to a safe place. You cannot edit the Client ID. |
| Client secret | Copy this to a safe place. You cannot edit the Client secret. |
| API access timeout. | You can edit the number of minutes. |
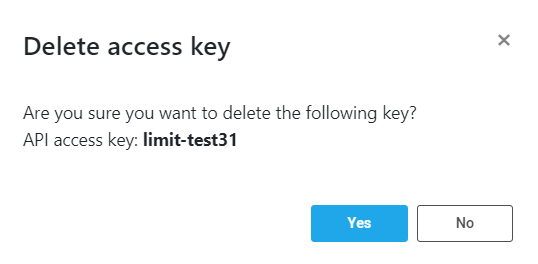
Delete an Access Key
Deleting an access key is very simple.:
-
Click on the vertical ellipsis
to the right of the access key you wish to delete. -
On the options pop-up menu that is displayed, click delete.
A confirmation Delete access key dialog is displayed, showing the name of the API access key to be deleted.
-
Click Yes to delete the key.
Note: You can click No to close the dialog without deleting the API access key.
Out-of-the-box User Roles
AppViz offers user roles out-of-the box. See AppViz users, permissions, and roles.
Note: Viewing user information, adding and editing users is only available to users assigned the Admin role.
Manage Single Sign-On (SSO)
Enable SSO login on your tenant to give users access to multiple services with a single authentication, reducing password fatigue and providing an easier sign up and log in experience.
Note: AlgoSec SaaS applications officially support Azure Active Directory and Okta as SSO providers. Other SAML2 SSO providers may also work. Try to enable following the instructions below. If you encounter difficulties contact AlgoSec support for assistance.
Note: When SSO is enabled, users appear in the Access Management page USERS tab only after first login. They are assigned a default system role User, which can be edited later.
Important: Users must have a valid email address, surname (last name), given name (first name), and name identifier in the relevant fields of the Identity Provider.
Set SAML attributes as specified by your identity provider.
-
For Active Directory, use:
-
Attribute Name= http://schemas.xmlsoap.org/ws/2005/05/identity/claims/emailaddress Value=user.email
-
Attribute Name=http://schemas.xmlsoap.org/ws/2005/05/identity/claims/surname and Value= user.surname
-
Attribute Name=http://schemas.xmlsoap.org/ws/2005/05/identity/claims/givenname and Value= user.givenname
-
Attribute Name=http://schemas.xmlsoap.org/ws/2005/05/identity/claims/name and Value= user.principalname
-
-
Similarly for Okta, use recommended attribute statements:
-
Name=http://schemas.xmlsoap.org/ws/2005/05/identity/claims/emailaddress and Name Format=URI reference format and Value=user.email)
-
Name=http://schemas.xmlsoap.org/ws/2005/05/identity/claims/surname and Name Format=URI reference format and Value= user.lastName
-
Name=http://schemas.xmlsoap.org/ws/2005/05/identity/claims/givenname and Name Format=URI reference format and Value= user.firstName
-
Attribute Name=http://schemas.xmlsoap.org/ws/2005/05/identity/claims/nameidentifyer and Name Format=URI reference format and Value= user.login
-
To configure SSO user authentication
-
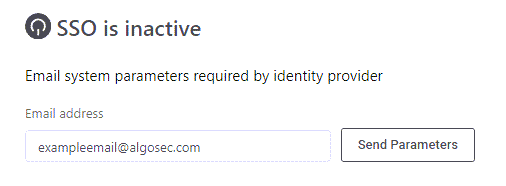
In Access Management, click the SSO SETUP tab.

-
Enter the email of the IT admin associated with your account and click Send Parameters.
The application parameters are sent to that email address.
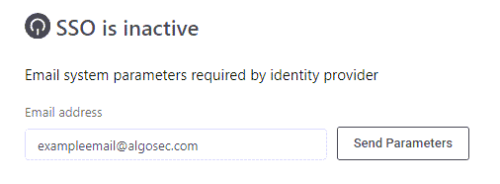
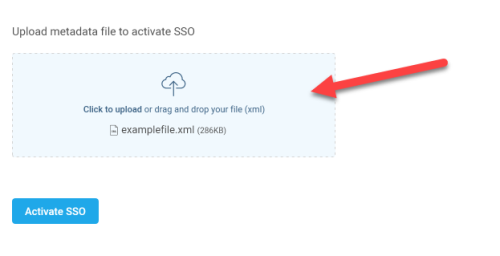
Note: Using the details sent by AppViz, the IT admin generates the XML metadata file needed for the next step.
Tip for IT department: For more information about Federation Metadata XML, refer to Identity provider documentation.
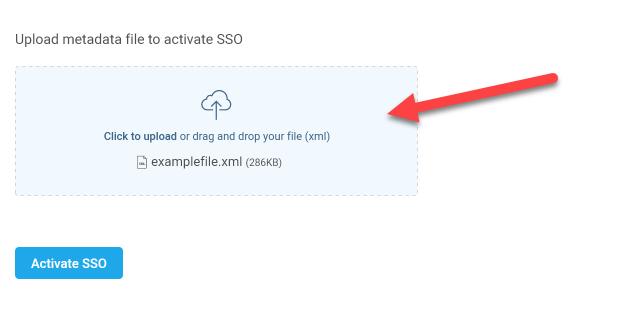
-
Upload the XML metadata file provided by the IT admin and then click Activate SSO.
Once activated, all users in the Users tab can log in with SSO.
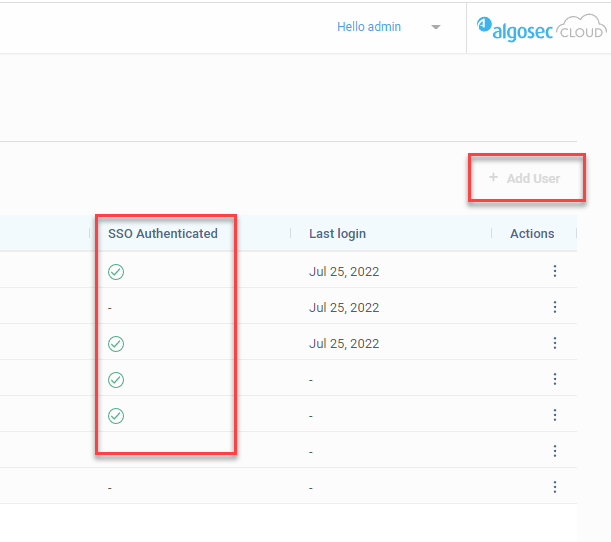
Note:
-
A check appears on the Users tab in the SSO Authenticated column after a user logs in at least one time using SSO.
-
+Add User is disabled for SSO-enabled tenants. Contact your IT department to add additional users.

-
Deactivate / Reactivate SSO
To deactivate SSO: Administrators can deactivate SSO on a tenant by clicking Deactivate SSO.
To reactivate SSO: Administrators can reactivate SSO using the previously stored XML metadata file by clicking Reactivate SSO.
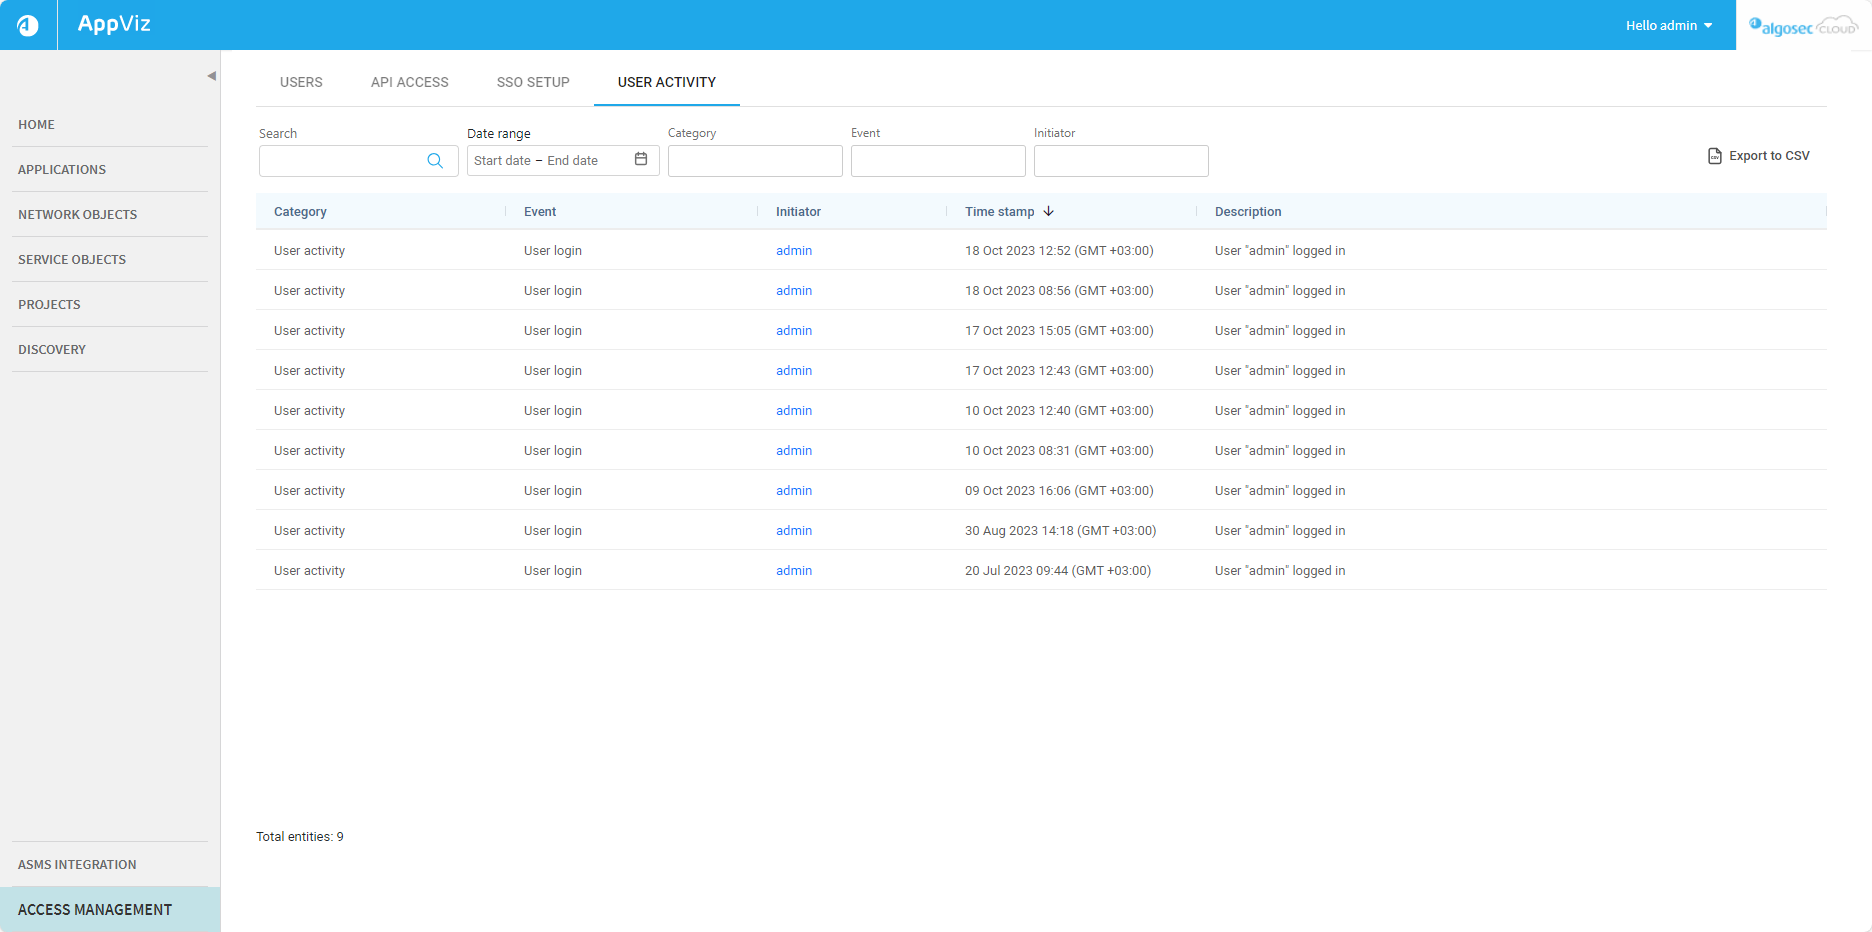
Track User Activity
The User Activity tab lists user activities detected by the system, including who initiated the activity and when. This makes it easy to check that users are following established protocols, and assists in preventing and tracking down fraud.
Note: User activity is based on the last three months of recorded data.
To view a log of other actions, see:
The following is a list of the user activity tracked by AppViz:
| Category | Event | Description |
|---|---|---|
| User management | User creation | A new user was added to the system. |
| SSO user creation | A new user was added to the system using an SSO login session. | |
| User deletion | A user was removed from the system. | |
| User modification | User information or role was updated. | |
| API management | API creation | A new access key was created. |
| Role management | Role creation | A new role was added to the system. |
| Role deletion | A role was removed in the system. | |
| Role modification | An existing role in the system was updated. | |
| Access management | SSO Activated | Single Sign-On (SSO) was enabled. |
| SSO Deactivated | Single Sign-On (SSO) was disabled. | |
| User Activity | User login | User login-related activity was detected. |
| API Activity | API connection | Access key logged in. |
| API management | API deleted | Access key was deleted. |
| API updated | Access key was renamed or configuration changed. |
The following details are displayed for each recognized activity:
| Column Name | Description |
|---|---|
| Category | The category type of the activity detected. |
| Event | Event name as identified in the system. |
| Initiator | Username or access key name (of the API) that initiated the activity. |
| Time stamp | The date and time (UTC) the action took place. |
| Description | Easy-to-understand description of the event. |
Search and filtering options

Use the search and filters to see a targeted selection of user activities.
| Search | Search activities by any of the fields (except for time stamp). |
| Time range | Display activities occurring within the specified dates. |
| Category | Filter activities by category type. |
| Event | Filter activities by event type. |
| Initiator | Filter activities by the username(s) or access key name(s) that initiated the activity. |
Export user activites
Export a list of user activities to a CSV file for easy sharing and further analysis.
Do the following:
-
(Optional) Customize the list of user activites displayed by using the Search and filtering options as needed.
-
Click
 .
.The Confirm export popup window appears.
-
In the Confirm export popup, click Yes.
A CSV file of the user activites is saved in the browser's download folder.