This procedure describes how to add or edit a Remote Agent, and is part of configuring geographic distribution.
To add or to repurpose a machine as an Application Discovery Remote Agent, see Deploy Application Discovery .
If you are adding an HA cluster of appliances as a Remote Agent, first add node to the Central Manager and then build the cluster. For details to build the cluster, see Build a cluster.
Do the following:
-
Ensure that you are logged in to AFA as an administrator. For details, see Logins and other basics.
-
In the toolbar, click your username, and select Administration.
-
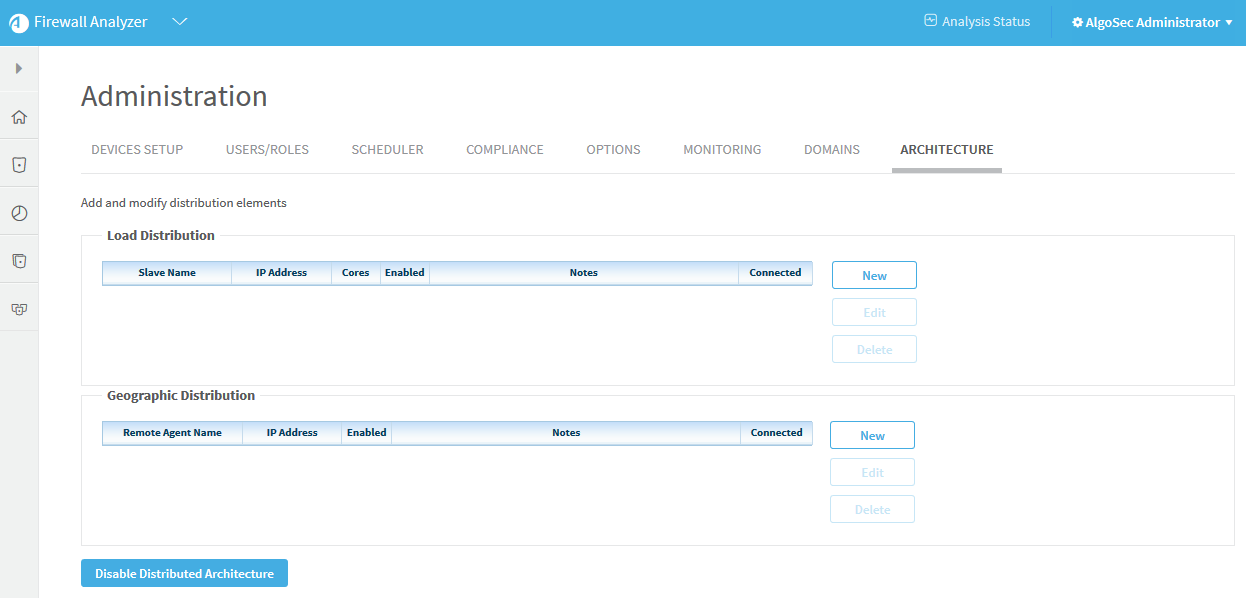
In the Administration area, click the Architecture tab.

-
In the Geographic Distribution area, do one of the following:
- To add a new Remote Agent, click New.
- To edit an existing Remote Agent, click on the relevant row, and click Edit.
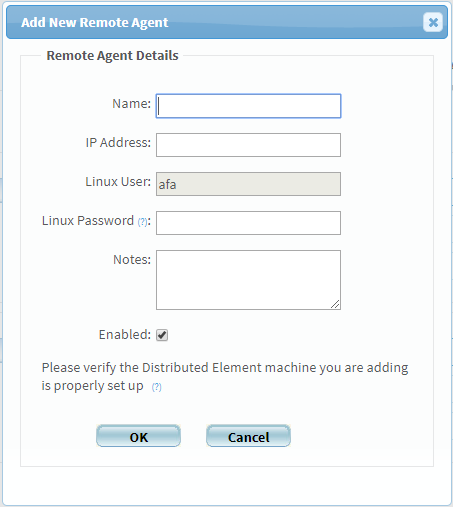
The Add New Remote Agent dialog is displayed.

-
Enter the following details:
Name
Enter a unique name for the Remote Agent. Read-only when editing.
IP Address
Enter the Remote Agent's unique IP address.
Linux User
Read only. The username of the Linux user you used to install AFA on the Remote Agent.
Linux Password
Enter the password of the Linux user shown.
Notes
Optional. Enter any notes about this Remote Agent.
Enabled
Select to enable the Remote Agent.
-
Click OK. If you added a new Remote Agent, AFA attempts to connect to it.
The Connected column on the ARCHITECTURE tab indicates whether this connection is successful. Connection statuses are indicated by the following colors:
- Green. Successful
- Red. Failed
- Grey. In progress
-
If you are building a high availability architecture using a remote agent, continue by building a cluster. For more details, see Build a cluster.
To change the IP address of a Remote Agent
Tip: The following steps can be used also to reassign the IP address of the source node to the target node to which devices have been relocated. In this case, make sure you have removed the original Remote Agent from the system before reassigning its IP to the target node.
Do the following:
Note: Perform the steps as specified from the Administration>Architecture tab. Using the CLI may not give you all the options you need.
- Disable any monitoring or analysis processes for the device whose IP you want to change.
- On the Central Manager, go to Administration > Architecture tab.
- On the Remote Agent, access the administration interface via SSH. On the algosec_conf main menu and enter 1 (Configure IP address).
- Enter 1 (Configure static device IP address). Change the IP of the Remote Agent.
- On the Central Manager, go to Administration > Architecture tab. Edit the Remote Agent. Change its IP address and enable the Remote Agent.
-
(alternative) If the Remote Agent is dedicated for Application Discovery:
-
Login to ASMS via SSH and run:
sed -i '/Auto_Discovery_Configured/d' ~afa/.fa/config
sed -i '/AutoDiscovery/d' /etc/hosts
-
In the algosec_conf menu, enter option 14 Product and cloud configuration> 2 Application Discovery configuration > 2 Configure Application Discovery on Remote Agent.
-
Enter new RA IP, at the prompt:
enter the Remote Agent IP: <new RA IP>
-
â See also: