NAS (Network Attached Storage) support
This procedure describes how to configure AFA to store all reports on a remote NAS server. Starting with ASMS v32.10, you can choose a local server or an AWS EFS as the location of your NAS server.
Configure or de-configure NAS storage as needed for your deployment or upgrade, and test your installation and configuration after making system changes.
ASMS support for NAS
ASMS supports NAS storage configurations as follows:
| Supported protocols |
NFSv4 (default) and NFSv3, depending on the NAS server. ASMS attempts to connect first via NFSv4, and if it cannot, automatically uses NFSv3. |
| Deployment types |
VMs with an AlgoSec-provided image deployed, AlgoSec Hardware Appliances only and AWS EFS. |
| HA clusters |
Configure NAS on the primary node. When you build the cluster, NAS is automatically configured on the secondary node. |
| DR clusters |
Secondary nodes can have their own NAS server at the disaster recovery site. In such cases, customers are responsible for configuring the communication synchronization between the NAS servers at the primary and disaster recovery sites. |
| Load distribution architectures |
Load distribution architectures are supported with NFSv4 only. Configuring NAS for the Central Manager automatically configures NAS for all Load Units. |
Configure NAS
You can configure NAS Storage for your reports on your site or on an AWS EFS.
Do the following:
-
Log on to the NAS server, and create a new directory in a shared space.
As mentioned, from ASMS A32.60 your NAS server can be an AWS EFS.
-
Connect to the Administration interface on your ASMS machine. For details, see Connect to and Utilize the Administration Interface.
-
Enter 11 to configure NAS. The system confirms that NAS is not configured.
-
Enter 1 to set NAS for storing system reports. The system displays a message similar to the following:
You are about to configure a NAS server for storing system reports.
Note: No changes will take place without your final approval.
Before adding NAS configuration, your reports will be copied to
the following directory: algosec/firewalls_back_algosec/groups_back
algosec/matrices_back algosec/fwfiles_back. -
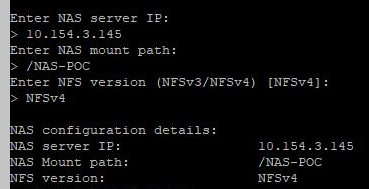
Enter the following NAS configuration details as prompted. See the example configuration dialog screenshot below.
-
Enter the IP address of the NAS server
-
Enter the NAS mount path.
This is the directory that you created on the NAS server in step 1.
For example, enter: /NAS-abc
Note: Be sure to include the leading "/".
-
Enter one of the NSF versions displayed in the prompt.
-
-
When the system prompts you to confirm the details. Enter y to confirm.
Note:
If there is already content present in the mount path directory, the system prompts you to continue by selecting one of the following actions:1. Abort NAS addition
2. Delete directory content
3. Use directory content
-
Enter 3 to use directory content and continue with NAS configuration or choose one of the other options if necessary.
Note: If you have Load Units configured, the system configures NAS on the Load Units as well.
When NAS configuration is complete, the following message appears:
NAS configured successfully
-
Copy reports from algosec/firewalls_back_algosec/groups_back algosec/matrices_back algosec/fwfiles_back to your newly mounted NAS directory.
For example: algosec/firewalls algosec/groups algosec/matrices algosec/fwfiles or 10.154.3.145/NAS-abc

NAS storage is now enabled and ASMS can connect to the NAS server.
Note: To check NAS status at any time, connect to the Administration interface again and enter 11.
The system confirms whether or not NAS is configured for your system.
Deconfigure NAS storage
Deconfigure NAS if needed as part of a larger process, or if you don't want reports to be stored on your remote NAS server.
Note: When NAS is deconfigured for a Master Appliance, it is automatically deconfigured for all Load Units.
Do the following:
-
Log on to the NAS server.
-
Connect to the ASMS machine's Administration Interface. For details, see Connect to and Utilize the Administration Interface.
-
Back up your data by copying the reports from the mounted NAS directory. For example, copy the files from algosec/firewalls algosec/groups algosec/matrices algosec/fwfiles to a backup directory at algosec/firewalls_back_algosec/groups_back algosec/matrices_back algosec/fwfiles_back.
-
From the ASMS Administration Interface, enter 11 to deconfigure NAS.
The system displays the NAS configuration details, and prompts you to select whether you want to check the NAS connectivity status or remove the NAS server.
-
Enter 2 to remove the server.
The system prompts you to confirm that you want to remove the existing configuration.
-
Enter y to confirm.
NAS is removed from any Load Units, as needed. When NAS is fully removed, the following message appears:
NAS removal succeeded. Press 'Enter' to go back to main menu.
*NAS is not configured*
-
Copy your reports to your production directories and remove them from the remote NAS server.
NAS is deconfigured, and ASMS no longer connects to the remote NAS server.