
Manage user permissions
Relevant for: Administrators
This section explains how to configure permissions.
Permission types
FireFlow supports the following types of permissions:
| Built-in permissions |
FireFlow includes a set of built-in permissions that represent specific actions users can perform. |
| User-defined permissions |
FireFlow includes a set of user-defined permissions that are labeled UserDefinedRight01 through UserDefinedRight10. Unlike the built-in permissions, which are tied to specific actions, user-defined permissions can be used to represent any custom action, in order to restrict the performance of those actions to certain users. For example, let's say you want to modify the Standard workflow so that it includes a custom action called "First Approve", and you want to restrict this action to users who have "First Approval" permissions. Since "First Approval" permissions do not exist in the FireFlow system, you can decide that UserDefinedRight01 will represent "First Approval" permissions, and assign these permissions to the desired user roles. Note: You cannot rename user-defined permissions. |
When assigning permissions to a user role, all those assigned the role (both users and sub-roles) will automatically inherit the permissions. This enables you to quickly configure a new user's permissions, by simply assigning the user the desired role.
You can assign permissions to the following types of user roles:
| Custom roles |
Includes Network, Security, and any other roles defined by a user. |
| FireFlow roles |
FireFlow roles include:
|
Permissions assigned to a per-request role are only relevant for users who are filling that role in relation to a specific change request.
For example, if you assign "ShowTicket" permissions to the Requestor role, then a user who is the requestor for a specific change request will be able to view that change request.
The same user will not be able to view other change requests for which they are not the requestor, unless the user is also assigned a system or custom role with "ShowTicket" permissions.
Note: The AdminCc per-request role is not in use and should be ignored.
Configure built-in permissions for roles
Note: By default, both the Network and Security user roles can view matching output, but only the Security user role can perform manual matching. Furthermore, both these user roles can view change records in FireFlow and modify their summary or comment on the change records. If desired, you can change these settings for these user roles or any other user role.
Do the following:
- Log in to FireFlow for configuration purposes. For details, see Log in for configuration purposes.
-
In the main menu, click Configuration.
The FireFlow Configuration page is displayed.
-
Click Roles.
The Select a role page is displayed.
-
If you want to assign permissions to a FireFlow role, click the FireFlow Roles tab.
The FireFlow Roles tab is displayed.
-
(Optional) To display disabled roles, click the Show disabled link.
To revert to a list which only displays enabled roles, click the Hide disabled link.
-
(Optional) To search for the desired role, type your search in the Type to filter your results field.
The roles which match your search appear in the Functional roles area.
-
In the row of the relevant role, click
 .
.The Manage Permissions window for the role you desire appears.
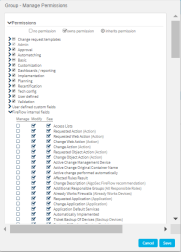
Each parent permission appears in the column. If the role is assigned all of the sub-permissions for a parent permission, the check box next to the parent permission is checked. If the role is assigned to none of the sub-permissions for a parent permission, the check box next to the parent permission is unchecked. If the role is assigned some of the sub-permissions for a parent permission, a box appears in the check box next to the parent permission.
-
To view the sub-permissions for a parent permission, click
 .
.If the role is not assigned the sub-permission, the check box next to the sub-permission is unchecked. If the role is directly assigned a sub-permission, the check box next to the sub-permission is checked. If the role inherits the sub-permission from another role, a circled arrow appears next to the sub-permission.
For descriptions of some of the built-in permissions, see Built-in Permissions (see Built-in Permissions).
User defined custom fields and FireFlow internal fieldsRegarding User defined custom fields and FireFlow internal fields:

- Users assigned a role with permission to Manage the field can view and modify the field's definition (for example, they can modify the field's name, disable it, and so on).
- Users assigned a role with permission to Modify the field can modify the fields value, but not view the field.
- Users assigned a role with permission to See the field can view the field.
-
To assign a permission, select the check box next to the desired permission.
Note: It is recommended to select permissions similar to those of the pre-defined Security and/or Network roles.
-
To revoke a permission, clear the check box next to the desired permission.
-
To set the role to inherit the permissions of another role, do the following:
- In the Inherit from other roles area, select the desired role in the drop-down list.
-
Click Add Role.
-
To set the role not to inherit the permissions of another role, in the Inherit from other roles area, click x next to the desired role.
-
Click Save.
The role's permissions are saved.
|
Permission |
Description |
|---|---|
| Change request templates |
Allows users with the role to view and use the selected request templates. |
| Automatching |
All of the following permissions are sub-permissions of the Automatching parent permission. |
|
DeleteMatches |
Allows users with the role to delete matching output for all change requests. This right is required for manual matching. |
|
ModifyChanges |
Allows users with the role to modify or comment on change records. |
|
ModifyMatches |
Allows users with the role to modify matching output for all change requests. This right is required for manual matching. |
|
ShowChanges |
Allows users with the role to view change records for all change requests. |
|
ShowMatches |
Allows users with the role to view matching output for all change requests. |
Configure user-defined permissions for roles
Do the following:
-
Choose an unused user-defined permission (UserDefinedRight01 through UserDefinedRight10) to represent the permission to perform a certain custom action.
For example, if you want to modify the Standard workflow so that it includes a custom action called "First Approve", and you want to restrict this action to users who have "First Approval" permissions, you would choose UserDefinedRight01 to represent the permission to perform the "First Approve" custom action.
-
Assign the user-defined permission to the user roles that should be allowed to perform the custom action, by doing the following:
- Log in to FireFlow for configuration purposes. For details, see Log in for configuration purposes.
-
In the main menu, click Configuration.
The FireFlow Configuration page is displayed.
-
Click Roles.
The Select a role page is displayed.
-
If you want to assign permissions to a FireFlow role, click the FireFlow Roles tab.
The FireFlow Roles tab is displayed.
-
(Optional) To display disabled roles, click the Show disabled link.
To revert to a list which only displays enabled roles, click the Hide disabled link.
-
(Optional) To search for the desired role, type your search in the Type to filter your results field.
The roles which match your search appear in the Functional roles area.
-
In the row of the relevant role, click
.The Manage Permissions window for the role you desire is displayed.
-
Click
next to User defined.The sub-permissions appear.
-
Check the check box for the user-defined permission you are using.
In our example, you would assign UserDefinedRight01 permissions to the user roles that should be allowed to perform the "First Approve" action.
-
Modify the custom action to restrict its use to users with the selected user-defined permission.
For more details, see Manage workflow options.
