
Manage user roles
Relevant for: Administrators
 Edit Role Permissions for Implementation: Watch to learn how to control granular permissions at the role level.
Assign and revoke user roles in AFA
Do the following:
-
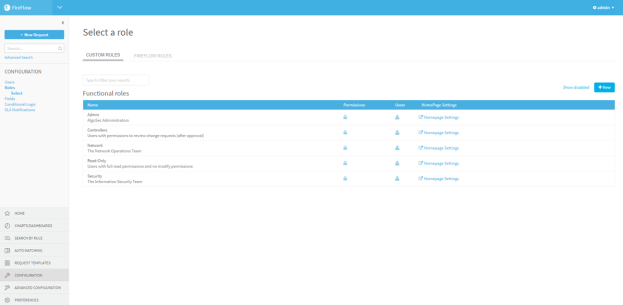
In the AFA Administration area, click the Users / Roles tab.
The User and Role Management page appears.
-
Click Manage FireFlow roles.
FireFlow opens, displaying the Select a role page.
-
(Optional) To display disabled roles, click the Show disabled link.
To revert to a list which only displays enabled roles, click the Hide disabled link.
-
(Optional) To search for the desired role, type your search in the Type to filter your results field.
The roles which match your search appear in the Functional roles area.
-
In the row of the relevant role, click
 .
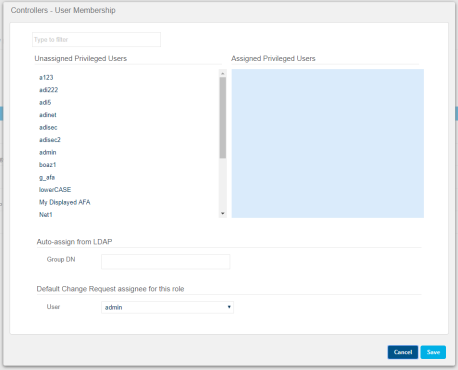
.The Users Membership window for the role you desire appears.
-
To assign a user to the role, click on the user in the Unassigned Privileged Users list.
-
To revoke a role from a user, click on the user in the Assigned Privileged Users list.
-
Click OK.
The user(s) and role(s) are updated.
Assign default change request assignees in AFA
When a change request advances to certain stages in FireFlow workflows, FireFlow automatically assigns the change request to a user with a specific role. For each role, you can designate which user (amongst the users assigned the relevant role) will be assigned the change request.
Do the following:
-
In the AFA Administration area, click the Users / Roles tab.
The User and Role Management page appears.
-
Click Manage FireFlow roles.
FireFlow opens, displaying the Select a role page.
-
In the row of the relevant role, click
.The Users Assignment window for the role appears.
-
In the Default Change Request assignee for this role area, select a user in the drop-down menu.
-
Click OK.
The user is assigned as the default assignee for the role.
Add user roles in FireFlow
Do the following:
- Log in to FireFlow for configuration purposes. For details, see Log in for configuration purposes.
-
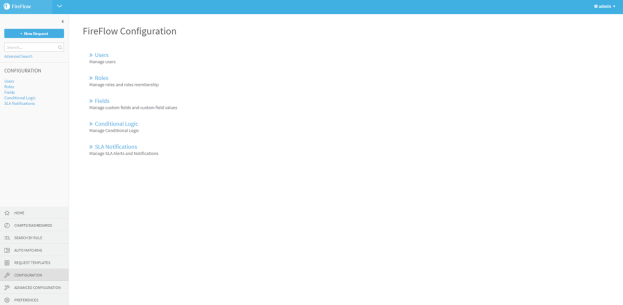
In the main menu, click Configuration.
The FireFlow Configuration page is displayed.
-
Click Roles.
The Select a role page is displayed.

-
Click + New.
The Create New Role window is displayed.

-
Complete the fields as needed:
Role Name
Type a name for the role.
Description
Type a description of the role.
Enabled
Select this option to enable the role.
-
Click Save.
Continue with any of the following:
- Assign and revoke user roles in FireFlow
- Customize the FireFlow Home page
- View user membership and permissions
Edit user roles in FireFlow
Note: Do not change any of the pre-defined Admin user role's settings. This role consists of the AlgoSec administrators and is only used by FireFlow internally.
Note: If you change the name of a pre-defined user role (Network, Security, Controllers, or Read-Only), you must also change the role's name in all workflows.
For more details, see Manage workflow options.
Do the following:
- Log in to FireFlow for configuration purposes. For details, see Log in for configuration purposes.
-
To edit the role's name and description, do the following:
-
In the main menu, click Configuration.
The FireFlow Configuration page appears.
-
Click Roles.
The Select a role page appears.
-
(Optional) To display disabled roles, click the Show disabled link.
To revert to a list which only displays enabled roles, click the Hide disabled link.
-
(Optional) To search for the desired role, type your search in the Type to filter your results field.
The roles which match your search appear in the Functional roles area.
-
Click the desired role's name.
The Editing Role window appears.
-
Complete the fields as needed:
Role Name
Type a name for the role.
Description
Type a description of the role.
Enabled
Select this option to enable the role.
-
Click Save.
-
Continue with any of the following:
- Assign and revoke user roles in FireFlow
- Customize the FireFlow Home page
- View user membership and permissions
Assign and revoke user roles in FireFlow
Tip: Alternately, assign all members of a specific LDAP group to a specific role. For more details, see Manage authentication servers and SSO.
Do the following:
- Log in to FireFlow for configuration purposes. For details, see Log in for configuration purposes.
-
In the main menu, click Configuration.
The FireFlow Configuration page appears.
-
Click Roles.
The Select a role page appears.
-
(Optional) To display disabled roles, click the Show disabled link.
To revert to a list which only displays enabled roles, click the Hide disabled link.
-
(Optional) To search for the desired role, type your search in the Type to filter your results field.
The roles which match your search appear in the Functional roles area.
-
In the row of the relevant role, click
 .
.The Users Membership window for the role you desire appears.

-
To assign a user to the role, click on the user in the Unassigned Privileged Users list.
-
To revoke a role from a user, click on the user in the Assigned Privileged Users list.
-
Click OK.
The user(s) and role(s) are updated.
Assign default change request assignees in FireFlow
When a change request advances to certain stages in FireFlow workflows, FireFlow automatically assigns the change request to a user with a specific role. For each role, you can designate which user (amongst the users assigned the relevant role) will be assigned the change request.
Do the following:
- Log in to FireFlow for configuration purposes. For details, see Log in for configuration purposes.
-
In the main menu, click Configuration.
The FireFlow Configuration page appears.
-
Click Roles.
The Select a role page appears.
-
In the row of the relevant role, click
.The Users Assignment window for the role appears.
-
In the Default Change Request assignee for this role area, select a user in the drop-down menu.
-
Click OK.
The user is assigned as the default assignee for the role.
Disable or enable user roles in FireFlow
If desired, you can disable a user role, so that it no longer appears in the FireFlow interface. You can also re-enable disabled user roles.
Note: Values that were entered for the user role before it was disabled are retained in the FireFlow database.
Do the following:
- Log in to FireFlow for configuration purposes. For details, see Log in for configuration purposes.
-
In the main menu, click Configuration.
The FireFlow Configuration page is displayed.
-
Click Roles.
The Select a role page is displayed.
-
(Optional) To display disabled roles, click the Show disabled link.
To revert to a list which only displays enabled roles, click the Hide disabled link.
-
(Optional) To search for the desired role, type your search in the Type to filter your results field.
The roles which match your search appear in the Functional roles area.
-
Click the desired role's name.
The Editing Role window is displayed.
-
Do one of the following:
- To disable a role, clear the Enabled check box.
- To enable a role, check the Enabled check box.
-
Click Save.
View user membership and permissions
You can view the roles and permissions that a user is assigned.
Do the following:
-
In the main menu, click Configuration.
The FireFlow Configuration page is displayed.
-
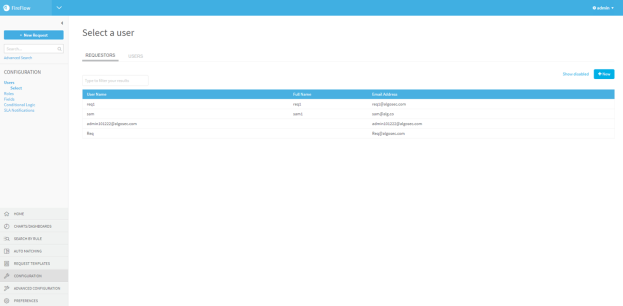
Click Users.
The Select a user page is displayed.
-
Click the Users tab.
The Users tab is displayed.

-
(Optional) To display disabled users, click the Show disabled link.
To revert to a list which only displays enabled users, click the Hide disabled link.
-
(Optional) To search for the desired user, type your search in the Type to filter your results field.
The fields which match your search appear in the Users area.
-
To view a user's role membership, click
in the row of the relevant user.The User Membership window is displayed.
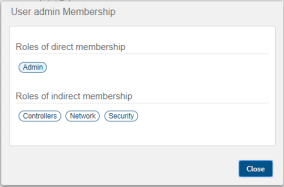
The window display's the user's direct and indirect roles.
-
To view a user's permissions, click in the row of the relevant user.
The View Permissions window is displayed.
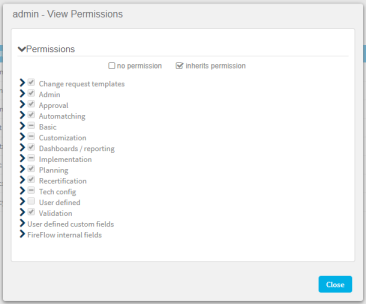
Each parent permission appears in the column. If the user is assigned all of the sub-permissions for a parent permission, the check box next to the parent permission is checked. If the user is assigned none of the sub-permissions for a parent permission, the check box next to the parent permission is unchecked. If the user is assigned some of the sub-permissions for a parent permission, a box appears in the check box next to the parent permission.
To view the sub-permissions for a parent permission, click
 .
. -
Click Close.
Define responsible role conditions
When a change request enters a new status, the responsible party for the change request may change. A specific role is responsible for the change request in the new status, and the default assignee of the role is assigned ownership of the change request when the change request enters the new status. FireFlow supports configuring custom conditions (which override the default configuration for the status) to indicate when a role should be the responsible role for the status.
Note: Conditions configured for responsible roles in the FireFlow web interface take precedence over any conditions specified with the GetRealGroupName (see GetRealGroupName ) hook.
Do the following:
- Log in to FireFlow for configuration purposes. For details, see Log in for configuration purposes.
-
In the main menu, click Configuration.
The FireFlow Configuration page appears.
-
Click Conditional Logic.
The Select a condition page appears.
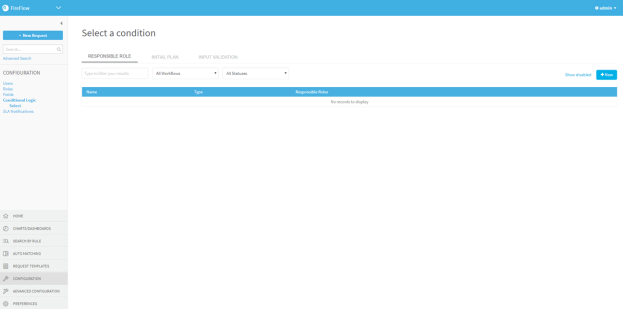
-
Click
 .
. The Create responsible role custom logic window appears.
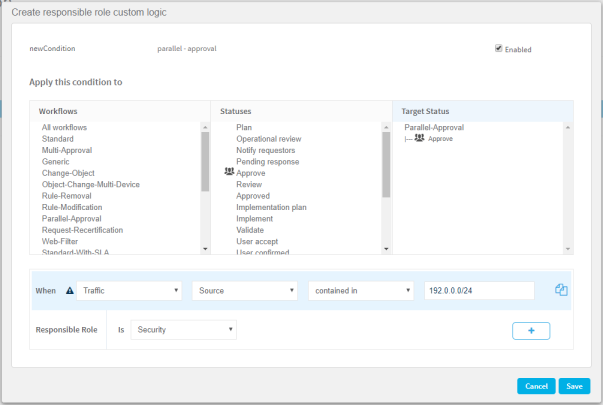
Note: Some statuses support multiple responsible role definitions, allowing you to specify a different responsible role for a slightly different scenario. These statuses are marked with the multi-condition icon:
 .
. -
Complete the fields using the relevant information in Responsible Role Custom Logic Fields (see Responsible Role Custom Logic Fields).
-
Click Save.
|
In this field... |
Do this... |
|---|---|
|
Enter Condition Name |
Type a name to represent the condition. |
|
Enter Description |
Type the description of the condition. |
|
Enabled |
Select this check box to enable the condition. |
|
Apply this condition to |
Select the relevant workflow, and then corresponding status. You can select multiple statuses from the same workflow or from different workflows. The selected statuses appear in the Target Status list. To remove a status, click the status in the Target Status list. |
|
When |
Define the condition by selecting the condition type in the drop down menu and completing the relevant fields.
Note: The Traffic condition type is only for traffic change request workflows. |
|
Responsible Role |
In the drop-down list, select the role which should be assigned to change requests which meet the defined conditions. |
|
|
Click this to duplicate a condition in order to add a different condition for the target statuses. Additional conditions allow you to specify different responsible roles for slightly different situations. Note: Additional conditions are only supported for some statuses. These statuses are marked with the multi-condition icon: |
|
|
Click this to remove a condition. |
|
|
Click this to add an additional condition for the target statuses. Additional conditions allow you to specify different responsible roles for slightly different situations. Note: Additional conditions are only supported for some statuses. These statuses are marked with the multi-condition icon: |
