
Manage workflow statuses
Relevant for: Administrators
You can add, edit, reorder, and delete statuses in a workflow.
Add workflow statuses
Do the following:
-
In the VisualFlow main menu, click Workflows.
The List of Workflows page is displayed.
-
Next to the desired workflow, click Edit.
The Edit Workflow page opens with the workflow's details.
-
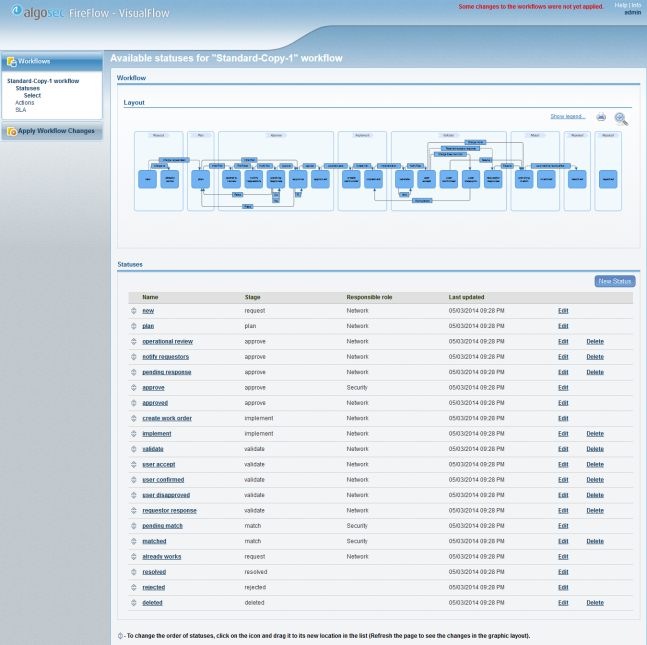
In the VisualFlow main menu, click Statuses.
The Available statuses page is displayed.
-
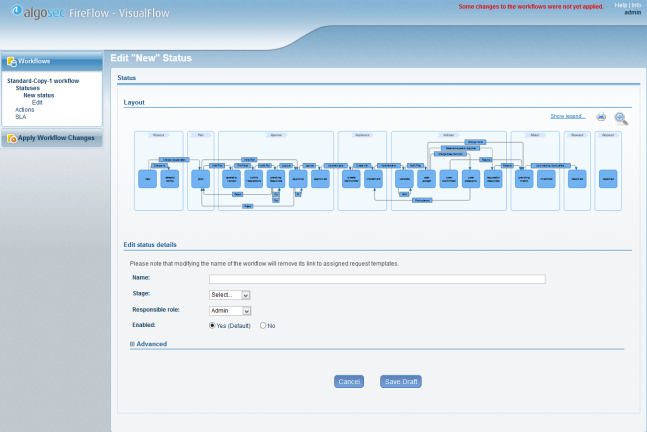
Click New Status.
The Edit Status page is displayed.
-
Complete the fields using the information in Status Fields (see Status Fields ).
-
Click Save Draft.
The status is added to the workflow's list of available statuses and to the workflow.
The Outbound Actions and Inbound Actions areas are displayed.
-
Add, edit, or delete actions for this status. For details, see Manage workflow actions.
-
Click Save Draft.
The status is added to the workflow's list of available statuses and to the workflow.
|
In this field... |
Do this... |
|---|---|
|
Name |
The name can include up to 50 characters of the Latin character set. Spaces are allowed. This field is mandatory. Note: Some statuses cannot be renamed. When editing such a status, this field is read-only. |
|
Stage |
The name of the image used in the lifecycle diagram at the top of the change request page. This field is mandatory. For more details, see Modify FireFlow stages. |
|
Responsible role |
Select the single user role responsible for change requests in this status. Note: Usually, this role is configured to see these change requests in its Home page. For more details, see Customize the FireFlow Home page. When an action is performed on the change request, and the action transitions the change request to a new status for which the change request owner is not responsible, the change request is re-assigned to the default assignee of the new status’s responsible role, and the current user is re-directed to their Home page. If you want to designate a new responsible role for the status, first create the role in the FireFlow Configuration page, then access VisualFlow again. The new role will appear in this list, and you can select it. This field is mandatory. |
|
Additional responsible roles |
All user roles that are responsible for change requests in this status, other than the role specified in the Responsible role field. This field is read-only, and it only appears for statuses that are the source status of a parallel action. |
|
Enabled |
Specify whether this status should be enabled, by choosing one of the following:
The default value is Yes. Note: Some statuses cannot be disabled. When editing such a status, this field either does not appear or is read-only. |
|
Advanced |
Expand this area to display the Advanced fields. |
|
Allow editing traffic fields |
Specify whether it is possible to plan the change when a change request is in this status. Planning the change involves modifying any of the following fields:
Choose one of the following:
The default value is No. |
|
Allow editing device |
Specify whether it is possible to change the device when a change request is in this status. Choose one of the following:
The default value is Yes. Note: For object change requests, this field will always behave as it is set to yes when the Allow editing traffic fields field is set to yes, and no when the Allow editing traffic fields field is set to no. |
|
Next status when mail or comment is received from requestor |
Select the next status to assign the change request, when incoming correspondence from the change request’s unprivileged requestor to the change request occurs. If this field is not set, then the change request status will not change upon incoming correspondence. This field only appears for statuses where an email response is possible. |
|
Await Requestor's Response |
Specify whether a change request should appear in the Change Requests Awaiting Response page for unprivileged users. The default value is No. |
|
Mark change request as closed |
Specify whether a change request in this status is considered "closed", by choosing one of the following:
The default value is No. This field does not appear for the "new" status. |
|
Stage still incomplete |
Specify whether there are additional statuses that a change request must achieve before completing the stage, by choosing one of the following:
The default value is No. This field must be set to No for exactly one status per stage. |
|
Display Initial Plan Results |
Specify whether to display initial plan results at this stage, by choosing one of the following:
The default value is No. |
|
Display Risk Check Results |
Specify whether to display risk check results at this stage, by choosing one of the following:
The default value is No. |
|
Display Create Work Order Results |
Specify whether to display the work order at this stage, by choosing one of the following:
The default value is No. |
|
Display Validation Results |
Specify whether to display the validation results at this stage, by choosing one of the following:
The default value is No. |
|
Perform Active Change Automatically |
Specify wheter FireFlow should automatically initiate active change at this stage, by choosing one of the following:
The default value is No. This field only appears for the "implement" status. |
|
Status after new |
Select the status to which the change request should transition after it has been assigned an owner. This field only appears for the "new" status. |
Edit workflow statuses
Do the following:
-
In the VisualFlow main menu, click Workflows.
The List of Workflows page is displayed.
-
Do one of the following:
- Click on the desired workflow's name.
- Next to the desired workflow, click Edit.
The Edit Workflow page opens with the workflow's details.
-
Do one of the following:
- To go directly to the desired status, click the status in the workflow layout.
-
To select the status from a list of statuses:
-
In the VisualFlow main menu, click Statuses.
The Available statuses page is displayed.
-
Next to the desired status, click Edit.
The Edit Status page is displayed.
-
-
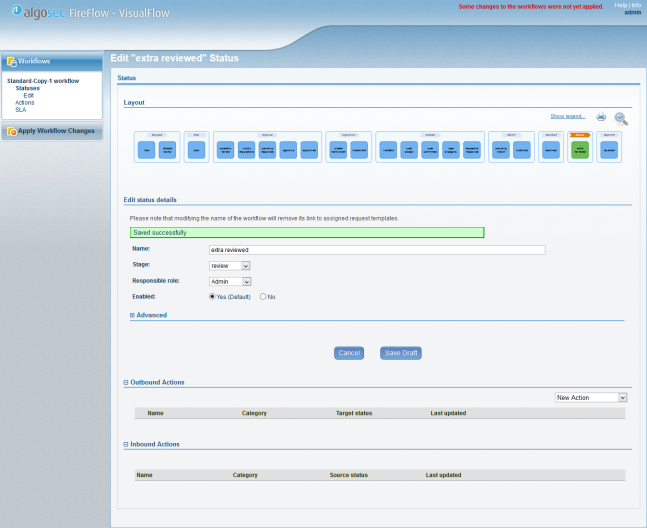
Complete the fields as needed. For details, see Status Fields .
If you expanded the Advanced area, additional fields appear.
-
Add, edit, or delete actions for this status.
-
Click Save Draft.
Reorder statuses
You can control the order in which statuses appear in a workflow's list of available statuses.
Do the following:
-
In the VisualFlow main menu, click Workflows.
The List of Workflows page is displayed.
-
Do one of the following:
- Click on the desired workflow's name.
- Next to the desired workflow, click Edit.
The Edit Workflow page opens with the workflow's details.
-
In the VisualFlow main menu, click Statuses.
The Available statuses page is displayed.
-
In the list of statuses, click
 next to a status you want to move, and drag it to the desired location in the list.
Delete statuses
Do the following:
-
In the VisualFlow main menu, click Workflows.
The List of Workflows page is displayed.
-
Do one of the following:
- Click on the desired workflow's name.
- Next to the desired workflow, click Edit.
The Edit Workflow page opens with the workflow's details.
-
In the VisualFlow main menu, click Statuses.
The Available statuses page is displayed.
-
Next to the desired status, click Delete.
A confirmation message appears.
Note: Some statuses cannot be deleted. These statuses do not have a Delete link next to them.
Note: If a status is the source or target of an action, or if the status is used in one or more SLOs, you must disassociate those actions/SLOs from the status before you can delete it.
For details, see Manage workflow actions and Working with SLAs .
-
Click OK.
The status is deleted from the workflow's list of available statuses and from the workflow.
